As the year draws to a close, it’s the perfect time to give your floors the attention they deserve. Whether you manage a busy commercial space or simply want to keep your home spotless for the festive season, year-end floor maintenance plays a crucial role in preserving your flooring’s appearance, hygiene, and lifespan
Floors endure daily wear from foot traffic, dirt, moisture, and changing weather — and by December, many surfaces need a little care. A structured year-end cleaning and maintenance routine helps prevent long-term damage and sets your floors up for a fresh start in the new year.
For commercial properties, such as offices, retail spaces, and hospitality venues, floor maintenance isn’t just about aesthetics—it’s a matter of hygiene, safety, and compliance. Clean, well-maintained floors create a professional image and ensure compliance with UK workplace standards related to cleanliness and slip prevention.
For residential homes, the motivation is more personal. Clean floors mean a healthier, more comfortable environment for your family. Dust, allergens, and winter grime can build up throughout the year, and refreshing your floors before the new year helps protect your flooring investment and maintain indoor air quality.
Your exact checklist depends on the flooring type and setting, but these universal steps form a solid foundation for both commercial and residential environments:
Completing these steps before year-end ensures that minor issues don’t turn into costly repairs later on.
Start by examining all your floors — especially in high-traffic zones like entrances, hallways, or retail areas. Look for dull patches, scratches, warping, or moisture damage. For wooden floors, pay close attention to the finish: if the shine is fading or scratches are visible, you may need to sand and recoat the surface.
Commercial clients can use this inspection to document conditions for health and safety records, while homeowners can make note of any repairs or refinishing needed before hosting holiday gatherings.
A thorough deep clean is essential before the year ends. Over time, dirt, grit, and cleaning residue can settle into floor surfaces, dulling their appearance. Use pH-neutral cleaners and soft mops or microfibre cloths to avoid damaging finishes.
For commercial properties, this may mean hiring a professional cleaning team to tackle high-traffic areas and deep-clean floors overnight or during downtime.
By year-end, even well-maintained floors can show signs of fatigue. Refinishing or recoating your wooden floors can restore their lustre and extend their lifespan.
If you notice visible wear through the finish or patchy colouring, it might be time to schedule professional floor sanding and refinishing. This process removes surface imperfections, smooths the texture, and adds a fresh protective coating — leaving your floors looking brand new for the new year.
For London homeowners and businesses, Floor Sanders London provides professional-grade equipment, bundles, and accessories to help you achieve excellent results, whether you’re tackling the job yourself or hiring a specialist.
You can explore our floor sander packages and sanding tips for expert guidance.
The UK winter can be harsh on floors. Muddy boots, road salt, rainwater, and grit are frequent culprits of surface damage and discolouration. Preventative measures can make a world of difference:
Commercial buildings can also implement matting systems and regular entryway cleaning schedules to reduce tracked-in debris.
Using the wrong product can do more harm than good. Avoid bleach, harsh detergents, or wax-based solutions unless recommended for your floor type. Instead, invest in eco-friendly and pH-balanced cleaners that preserve finishes without leaving residues.
Find the best of the best floor sanding accessories and maintenance tools for your floors. Don’t forget that the right products go a long way to supporting safe cleaning and upkeep.
For commercial premises, December often brings quieter operational periods — making it the ideal time to conduct deep cleaning or refinishing without disrupting business activities.
Scheduling professional sanding or recoating before the new year ensures that your floors are ready for increased footfall in January, giving your space a refreshed, professional appearance for returning staff and customers. Homeowners can take advantage of time off over the holidays to reset their home environment, completing floor care tasks before the new year begins.
When performing year-end maintenance, steer clear of these common errors:
Avoiding these mistakes ensures that your floors remain strong, safe, and visually appealing throughout the coming year.
For commercial spaces, the focus is on rigorous scheduling, safety, and professional longevity. Establish a scheduled maintenance log to document inspections and cleaning routines. To minimize slip hazards and prevent debris from damaging the floor, ensure entrances and exits have proper matting. For deep maintenance, plan professional sanding or recoating every few years based on the level of foot traffic. Logistically, coordinate maintenance during holiday shutdowns or other slow periods to prevent disruption to business operations.
In residential settings, the emphasis is on gentle, everyday care and environmental control. For the daily routine, use soft brushes or microfibre mops for everyday cleaning. To prevent wear, place rugs in hallways and play areas to reduce wear from movement. Deep maintenance involves scheduling seasonal deep cleans to prevent damage from moisture or grit. Environmentally, it’s crucial to regularly check humidity levels—especially for wood floors—to prevent warping or cracking.
Quick Reference List for the Season:
Keep this checklist handy for both residential and commercial environments—it’s a simple yet effective way to ensure your flooring remains protected year after year.
Year-end floor maintenance isn’t just a finishing touch — it’s a vital part of protecting your investment, enhancing hygiene, and ensuring your space starts the new year on the right foot. Whether you manage a commercial property or simply want your home to shine through the holidays, adopting best practices now saves time, money, and effort later.
Take the proactive approach: assess, clean, protect, and, if necessary, refinish your floors before the calendar turns. With the right equipment and expert advice from Floor Sanders London, your floors will stay strong, safe, and beautiful all year long.
Give your floors the professional care they deserve this year-end. Whether you’re tackling a full home renovation or refreshing a busy commercial space, Floor Sanders London has everything you need for flawless results. From professional floor sander hire to expert sanding tips, complete bundles, and high-quality accessories, they make it easy to restore your floors with confidence.
Their flexible packages suit both DIY enthusiasts and professional contractors — ensuring every project runs smoothly and cost-effectively. With fast, London-wide delivery, you can get your tools and supplies exactly when you need them.
Don’t start the new year with tired, worn floors — revive them today with Floor Sanders London. Explore our full range of floor sanding solutions and make your space look brand new again.
Living with furry companions brings immense joy, but it also presents unique challenges for maintaining beautiful wooden floors. From playful puppy scratches to unexpected accidents, pets can leave their mark on even the most cherished hardwood surfaces. The good news? Professional floor sanding offers pet owners a powerful solution to restore, protect, and maintain their floors whilst continuing to enjoy life with their beloved animals.
Whether you’re dealing with existing pet damage or looking to create a more resilient surface for future adventures, understanding how floor sanding can help is essential for any pet-loving homeowner.
Pet ownership inevitably leads to some level of floor wear, but the extent and type of damage can vary dramatically depending on your pet’s size, activity level, and habits. Understanding these common issues helps you identify when floor sanding might be the ideal solution.
Dogs’ nails naturally scratch wooden surfaces as they walk, run, and play. Larger dogs with longer nails tend to create deeper scratches, whilst smaller pets might leave lighter surface marks. These scratches accumulate over time, creating a network of fine lines that dulls the floor’s appearance and can eventually compromise the protective finish.
Pet accidents happen, and when they do, the moisture can penetrate wooden floors if not cleaned immediately. Urine, in particular, can cause dark staining that penetrates deep into the wood grain. Even water from drinking bowls, if left standing regularly, can create ring marks and discolouration around feeding areas.
Enthusiastic pets can create more significant damage through digging, playing with toys, or sudden bursts of energy. Racing around corners, sliding on smooth surfaces, or playing with hard toys can gouge the wood more deeply than everyday walking.
Perhaps most concerning for homeowners, pet odours can seep into wooden floors through scratches and gaps between boards. Once absorbed into the wood, these odours can be incredibly difficult to eliminate with surface cleaning alone.
The key to managing pet-related floor damage lies in understanding that wooden floors are living materials that react to moisture, scratches, and wear over time.
What starts as minor surface scratches can worsen if the protective finish is compromised, allowing moisture to penetrate more easily.
Acting quickly when you notice accumulating damage prevents minor issues from becoming major restoration projects. Regular assessment of your floor’s condition helps you time interventions appropriately, potentially saving significant costs and preserving more of the original wood.
Professional floor sanding offers a comprehensive solution to pet-related damage, working systematically to remove damaged surface layers and restore the wood’s natural beauty. The process is particularly effective because it addresses multiple types of damage simultaneously.
The sanding process begins with coarser grits that effectively remove surface scratches and scuff marks accumulated over months or years of pet activity. Modern sanding techniques ensure even removal across the entire floor surface, eliminating the patchwork appearance that can result from spot treatments.
The systematic progression from coarse to fine grits creates an increasingly smooth surface that prepares the wood for protective finishing. This thorough approach ensures that all traces of surface damage are eliminated, providing a fresh canvas for protection.
One of floor sanding’s most valuable benefits for pet owners is its ability to remove stains that have penetrated below the surface finish. By removing the affected wood layers, sanding can eliminate even stubborn pet stains that resist surface cleaning methods.
More importantly, sanding removes the wood layers where pet odours have been absorbed. This physical removal of odour-contaminated material is often the only effective method for completely eliminating persistent pet smells from wooden floors.
Deeper damage from enthusiastic pets requires more extensive sanding, but even significant gouges can often be minimised or eliminated. Professional assessment determines whether deep damage can be sanded out or requires board replacement, helping you make informed decisions about restoration approaches.
The sanding process also addresses uneven wear patterns caused by pets’ favourite running routes or play areas. By levelling these worn areas, sanding restores uniform appearance and texture across the entire floor.
Forward-thinking pet owners can use floor sanding proactively to create more resilient surfaces that better withstand future pet activity. This preventative approach often proves more cost-effective than reactive restoration.
Fresh sanding allows for the application of advanced protective finishes specifically designed to resist pet-related damage. Modern polyurethane and oil-based finishes offer varying levels of scratch resistance, moisture protection, and durability.
Multiple coat applications during the finishing process create deeper protective barriers that can absorb minor scratches and moisture exposure without allowing damage to reach the wood itself. This protective depth means your floors can handle pet activity for longer periods between maintenance interventions.
Not all floor finishes perform equally well in pet households. Water-based polyurethanes dry quickly and produce fewer volatile organic compounds, making them safer for pets during application. However, oil-based finishes often provide superior durability and scratch resistance over time.
Matte and satin finishes tend to hide minor scratches better than high-gloss options, making them practical choices for active pet households. The reduced reflectivity also means that small scratches and scuffs are less visible in daily lighting conditions.
Proper maintenance between professional sanding sessions dramatically extends your floors’ lifespan and maintains their appearance despite pet activity.
Daily sweeping or vacuuming removes dirt and debris that can act like sandpaper under pet paws. Weekly damp mopping with appropriate wood floor cleaners maintains the protective finish and prevents the buildup of pet hair and dander.
Trimming pets’ nails regularly significantly reduces the severity of scratches they create during normal activity. Even small reductions in nail length can substantially decrease floor damage over time.
Quick cleanup of pet accidents prevents moisture penetration that leads to staining and odour absorption. Blotting rather than wiping prevents spreading moisture across a larger area, and immediate drying helps preserve the protective finish.
Placing mats near water bowls and in high-traffic areas protects floors from water splashes and concentrated wear. These simple interventions can dramatically extend the time between necessary sanding sessions.
Recognising when DIY maintenance is insufficient and professional intervention is needed helps preserve your investment in quality flooring. Several indicators suggest it’s time for professional floor sanding.
Widespread surface scratching that’s visible from standing height usually indicates the protective finish has been compromised across large areas. Similarly, persistent odours that don’t respond to thorough cleaning often require the physical removal of affected wood layers.
Multiple pet stains or large stained areas typically need professional assessment to determine whether sanding can address the damage or board replacement is necessary. Professional evaluation helps avoid unsuccessful DIY attempts that might worsen damage.
When your floors feel rough underfoot or show significant colour variation across different areas, comprehensive sanding and refinishing usually provides the most effective restoration approach.
Maintaining beautiful wooden floors whilst enjoying life with pets doesn’t have to be an impossible balance. At Floor Sanders London, we provide professional-grade floor sanding equipment specifically designed for comprehensive floor restoration, perfect for addressing pet-related damage whilst preserving your floor’s character and longevity.
Our dust-free sanding systems create cleaner, safer working environments, critical in homes with pets who might be sensitive to airborne particles. From powerful belt sanders for addressing widespread damage to precision edge sanders for detailed work around skirting boards, our complete equipment packages ensure thorough, professional results.
Whether you’re tackling accumulated scratches from years of pet activity or preparing floors for enhanced protective finishes, our machines deliver the consistent performance needed for lasting results. Each sander bundle includes appropriate grits for systematic damage removal and surface preparation, ensuring your restored floors can withstand future pet adventures.
If you’re unsure about the best approach for your pet-damaged floors or need guidance on equipment selection, call us on 0208 427 6604 for expert advice tailored to your specific situation.
If you prefer to discuss your project in detail, fill out our quick enquiry form, and one of our flooring specialists will be in touch to help you create pet-friendly floors that maintain their beauty for years to come.
Yes, professional floor sanding can remove most surface scratches caused by dogs’ or cats’ nails. The sanding process uses coarse to fine grits to strip away the damaged top layers of wood, leaving a smooth, even surface. For deeper gouges, sanding can reduce their visibility, though in severe cases, individual boards may need replacing.
Pet owners usually benefit from scratch-resistant finishes such as oil-based polyurethanes, which provide long-lasting durability. Water-based finishes are safer during application and dry faster, but may need more frequent reapplication. A matte or satin sheen is often better than gloss, as it hides small scratches and scuffs more effectively. Always ask for pet-safe finishes with low VOCs to protect your animals’ health.
The frequency depends on your pets’ size, activity, and habits. On average, homes with pets may need sanding and refinishing every 7-10 years, compared to 10-15 years in pet-free homes. Proactive maintenance like trimming nails, cleaning spills quickly, and using mats in feeding/play areas can extend the time between professional treatments.
Most professionals recommend keeping pets away during sanding and finishing. Even with dust-free sanders, the noise and disruption can cause stress. In addition, some finishes emit fumes during drying, which may be harmful. It’s best to arrange temporary pet care until the floors are fully cured and safe.
If your business space has a tired, scratched floor, what does that say to your clients?
Flooring is often one of the first things people notice when they walk into a commercial property. Whether it’s a retail shop, office, restaurant or public building, the condition of your floors says a lot about your professionalism, attention to detail, and how you care for your environment.
That’s where floor sanding for commercial properties comes into play.
Floor sanding is a powerful restorative process that helps protect your investment, maintain safety standards, and extend the lifespan of your floors.
In high-traffic areas where wear and tear are inevitable, commercial floor sanding could be one of the smartest long-term decisions you can make as part of your overall commercial property maintenance strategy.
Commercial floor sanding is the process of removing the top, damaged layer of a wooden floor to expose the fresh timber beneath. Once sanded, the surface is then sealed and refinished to protect it from future damage and to enhance its appearance.
This differs from residential floor sanding, as commercial projects usually require:
One popular method is dust-free sanding, which uses advanced extraction systems to collect dust as it’s created, perfect for busy workspaces where air quality and minimal disruption are priorities.
Commercial floor sanding is ideal for a wide range of business settings, including:
Floor sanding is a smart business investment. Here are some of the top reasons why:
Over time, wooden floors in commercial buildings can become dull, scratched, and stained. Whether it’s from office chairs, muddy boots, or rolling trolleys, that surface damage builds up fast.
Floor sanding works by removing the outermost layer of damaged wood and revealing the beautiful grain underneath. Once sealed, your floor regains a rich, polished appearance that reflects light and brings a sense of freshness and professionalism to the space.
By sanding worn or splintered surfaces, you are making the floor look better, and also making it stronger. After sanding, a new protective layer is applied (such as lacquer or oil), which helps the wood resist future wear.
This is important in high-traffic commercial areas, such as reception zones, corridors, and shop floors, where constant footfall can wear down finishes quickly.
Damaged, uneven, or splintered flooring can be a potential hazard. Trip risks, loose boards, and slippery surfaces can all lead to accidents, which can put staff, customers, and your business at risk.
Commercial floor sanding helps create a level, even surface, which significantly reduces these risks.
It also supports your commitment to health and safety compliance, particularly in sectors like hospitality, retail, and healthcare, where floor conditions must meet high standards.
When you think about the cost of completely replacing your commercial flooring, it’s clear that prevention is better than a cure. Regular commercial floor sanding can significantly reduce repair costs by stopping small issues, like minor surface damage or uneven finishes, from escalating into major structural problems.
Sanding your wooden floors as part of routine floor maintenance for businesses is far more economical over time than ripping them out and starting from scratch.
Scratched or rough flooring can trap dust, dirt, and allergens. In busy work environments, especially those open to the public, hygiene matters. Floor sanding creates a smooth, sealed surface that’s easier to clean and maintain, promoting a healthier work environment.
With modern dust-free sanding equipment, the process itself doesn’t contribute to poor air quality. And once refinished, the clean surface helps reduce mould, bacteria, and irritants that can build up in neglected cracks or damaged areas.
If you lease or own commercial property, maintaining its condition should be a top priority. Clients, tenants, and prospective buyers all notice the details, and a scuffed, damaged floor can undermine an otherwise high-quality space.
Freshly sanded and sealed flooring adds immediate visual and functional value.
It displays that the property is well-maintained and looked after, which can directly contribute to higher resale or rental appeal.
Regular sanding is one of the simplest ways to boost your space and preserve value long-term.
In client-facing industries, appearances matter. From a high-street fashion retailer to a corporate office in the city, polished wooden flooring sends a message of care, quality, and attention to detail.
A well-maintained floor helps create a more welcoming, professional environment for staff and visitors alike. If you’re hosting meetings, welcoming customers, or showcasing products, floor sanding ensures your space lives up to your brand’s reputation.
The time it takes to complete a commercial floor sanding project largely depends on the size of the area and the condition of the flooring. As a general guide, a medium-sized office space might take 1–2 days for sanding and sealing.
Other factors include:
Most commercial wood floors benefit from sanding every 3 to 5 years, depending on:
If your business sees heavy use, such as retail shops, restaurants, or schools, more frequent floor maintenance may be required. Keeping up with regular sanding helps to prolong floor lifespan and avoids deeper damage later on.
Absolutely, floor sanding is typically far more cost-effective than full floor replacement. It allows you to restore your existing hardwood flooring, rather than tearing it up and starting over.
That said, replacement may be necessary if the wood is warped, heavily water-damaged, or previously sanded beyond its limit. In most cases, though, floor refinishing can save money, reduce waste, and help protect your investment.
In commercial spaces, your floors do more than support your business; they represent it.
From improving safety to enhancing durability and boosting workplace aesthetics, floor sanding for commercial properties is a smart, long-term investment. It helps preserve the natural beauty of wood, keeps your environment clean and professional, and ensures you’re meeting both visual and practical standards.
If you’re looking for a way to extend the life of your floors, reduce long-term costs, and create a better impression for your clients and employees, commercial floor sanding is the answer.
If you’re looking to bring tired timber floors back to life, then it is time to explore high-quality floor sanding equipment at Floor Sander London. We offer complete sander packages designed to suit any commercial project, big or small.
From machines to finishes, you’ll find everything you need in our carefully curated range of floor sanding products.
Call us today on 0208 427 6604 for expert advice from our friendly, knowledgeable team. Or, simply fill out our quick enquiry form, and one of our team members will be in touch to help guide your next step.
Is your wooden flooring looking a little worse for wear? Perhaps it’s lost its shine, or those everyday scuffs and scratches are starting to catch your eye. You could be wondering whether floor sanding is worth the effort, or the cost. This thought generally occurs to everyone before making a decision.
Floor sanding is a tried and tested way to bring old or tired floors back to life. Whether you’re restoring original hardwood or freshening up engineered timber, sanding can completely transform your home.
Now, let’s explore the top five floor sanding benefits and explain why it’s often a smarter choice than complete floor replacement. Whether you’re considering DIY floor sanding or calling in the professionals, we’ve got the insights to help you decide.
Over time, your floor takes a beating, with muddy shoes, dragging furniture, pet claws, and spills. These all leave behind a trail of scratches, dents, and stains that dull the appearance of your floor.
Sanding = a fresh start.
Professional sanding removes this top layer of damage and imperfections, revealing fresh, clean wood underneath. Once sealed, your floor regains its original beauty often even better than before.
A well-sanded floor reflects light, adds warmth to the room, and makes the entire space feel cleaner and more open.
Potential buyers notice your floors immediately. They form part of a home’s first impression, and if they’re in good condition, they convey that the entire property is well-maintained.
Professionally restored floors can increase resale value by up to 5% and often help homes sell faster too. In a competitive property market, that’s a considerable return on a relatively small investment.
If you’re planning to sell or just want to future-proof your home, floor sanding adds tangible value that goes beyond visual appeal.
Wooden floors are durable by nature, but like any surface, they wear down over time. When left untreated, this wear can lead to deeper damage that may require full replacement.
Sanding removes old finishes and allows a fresh, durable sealant to be applied. This new coating protects against moisture, foot traffic, and general wear, extending your floor’s lifespan.
Regular maintenance through sanding is far more affordable than replacing large sections of damaged flooring.
Plus, it keeps your floors looking fantastic year after year.
Dust, pollen, and pet dander can get trapped in cracks, grooves, and between boards, especially on older floors with worn or chipped finishes.
This can make allergies worse and reduce air quality indoors.
Sanding smooths out these crevices and removes years of built-up debris, making it easier to clean your floors thoroughly and keeping allergens at bay.
Especially important for families, children, or allergy sufferers, floor sanding is a simple way to support a healthier, more breathable home.
Replacing a floor is a major expense, not just for materials, but also for labour, time, and disruption.
Floor sanding, on the other hand, can deliver similar visual results at a fraction of the price.
Rather than paying for new flooring, you’re simply maximising the potential of what you already have. And when you consider how long a sanded and sealed floor lasts, the long-term savings add up.
If you’ve been considering floor sanding, one of the biggest decisions you’ll face is whether to do it yourself or call in the professionals. Both options come with their pros and cons, and the right choice really depends on your budget, confidence, and the scale of your project.
For the hands-on homeowner, DIY floor sanding can be a rewarding challenge. With the right sander and a bit of research, it’s possible to get decent results, especially in smaller spaces like bedrooms or hallways.
| Pros of DIY Floor Sanding | Cons of DIY Floor Sanding |
| You can save on labour by doing the work yourself. | DIY flooring can be time-consuming. Prepping, sanding, finishing, and fixing errors, can take up your weekends. |
| You have the flexibility of working around your own schedule. | Uneven sanding or over-sanding can cause lasting damage to your floorboards. |
| You can enjoy the pride of completing a big job solo and have the satisfaction of a DIY project. | DIY kits often lack professional-grade dust extraction, leading to dust and mess, which then leads to more cleanup. |
If you’re doing a quick touch-up in a small room and you’re confident with tools, DIY might be a good option. But for larger areas or more delicate wood, it’s often best to trust the professionals.
Hiring a professional means you get the benefit of experience, high-quality tools, and peace of mind. Here’s what you gain with a professional floor sanding service
So, if you’re after long-lasting, professional-looking results with minimal hassle, investing in expert floor sanding is well worth considering.
Whether you’re going the DIY route or managing a team of pros, having the right equipment can make or break your project. That’s where Floor Sanders London comes in.
We offer a wide range of high-quality floor sanders for hire, suitable for all types of wooden flooring jobs, big or small. Whether you’re restoring a vintage pine floor or tackling a modern hardwood surface, we’ve got the right tools for the task.
Choose the right sander for the project. From our extensive range, you’ll find:
We also stock all the essential floor sander maintenance tools, from dust bags and sanding belts to sealants and protective gear. Everything you need to keep your project running smoothly.
To make things even easier, we offer a Complete Sander Package, giving you everything required for your floor sanding project in one convenient bundle.
Do you have questions or need expert advice? Call us at 0208 427 6604, we’re always happy to help.
Prefer to reach out online? Simply fill out our quick enquiry form and one of our friendly team members will get back to you to discuss your project, offer expert tips, or help you arrange your sander hire.
Floor sanders are crucial tools for anyone aiming to achieve a flawless, professional-grade finish on wooden floors. However, the durability and longevity of the floor sander can make a huge difference in the quality of your work and the efficiency of your projects.
The truth is, well-maintained, professional-grade floor sanders like Bona and Lagler can last upwards of 10-15 years, whereas cheaper models may only last between 3-5 years, and may often fail when you need them most. A reliable sander not only ensures that your work gets completed smoothly but also saves you time and money by reducing the need for frequent repairs or replacements.
Let us walk you through the essential features that contribute to a floor sander’s longevity and help you make an informed decision. So that you can get the best value from your investment, keeping your projects running smoothly for years to come.
Floor sanders are an essential investment for anyone looking to create a high-quality, smooth finish on wooden floors. While cheaper models may seem tempting, they often lack the durability needed for long-term performance and reliability.
If you’re halfway through a demanding DIY project tirelessly, when suddenly, it gives out. The motor dies, and you’re left frustrated with a project that’s far from finished. It’s a scenario many DIY enthusiasts and professionals can relate to.
Hence, investing in a durable, high-quality floor sander is essential. Here are a few more reasons why you should consider high-quality floor sanders:
To ensure your floor sander will stand the test of time, focus on the following key features:
The motor is the heart of any floor sander, and its durability is essential for handling demanding tasks without breaking down. A motor’s power rating determines its ability to handle intensive work. For example, a 1.5-horsepower motor might be sufficient for smaller tasks, but for large-scale projects or harder wood types, a 2.5-horsepower motor is suggested to maintain quality without excessive wear.
Adjustable speed settings allow users to vary the machine’s intensity depending on the floor type and sanding requirements. This feature helps to prevent the motor from straining on challenging surfaces, extending its life by avoiding unnecessary damage.
Excessive vibration can quickly break down components and cause user fatigue. Look for sanders with vibration-dampening mechanisms or ergonomic handles to minimise wear on the motor and other internal parts, which adds to the machine’s overall lifespan.
Brushless motors are often preferred for their longer lifespan, quieter operation, and reduced maintenance. While they may cost more initially, they require less frequent servicing than brush motors. However, renting a floor sander with a brushless motor would help you cut down on the investment cost, and get the project done at an even lower cost.
Heat management is critical to avoid motor damage, as excessive heat is one of the primary causes of motor failure in many floor sanders. Hence, look for a floor sander with an efficient cooling system, either through built-in fans or optimised ventilation to maintain an ideal temperature during long or intensive use.
Some floor sanders even come with thermal overload protection, which automatically shuts off the machine if it overheats. This safety feature is particularly valuable for preventing irreversible motor damage on prolonged, intensive projects.
The quality of materials used in the construction of a floor sander greatly affects its durability and resistance to wear and tear.
Machines with metal housings offer better durability, as they are less likely to crack or break if dropped or bumped. On the other hand, plastic housings are lighter, which may be ideal for smaller projects, but metal is more suited for machines expected to withstand heavy-duty use.
Moreover, internal parts like screws, connectors, and joints made from high-quality materials such as stainless steel or durable alloys can resist rust and corrosion, allowing for smoother operation and less frequent repairs.
A reliable dust collection system not only helps maintain a clean work area but also prevents dust from infiltrating and damaging the machine’s internal parts. It is advised to use high-grade filters that effectively capture fine dust particles to prevent dust build-up inside the motor and other critical parts.
Also, consider using a larger dust collection bin or bag that minimises the need for frequent emptying, allowing you to work longer without interruption, which is particularly valuable on larger projects.
High-quality bearing systems allow for smoother operation, which not only makes the machine easier to use but also reduces the risk of motor strain, which further reduces the motor heating and even parts corrosion. Consider investing in a sander with professional-grade bearings and it can make a noticeable difference in durability.
Furthermore, precision-engineered gears and drive systems allow for smoother performance, especially on demanding jobs, and help ensure that your machine continues to operate efficiently throughout its life.
A well-balanced floor sander is easier to control and reduces strain on specific parts of the machine. For instance, a sander with evenly distributed weight can reduce fatigue for both the user and the machine, allowing for longer, uninterrupted use. Some floor sanders are designed with a centred motor, which evenly distributes weight and prevents component breakdown.
Owning a high-quality floor sander is a great start, but proper maintenance of the floor sander is essential to ensure it performs optimally over time. Follow these tips to keep your machine in peak condition:
Choosing a durable, well-built floor sander is essential for ensuring high-quality results, reducing costs over time, and maintaining a smooth workflow. For anyone planning to buy a floor sander for DIY or home renovation projects, it’s crucial to consider a range of factors to ensure your investment is durable and high-performing. From checking motor quality and dust collection efficiency to regular maintenance before, during, and after each project, the process can be complex, expensive and time-consuming.
To save yourself from this hassle, consider floor sander for rent, such as a belt or drum sander or more, from Floor Sanders London. Renting eliminates the need for long-term upkeep and gives you peace of mind that your equipment is professionally maintained and ready for optimal performance.
If you already own a floor sander, explore our selection of high-quality accessories designed to enhance and maintain your machine’s performance. Floor Sanders London proudly serves customers across London and the home counties, with delivery options available to even more distant areas by arrangement.
For an enquiry about floor sander rentals, accessories, prices, or delivery options, please complete our online form. If you have any questions or need advice on the best sander for your project, don’t hesitate to call us at 020 8427 6604. We’re here to make your sanding project simple and successful.
Imagine spending hours sanding a floor only to end up with an uneven finish, or worse, finding that your equipment breaks down halfway through the project. A well-maintained floor sander is crucial for anyone working with wood flooring, whether a seasoned professional or a DIY enthusiast. Regular upkeep ensures that your sander is always ready to deliver high-quality results, from the first pass on rough floors to the final, smooth polish. Think of maintenance as the unsung hero of floor sanding; it keeps your equipment in peak condition, ensuring both efficiency and longevity.
In this article, we’ll guide you through the essential tools and supplies needed for maintaining a floor sander. From dust extractors and sandpaper pads to oils, replacement parts, and storage solutions, each item has its role in supporting a smooth, consistent sanding process. Regular maintenance isn’t just about preserving your investment—it’s also about ensuring safe and reliable results every time you work on a floor.
Regular maintenance of floor sanding equipment is essential for several reasons, spanning from enhanced performance and safety to cost savings and job quality. Here’s why a maintenance routine is vital:
Well-maintained floor sanders deliver consistent, high-quality results, which help you finish projects faster and with fewer issues. Dirt, dust, or wear and tear can hinder the machine’s sanding capabilities, affecting the quality of your finish and potentially leading to errors that could set your project back.
Taking care of your floor sander can significantly extend its life. Maintenance prevents excess strain on the machine, helping it handle more projects without frequent breakdowns or part replacements. Regular cleaning, lubrication, and inspection are simple steps that keep everything in working order.
Floor sanders are designed to provide a smooth, professional finish. When sandpaper becomes worn, or dust clogs parts of the machine, the sander’s efficiency drops, causing uneven sanding and scratches. Proper maintenance ensures a smooth sanding process, resulting in a high-quality, flawless finish every time.
Safety is a crucial aspect of floor sander maintenance. Regular upkeep reduces the risk of malfunctions, which could lead to accidents. Dust buildup, for example, not only affects machine performance but can also become a fire hazard if neglected. By keeping the sander clean and well-maintained, you also create a safer work environment.
Investing a bit of time in regular maintenance can save you significant repair or replacement costs in the future. A neglected sander may develop serious issues that require expensive parts or, in the worst case, complete replacement. Regular maintenance keeps your floor sander functioning longer and helps avoid these added costs.
Different types of floor sanders require specific maintenance practices to ensure they continue to operate at their best. Here’s a quick look at the common types and their unique care requirements:
Belt sanders use a continuous sanding belt to sand floors. For optimal performance, it’s essential to replace the sanding belts regularly, especially if you’re working on large surfaces or tough wood. Inspect the tracking mechanism periodically to ensure that the belt remains aligned, as this prevents uneven wear.
Drum sanders are known for their aggressive sanding capabilities and use a rotating drum covered with sandpaper. Key maintenance practices for drum sanders include checking the drum for smooth operation and replacing sandpaper frequently to avoid rough, uneven sanding. Regularly inspect the drum for signs of wear and tear.
Orbital sanders, which operate in circular motions, are gentler than belt or drum sanders, making them ideal for finish sanding. These sanders require regular pad checks, as worn pads can hinder sanding effectiveness and damage the floor. Prevent clogging by replacing the sanding discs whenever they start to lose grit.
Edge sanders are designed for hard-to-reach areas, making them essential for detailed sanding work. Keep an eye on edge wear and replace pads or discs regularly for smooth, precise sanding along edges. Since they’re often used close to walls, cleaning dust and debris from edge sanders after each use helps to preserve their effectiveness and protect adjacent surfaces.
The right tools and supplies are crucial to maintaining your floor sanding equipment. Below are the must-haves for keeping your sander in peak condition.
Dust extractors are indispensable when it comes to minimising airborne dust and keeping the workspace clean. These machines help maintain a clean environment and prevent dust buildup inside the sander’s vents, protecting internal parts from damage. Using a dust extractor regularly can improve your sander’s efficiency and contribute to a healthier work environment.
Using high-quality sandpaper is essential for achieving a smooth finish. Sandpaper and pads come in various grits suitable for different stages of sanding, from coarse grit for initial sanding to fine grit for finishing touches. Replace sandpaper as soon as it shows signs of wear; dull paper strains the machine and may leave scratches on the floor.
Oils and lubricants are essential for keeping your floor sander’s moving parts in good working order. Apply lubricant to prevent rust and ensure smooth operation, especially for high-contact areas. Regular lubrication keeps the motor and internal components functioning efficiently, enhancing the machine’s overall lifespan.
Maintaining an inventory of replacement belts, brushes, and other parts is wise. Floor sanders experience wear on belts, brushes, and wheels over time, and replacing these parts as needed ensures uninterrupted work and extends the equipment’s lifespan. Look for parts compatible with your specific machine model for a smooth fit and function.
A vacuum or blower is essential for clearing dust from filters, vents, and hard-to-reach areas. This reduces strain on the motor by maintaining airflow, which helps to keep the machine cooler and functioning efficiently. Clearing out dust also prevents clogs, which can reduce sanding precision and quality.
For dusting off the sander’s exterior, microfibre cloths and soft brushes are ideal as they are gentle enough to avoid scratching surfaces while effectively removing dust and dirt. Regular dusting can prevent particles from accumulating in controls or digital displays, helping to maintain the machine’s overall functionality.
Proper storage helps prevent dust accumulation and shields your floor sander from moisture and accidental damage. Storage cases or covers are essential if your equipment will be unused for extended periods. Protecting the sander between uses helps keep it in top condition and reduces maintenance needs.
In floor sanding, maintaining your equipment is as essential as choosing the right tools for the job. A well-maintained floor sander not only provides better results and improves safety but also extends the life of your machine, saving you time and money on repairs and replacements. By following a regular maintenance routine, you ensure that your sander will consistently deliver a smooth, flooring finish, project after project.
With over 30 years in the industry, we’re committed to providing a comprehensive range of high-quality, dust-free sanding tools. At Floor Sanders London, we offer a wide range of floor sanding equipment for hire, including top-quality belt sanders and drum sanders, perfect for any hardwood flooring project. We also provide essential flooring consumables, from sanding tools to accessories, ensuring you have everything needed to achieve a smooth, professional finish.
Beyond equipment rental, we’re here to support you with expert advice on maintenance and project planning. Our team can help you choose the right tools for your specific needs, and we encourage you to explore our Floor Sanding Tips for valuable insights on achieving the best results. For more details on our rental options or to discuss your project, visit our website or give us a call at 020 8427 6604. At Floor Sanders London, we’re committed to guiding you every step of the way, with quality equipment and expert advice to make your flooring project a success.
When it comes to home improvement, one of the most rewarding yet challenging tasks is restoring your wooden floors. While many homeowners opt to hire professionals, there’s a growing trend of people taking matters into their own hands by tackling DIY floor sanding. If you’re looking to save both time and money, DIY floor sanding is an excellent option. Not only can you achieve great results with a little patience and the right tools, but you’ll also get the satisfaction of completing the project on your own terms.
In this guide, let us explore why DIY floor sanding is a smart financial and time-saving decision, how to do it properly, and what you can achieve with the process.
For many homeowners, the idea of taking control of their home improvement projects is incredibly appealing. DIY projects allow you to put your personal stamp on your home while saving money. When it comes to DIY floor sanding, the value goes beyond the monetary savings. It’s about the sense of empowerment and accomplishment you get from maintaining and improving your home with your own hands.
Restoring a wooden floor through sanding not only enhances the look and feel of your space but also adds to your home’s value. With the right techniques and tools, you can achieve a polished, professional-looking finish without the hefty price tag that comes with hiring professionals.
One of the biggest reasons homeowners choose to sand their own floors is the cost savings. Wooden floor sanding costs can vary greatly depending on the size of the area and whether you hire a professional or do it yourself. On average, hiring a professional can cost anywhere from £12 to £25 per square metre, depending on the complexity of the job and your location. When you take the DIY method, your primary expenses include hiring floor sander hire, sanding consumables, and any protective gear, which adds up to a fraction of the cost.
Moreover, DIY floor sanding allows you to control your budget more efficiently. If you’re renovating your entire house, saving on professional labour costs can free up money for other projects. Plus, if you have more than one room to sand, renting the equipment for a weekend can help you cover a larger area without extra expenses.
Another reason to opt for DIY floor sanding is the flexibility it offers with your time. Hiring professionals means waiting for their availability, and often, that can mean delays. When you choose to sand your floors yourself, you can work on your own schedule. Whether you want to tackle it over a weekend or spread it out over a few days, you have complete control of the timeline.
Additionally, by familiarising yourself with the process and avoiding the waiting time for professionals, you can potentially complete the project quicker than you might expect. With the right preparation and tools, you can finish sanding a standard room in a day or two, leaving you with a smooth, polished floor ready for sealing.
Preparation is key to the success of any DIY project, and floor sanding is no exception. Start by clearing the room of all furniture, carpets, and rugs. It’s essential to remove any nails, staples, or tacks that may be sticking out of the floor, as these can damage the sander. Additionally, inspect the floor for any loose boards or cracks that need repairing before you begin sanding.
A little research goes a long way when preparing for your DIY floor sanding project. By gathering the right materials in advance, you’ll save time during the sanding process. You’ll need sandpaper in varying grits, floor sanders (which can be hired from local stores), an edge sander for corners and tight spots, a dust mask, and safety glasses.
For a successful DIY floor sanding project, having the right tools is crucial. By renting the following tools, you save on the high labour costs associated with professional floor sanding hire.
By following the DIY floor sanding tips provided, you can achieve professional results and also help you avoid costly mistakes or delays in your project.
Start with coarse-grit sandpaper (around 40 grit) to strip the old finish and remove deep scratches. Progress to medium grit (around 60-80 grit), and finally, use fine grit paper (100-120 grit) for a smooth finish.
The grit size of the sandpaper depends on the condition of your floor. If it’s heavily damaged, start with a lower grit to remove imperfections quickly. For smoother floors, you can start with a higher grit to avoid over-sanding.
Use an edge sander to reach the corners and along the skirting boards where the main sander can’t reach. Make sure to blend these areas into the rest of the floor to ensure a consistent finish.
When sanding, always keep the sander moving to avoid creating dips in the floor. Follow the wood grain and work methodically across the room, ensuring you don’t linger in one spot for too long.
The end result of your DIY floor sanding project can be just as good as professional work if done correctly. With patience and attention to detail, you’ll end up with a beautiful, smooth surface that enhances the overall aesthetic of your home. Plus, knowing you completed the project yourself adds an extra layer of satisfaction.
By following proper techniques and using the right tools, your floors can look polished and professionally done—without the hefty price tag.
To illustrate the savings, let’s break down the costs between the DIY method and hiring professionals. The floor sanding cost with a professional can range between £1,000 to £2,000 for an average-sized room. In contrast, floor sander for hire costs around £50-£100 per day, plus the price of sandpaper and any additional materials. Overall, you could complete the entire project for under £300, a fraction of what you’d pay a professional.
By opting for DIY, you save on labour costs and can reinvest that money into other home improvement projects.
While DIY floor sanding can be rewarding, there are some common pitfalls to watch out for. By being mindful of these mistakes, you can ensure your DIY project goes smoothly and delivers excellent results.
DIY floor sanding offers a great opportunity to not only save money but also to add a personal touch to your home improvement projects. Taking on the task yourself gives you full control over the process, allowing you to achieve professional-quality results at a fraction of the cost. With the right approach, patience, and tools, sanding your wooden or oak floors can be both a rewarding and financially smart choice.
If you’re considering taking the DIY route, we at Floor Sanders London are here to help you every step of the way. We provide high-quality floor sanders for hire and a range of essential tools and accessories to ensure your project runs smoothly from start to finish. Our affordable and flexible sander packages are tailored to suit projects of all sizes, so you can easily find the best option for your needs.
Ready to explore your DIY floor sanding project? Check out our sander packages and see how we can help you achieve a stunning, professional finish on your floors. If you have any questions or need advice on getting started, don’t hesitate to contact us, to learn more about we can support you throughout your DIY journey!
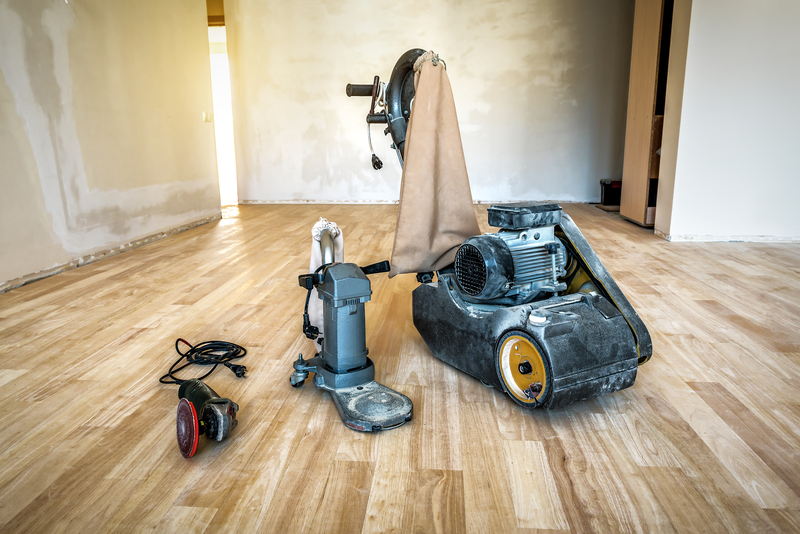
Revitalising wooden floors is a transformative process that breathes new life into your interior spaces. Central to this endeavour is the art of floor sanding, which strips away imperfections and prepares the surface for a fresh, polished finish. However, achieving a flawless sanding job requires the right tools – and that’s where floor sanders come into play.
These powerful machines are designed to tackle the nuances of different wood surfaces, ensuring a smooth and consistent finish. From the heavy-duty muscle of drum sanders to the finesse of orbital sanders, each type of floor sander serves a distinct purpose.
Let’s explore different types of sanders, equipping you with the knowledge to choose the right tool and each floor sander uses for your specific project and providing expert tips on their effective usage.
Floor sanders are essential tools in the world of wood floor refinishing. These machines harness the power of abrasive materials, such as sandpaper, to smooth and level the surface of wooden floors. By removing old finishes, stains, and imperfections, floor sanders prepare the surface for a fresh, pristine finish.
Choosing the right floor sander is crucial, as different types of sanders are designed to tackle various tasks and floor conditions. From aggressive material removal to delicate final touches, each sander offers distinct advantages and limitations. Understanding these nuances is key to achieving a flawless, professional-grade finish.
Floor sanding is an important task in the process of redesigning your wood floors. To achieve a flawless finish, it is crucial to understand the
Drum sanders are the heavy-duty workhorses of the floor sanding world. Featuring a large cylindrical drum onto which sandpaper is attached, these sanders are designed to make quick work of even the most challenging surfaces. As the drum rotates at high velocity, it aggressively removes material, tackling deep scratches, stains, and unevenness with ease.
Pros and Cons of Drum Sanders
| Pros | Cons |
|---|---|
| Extremely efficient at aggressive material removal | Requires a high level of skill and experience to operate properly |
| Can tackle deep scratches, stains, and significant unevenness | Aggressive nature increases risk of gouging or damaging floors |
| Perfect for intensive renovation projects on heavily damaged floors | Not well-suited for delicate finishing work |
When to use?
Drum sanders are the go-to choice for significant renovation projects where a substantial amount of material needs to be removed. They excel at smoothing out heavily worn, stained, or uneven floors, preparing them for a fresh start.
Orbital sanders offer a gentler approach to floor sanding, making them ideal for finer work and final finishes. Unlike drum sanders, these machines feature a square or rectangular sanding pad that vibrates in small, elliptical motions. This orbital action allows for a smooth and controlled sanding process, minimising the risk of accidental gouging or over-sanding.
Pros and Cons of Orbital Sanders
| Pros | Cons |
|---|---|
| Gentler sanding action reduces the risk of accidental damage | Relatively slow at removing significant amounts of material |
| Easy to manoeuvre and beginner-friendly | May not be powerful enough for heavily damaged floors |
| Provides a smooth, refined finish ideal for final stages | Relatively slow at removing significant amounts of material |
When to use?
Orbital sanders are the perfect choice when you need a smooth, consistent finish, especially on delicate surfaces like parquet or inlaid floors. They are also ideal for the final sanding stages, ensuring a refined and polished look before applying the finishing coats.
Belt sanders, also known as strip sanders, are a versatile option for floor sanding. These machines feature a continuous loop of sandpaper that rotates around two drums, allowing for efficient material removal. Belt sanders are particularly effective on softwood surfaces and for levelling out uneven areas.
Pros and Cons of Belt Sanders
| Pros | Cons |
| Efficient at levelling uneven surfaces and removing material | Require moderate experience to avoid patterns or gouging |
| Versatile for use on both rough and smooth wood surfaces | Not as aggressive as drum sanders for heavy-duty removal |
| Can be used for trimming and edging tasks in addition to broad areas | Can be difficult to manoeuvre compared to smaller sanders |
When to use?
Belt sanders are versatile tools that can be employed throughout the sanding process, from initial material removal to final smoothing. They are particularly useful for levelling out uneven or raised areas on softer wood floors.
As the name suggests, edging sanders are designed to tackle the areas that larger sanding machines cannot reach – the edges and corners of a room. These handheld tools allow for precise sanding along baseboards, corners, and other tight spaces, ensuring a uniform finish throughout the entire floor.
Pros and Cons of Edging Sanders
| Pros | Cons |
| Extremely precise for sanding along edges, corners and tight spaces. | Limited to edge work only, cannot sand broad open floors |
| Compact size allows access to hard-to-reach areas. | Require cautious handling to prevent accidental damage |
| Often include dust collection to minimise airborne particles. | It may leave visible lines or patterns if not used skillfully |
When to use?
After completing the main floor area with a drum or orbital sander, edging sanders become essential for achieving a seamless, consistent finish along the room’s perimeter. Their precision makes them indispensable for the final touches.
Detail sanders, also known as palm sanders, are compact and lightweight tools designed for intricate sanding tasks. With their small size and ergonomic design, they offer unparalleled control and manoeuvrability, making them ideal for detailed work and touch-ups.
Pros and Cons of Detail Sanders
| Pros | Cons |
| Compact and lightweight for maximum manoeuvrability | Very limited surface area coverage not suited for broad spaces |
| Ideal for intricate sanding work and touch-ups | Require frequent sandpaper changes on larger jobs |
| Can be used for rough removal or fine-finishing stages | Easy to apply too much pressure and cause divots if not careful |
When to use?
Detail sanders are versatile tools that can be employed throughout the sanding process. They are particularly useful for sanding corners, edges, and other hard-to-reach areas, as well as for touch-ups and final finishing tasks.
With the diverse array of floor sanders available, selecting the best sander for floors and tools for your specific project is crucial. Here are some key factors to consider:
Heavily damaged, uneven, or stained floors may require the aggressive material removal capabilities of a drum sander, while lightly worn floors can be handled with gentler options like orbital sanders or detail sanders.
Hardwood floors may require more robust sanders, while softer woods or delicate surfaces like parquet or inlaid floors call for gentler tools like orbital sanders.
Large open spaces may benefit from the efficiency of drum sanders or belt sanders, while smaller rooms or intricate areas are better suited for edging sanders or detail sanders.
If you’re aiming for a smooth, polished finish, consider combining the power of a drum sander with the finesse of an orbital sander or detail sander for the final touches.
Using floor sanders effectively requires a combination of knowledge, skill, and proper safety precautions. Here are some tips for getting the most out of your sanding tools:
What are the different types of floor sanders used for?
The main types of floor sanders include drum sanders (for aggressive material removal), orbital sanders (for smooth finishes), belt sanders (for levelling and softwood floors), edging sanders (for corners and edges), and detail sanders (for intricate work and touch-ups).
The appropriate floor sander depends on the condition of your floor, the type of wood, the project size, and the desired finish. Heavily damaged floors may require a drum sander, while lightly worn floors can be sanded with an orbital or detail sander.
Drum sanders are ideal for aggressive material removal on heavily damaged or uneven floors, while orbital sanders are better suited for achieving a smooth, consistent finish on lightly worn floors or for final finishing stages.
Orbital sanders are generally the best floor sander for hardwood floors, as they provide a smoother, more controlled finish. Belt sanders are more commonly used on softwood floors and for levelling out uneven areas.
Refurbishing wooden floors is a rewarding endeavour, but achieving a flawless finish requires the right tools and techniques. By understanding the different types of floor sanders and their specific uses, you can select the most appropriate tools for your project and ensure a seamless, professional-grade result.
Remember, safety should always be a top priority when working with powerful sanding equipment. Wear appropriate protective gear, follow manufacturer instructions, and take necessary precautions to minimise the risk of accidents or injuries.
If you’re unsure about the best approach for your floor sanding project or need professional assistance, don’t hesitate to reach out to Floor Sanders London. Our team of experts can provide valuable guidance and top-quality sanding services to help you achieve the beautiful, long-lasting wooden floors you desire.
Maintaining wooden floors that are newly sanded is imperative for preserving their aesthetic appeal, safeguarding your investment, and ensuring their longevity. Embracing appropriate care tips for sanded wood floors and preventive measures is the key to enjoying beautiful floors for an extended period. Following the initial investment in sanding and refinishing, recognising the importance of continuous upkeep becomes paramount.
Regular maintenance not only enhances the visual allure of the floors but also prolongs their lifespan. By integrating these care tips for sanded wood floors into your routine, you shield your floors from wear and tear, thus sustaining their beauty over time.
The first few days after your floors have been sanded are very important. During this time, it’s important to allow the new finish necessary time to fully cure and harden before subjecting it to regular foot traffic and furniture placement.
Depending on the type of finish applied, your newly sanded floors will require 24-72 hours to fully dry and cure. Avoid walking on the floors during this time, and keep pets and children off the surfaces as well.
Proper ventilation is key in the days following floor sanding. Open windows and use fans to circulate air and allow any lingering dust or fumes to dissipate. This will help the new finish dry properly and prevent any discoloration or damage.
Once the floors have had sufficient time to dry, you can gradually start walking on the floor. Start by allowing only light, careful foot traffic for the first few days. Avoid wearing shoes with high heels or hard soles, as these can easily scratch or dent the new finish. Encourage family members to wear socks or soft slippers when walking on the floors.
Wait at least 7 days before moving furniture back onto the newly sanded floors. This allows the finish to fully harden and prevents any indentations or scratches. When repositioning furniture, use felt pads or coasters to protect the floor surface.
Proper daily care is essential for maintaining wooden floors to ensure they look the best. Follow these wooden floor maintenance tips to enhance the appearance and extend their lifespan.
By following a consistent newly sanded floor care routine, you’ll be taking proactive steps to preserve the beauty and condition of your floors.
Maintaining wooden floors also involves controlling indoor humidity. Aim for a consistent level between 30-50% to prevent the wood from expanding, contracting, or warping. A dehumidifier or humidifier can help regulate the environment as needed.
Prolonged exposure to direct sunlight can cause the wood to fade or discolour over time. Use window treatments, such as curtains or blinds, to protect the floors from excessive UV rays.
Store all cleaning products, including mops and vacuums, in a designated area away from the floors. Avoid dragging or dropping these items directly onto the wood, as they can scratch or dent the surface.
While daily cleaning is crucial for maintaining wooden floors, periodic deep cleaning and professional attention are also essential for preserving their beauty and longevity. Here’s how to ensure your sanded wood floors stay in top condition:
Consider a thorough deep clean to remove built-up dirt and residue. Consult a Floor Sanders Hire for guidance on the best approach for your specific floors. This might involve specialised wood floor cleaners and methods like buffing, orbital or edger floor sanders.
Having your floors professionally inspected and maintained every 3-5 years, depending on traffic, is recommended. At Floor Sanders Hire, we can help you identify and address issues like worn finishes, scratches, or unevenness, ensuring your newly sanded floor care translates into long-term beauty.
Keep an eye out for these signs that your floors may require professional attention for wooden floor maintenance:
Addressing these issues promptly can help prevent further damage and extend the life of your sanded wooden floors.
Accidents happen, but quick action can help mitigate the impact on your newly sanded floors.
When a spill occurs, immediately blot up any excess liquid with a clean, dry cloth. Avoid rubbing or spreading the spill, as this can drive the stain deeper into the wood.
For tougher stains, use a small amount of the recommended hardwood floor cleaner and a soft cloth to gently scrub the affected area. Avoid excessive water or harsh scrubbing, as this can damage the finish.
If a stain persists, you may need to use a specialised wood floor stain remover. Test the product in an unnoticeable area first to ensure it doesn’t damage the finish. Follow the product instructions carefully, and avoid over-applying the solution.
For those persistent stains or unexpected damage beyond your DIY capabilities, consider Floor Sanders Hire. Our team of experts boasts the knowledge and specialised tools to tackle even the toughest challenges.
While diligent frequent maintenance is essential, there are times when professional assistance is necessary to keep your sanded wooden floors in top condition.
Regular professional inspections can help identify any emerging issues, such as wear patterns, finish damage, or structural problems. These inspections allow for proactive maintenance and prevent more extensive and costly repairs down the line.
Over time, even the most well-maintained floors will require refinishing to restore their shine and protection. In this case, Floor Sander Hire can sand away the existing finish, repair any damage, and apply a new, durable coating to revitalise the appearance of your floors.
For deep, thorough cleaning that goes beyond the capabilities of a homeowner, we can make a significant difference. Using specialised equipment and cleaning solutions, we can remove ingrained dirt, grime, and residue that daily maintenance may miss.
If you’re looking to change the appearance of your floors, such as altering the stain colour or finish type, Floor Sanders Hire can provide expert guidance and execution. We can help you achieve the desired look and ensure a seamless, high-quality result.
Following these essential care tips for sanded wood floors goes beyond just aesthetics. It’s an investment in your home’s beauty and value. By incorporating consistent care, preventive measures, and occasional professional attention into your wooden floor maintenance routine, you’ll reap the rewards for years to come.
As you embark on the journey of reworking your wooden floors and achieving a flawless finish for your home DIY projects, consider Floor Sanders Hire London your trusted partner. Our extensive selection of top-notch floor sanders caters to projects of all sizes, accompanied by expert advice and guidance tailored to your specific needs. Contact us today, and simplify your floor sanding endeavor with Floor Sanders London.
Selecting the appropriate coating for your sanded floors is vital in achieving both strength and visual appeal. Two popular options are water-based and oil-based finishes, each offering its unique advantages and considerations. Whether you prioritise fast drying times and eco-friendliness or desire a warm, luxurious look with exceptional durability, comprehending the distinctions between water-based and oil-based finishes is crucial in selecting the ideal coating for your floors.
Water-based coatings have become increasingly popular in recent years because of their environmentally friendly properties and ease of application. These coatings consist of resins and solvents, with water as the primary solvent. To ensure compatibility between the resins and water, additional chemicals are utilised to create an emulsion.
Water-based coatings provide a transparent and durable finish, making them suitable for a variety of wood types. They are renowned for their quick drying times, minimal odour, and reduced levels of volatile organic compounds (VOCs), making them the preferred choice for individuals who are concerned about indoor air quality.
Oil-based finishes are well-known for their classic richness and depth, making them a favoured option for enhancing the allure of sanded floors. These finishes infuse wood with a warm and profound radiance, lending an air of sophistication to the flooring.
One distinctive trait of oil-based finishes is their tendency to develop an amber or yellow hue over time. This can either be seen as a desirable vintage effect or a limitation based on personal preference. In comparison to water-based finishes, oil-based finishes typically require more time to dry, necessitating overnight drying for each coat. As a result, the application process may be prolonged.
Choosing the correct finish for your sanded floors is crucial in achieving the desired appearance and long-lasting quality. Water-based and oil-based finishes each have their advantages and disadvantages, so it’s important to consider the priorities and preferences before making a decision.
When deciding on the appropriate finish for your sanded floors, take into consideration factors such as drying time, durability, odour, and environmental impact. Ultimately, choose the finish that best compliments your style preferences and meets your practical needs.
If you prioritise quick drying times, minimal odour, and eco-friendliness, then a water-based finish may be the perfect choice for you. While it may not be as durable and offers limited options for sheen, water-based finishes provide a transparent and colour-stable coating that beautifully showcases the natural beauty of the wood.
On the other hand, if you value a warm and luxurious aesthetic with exceptional durability, an oil-based finish might be more suitable. Although it takes longer to dry and may develop a yellow tint over time, oil-based finishes offer a rich amber hue that adds character to your floors and stands up to the test of time.
If you are ready to take your sanded floors to new heights, then look no further than Floor Sanders London. Our collection of top-notch accessories is specially designed to perfectly complement both water-based and oil-based finishes, guaranteeing flawless outcomes every time.
At Floor Sanders London, you’ll discover everything you need to achieve professional-grade finishes. From applicators and sanding pads to maintenance products, our accessories are meticulously crafted to enhance the beauty and longevity of your floors.
Pay a visit to our Accessories page to explore our entire range and uncover how Floor Sanders London can assist you in attaining stunning results with your flooring projects.
Here at Floor Sanders London, we recognise the significance of selecting the ideal finish for your sanded floors. That’s why we provide an extensive selection of accessories that are tailored to complement both water-based and oil-based finishes, ensuring that your floors maintain their best appearance for years to come. Contact us today to learn more about our services and accessories.
As environmental awareness grows, Homeowners are looking for eco-friendly options in various aspects of the house renovation process. In such a way, eco-friendly floor sanding shows up as a viable option for restoring the beauty of hardwood floors at your home. In this comprehensive guide, we will explore the practices and benefits of eco-friendly floor sanding.
Before we dive into exploring the concept of eco-friendly practices of floor sanding, let us start with understanding the traditional methods of the floor sanding process. In essence, floor sanding is the process of removing the floor’s top layer with abrasive materials. Furthermore, it involves repairing or restoring old and worn-out floor materials for refinishing purposes.
As aforementioned, traditional floor sanding techniques come with various issues to worry about on a personal and environmental level. However, the eco-friendly floor sanding method offers the same makeover to the floors at your home, while leaving as little environmental problem as possible. Let us take a look at the multitude of benefits associated with eco-friendly floor sanding.
Eco-friendly floor sanding techniques include low-VOC (Volatile Organic Compounds) or water-based finishes and natural oil-based alternatives, which reduce harmful emissions, unlike traditional floor sanding employs high VOC finishes.
It is quite common that you will have to deal with copious amounts of dust and other toxic finishes like VOCs in the traditional floor sanding. This disrupts the air quality within the house and outside as well. However, eco-friendly flooring practices prioritise the use of non-toxic floor finishing materials. This significantly reduces indoor and outdoor air pollution.
By choosing sustainable materials, and employing eco-friendly methods, the preservation of natural resources is aided. Hence, promoting biodiversity and the general well-being of the ecosystem.
Employing eco-friendly practices and materials can significantly reduce the financial cost involved overall, with the flooring and with the maintenance. Being conscious about refinishing your floors can help you avoid huge sums instead of replacing your entire floor. Sustainable refinishing techniques can also aid in the longevity of your flooring.
It has been often proven that eco-friendly floor finishing can provide an aesthetically pleasing look, without any compromise on the durability or longevity of the wood. The use of low-VOC finishes allows you to choose from a wide range of colour options and better flooring sustainability.
As environmental concerns and technology advance, the scope of eco-friendly practices is evolving. In such a landscape, eco-friendly floor sanding and refinishing methods are getting constantly innovated. To shine more light on this matter, eco-friendly flooring materials are widely used in this modern age and the same are revolutionising the flooring, architectural and interior designing industry. Hence, shifting towards eco-friendly flooring from traditional methods will lead to a positive impact in various aspects.
Employing eco-friendly flooring methods not only renews your house and workplace’s charm but also aligns with your commitment to sustainability. If you’re looking for seamless and environmentally conscious floor sanding expertise, consider partnering with us – Floor Sanders Hire. Elevate your home, minimise environmental impact, and make a sustainable choice. Contact us to learn more about our services.
Oak floors add timeless beauty and warmth to any space. But over time, even the most durable oak can show signs of wear and tear. Sanding and refinishing is a fantastic way to breathe new life into your oak floors, restoring their natural lustre and enhancing your home’s value.
Whether you’re a seasoned DIYer or tackling this project for the first time, Floor Sander Hire is here to equip you with the knowledge and tools you need for a successful oak floor refurbishment. Here are some professional floor sander rental tips to guide you:
Before you begin the floor sanding process, it’s important to put in the proper preparation work:
To ensure the best possible finish to your floor, ensure you understand the floor sanding process correctly.
Finishing off your sanding job correctly is the key to maintaining a great finish:
At Floor Sanders, we have the expertise and equipment to guide you through your oak floor restoration project. Contact us today for professional advice, sander rental, and high-quality floor finishing products. With the right tools, knowledge, and these professional tips, you can achieve stunning results and enjoy your beautiful oak floors for years to come!
Copyright © 2026. Floor Sander Hire All Rights Reserved. Website & SEO by Loop Digital.