Many UK homeowners are drawn to engineered wood flooring for its authentic real-wood appearance and impressive stability, but what happens when it starts looking a bit worse for wear? Can you actually sand and refinish engineered wood floors like traditional solid hardwood?
The answer isn’t a simple yes or no. Whether you can successfully sand engineered wood flooring depends on several crucial factors: the thickness of the wear layer, the current condition of your floors, and the type of finish that’s already applied. Get it wrong, and you could end up with expensive damage that requires complete replacement.
Let us walk you through everything you need to know about sanding engineered wood floors in the UK.
Understanding the construction of engineered wood flooring is absolutely essential before you even think about sanding. Unlike solid hardwood, engineered wood consists of a real-wood veneer (the wear layer) that’s bonded to a multi-ply core, typically plywood or high-density fibreboard. This clever construction gives you the beauty of real wood with enhanced stability and resistance to moisture changes.
Here’s why this matters for refinishing: that top veneer layer is all you’ve got to work with. Sand too aggressively or go too deep, and you’ll break through to the core material underneath, which is not the look you’re going for!
Yes, you can sand engineered wood floors, but only sometimes. The limiting factor is always that precious veneer thickness. The sand is too deep, and you’ll hit the plywood core, leaving you with an unsightly and irreparable mess.
Engineered wood floors come with varying wear-layer thicknesses, and this is the crucial detail that determines your refinishing options:
Before you start any sanding project, you’ll want to check your manufacturer’s specifications or measure the veneer thickness at an edge where it’s visible. This one step could save you from a costly mistake.
For more detailed guidance on preparation and technique, read our Floor Sanding Tips Techniques guide.
Ready to tackle the sanding of engineered wood floors process? Here’s your step-by-step approach to refinishing engineered wood flooring safely and effectively.
Proper preparation is absolutely crucial for success. Start by completely clearing the room and removing any furniture. If feasible, take up thresholds and skirting boards; this gives you better access to edges and prevents damage to these fittings.
Next, set or nail punch any protruding fixings that could damage your sanding equipment.
Check the wear-layer thickness at an edge if you haven’t already, and confirm what type of finish you’re working with (oil versus lacquer), as this affects both your abrasive choice and topcoat selection.
Take time to repair or replace any damaged boards, and fill gaps as needed. There’s no point in creating a beautiful finish only to have gaps and damage show through.
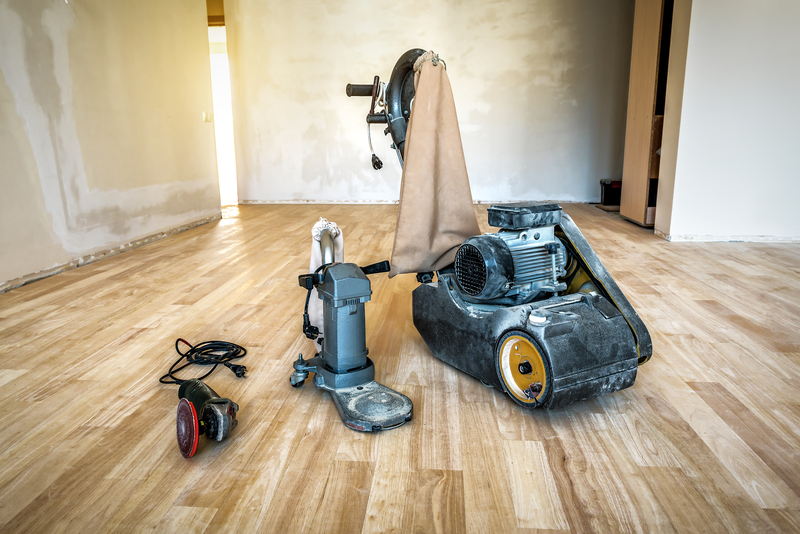
For professional results, you’ll need quality equipment. Consider hiring from Floor Sanders London, such as the following:
Having the right kit makes all the difference between a professional finish and a disappointing result.
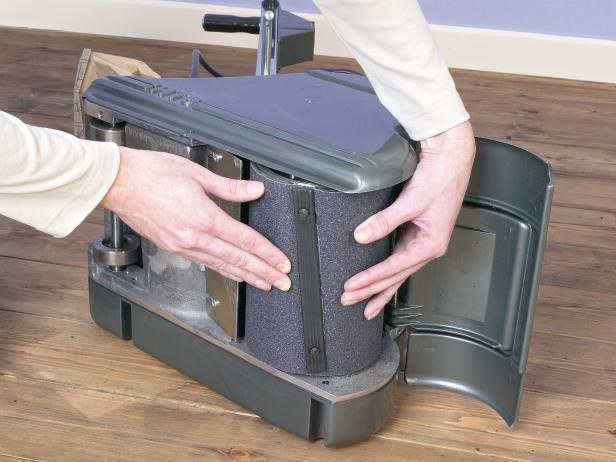
Start conservatively when sanding veneer flooring. Test your technique in a discrete area first, perhaps under where a sofa will sit or near a wall that’ll be covered by furniture.
Your grit progression depends entirely on that crucial veneer thickness:
Don’t forget the edges and corners; use an edger or detail sander here, and take extra care to blend these areas smoothly with the main floor area. Dish-outs and uneven transitions are very noticeable once the finish goes on.
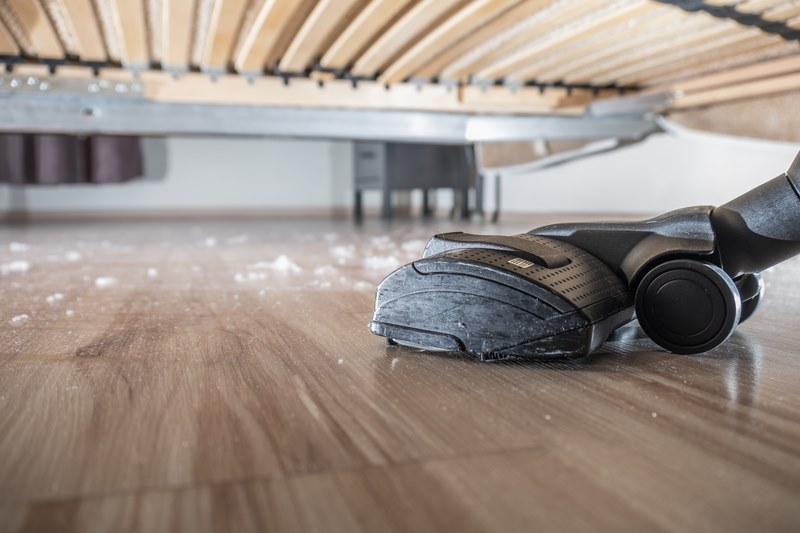
Dust control is crucial for a quality finish. Start with thorough vacuuming, paying particular attention to edges, corners, and any gaps between boards. Follow up with a tack-cloth wipe using cloths compatible with your chosen finish.
Ask about dust-free sanding hire packages with integrated extraction systems. These professional-grade setups dramatically reduce airborne dust, keeping your home cleaner and ensuring better finish adhesion.
If you’re planning to change the colour of your engineered wood flooring, now’s the time for staining. Always check compatibility between your chosen stain and topcoat system; some combinations simply don’t work together.
Apply stain evenly, working in manageable sections, and wipe away excess product as directed. Allow full drying time as specified by the manufacturer.
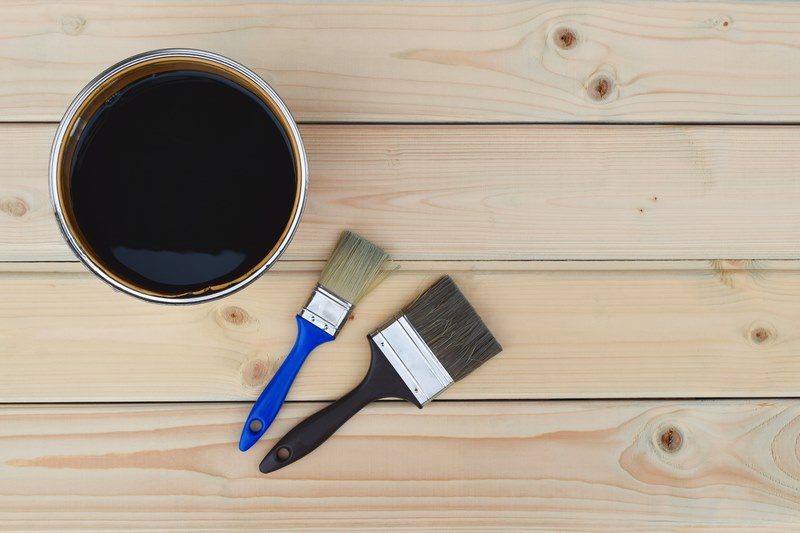
Choose your finish system carefully; oil/wax-oil systems offer a natural look and easy spot repairs, while lacquers provide a tougher protective film with longer intervals between maintenance.
Follow the manufacturer’s recommendations for coat counts and recoat windows precisely. These timings exist for good reason and affect both appearance and durability.
After your penultimate coat, a very light screen is often beneficial for achieving that perfect smooth finish. Use fine mesh (220 grit or finer), work gently, and vacuum plus tack-cloth before applying your final coat.
Sometimes, the kindest thing you can do for your engineered wood floors is to leave them well alone. Here are the situations where sanding simply isn’t appropriate:
The golden rule for sanding engineered wood floors is simple: success depends on veneer thickness plus current condition. Thicker wear layers offer more refinishing opportunities, while thinner veneers require extreme caution or alternative approaches.
When you do proceed with the engineered wood sanding process, conservative techniques and professional-grade, dust-controlled equipment significantly reduce your risk of problems. The investment in proper kit rental often pays for itself through better results and reduced cleanup time.
If you’re uncertain about your floor’s suitability for sanding, a professional consultation or expert hire guidance can prevent costly mistakes. Sometimes spending a little on advice upfront saves a fortune in replacement costs later.
Thinking about tackling your engineered wood floor refinishing project? Floor Sanders London supplies professional-grade floor sander hire across London, providing everything you need to refinish engineered wood floors safely and achieve outstanding results.
Our comprehensive tool packages include belt sanders, edge sanders, finishing sanders, plus essential dust extraction systems and complete abrasive packs. We also stock all the accessories and consumables you’ll need: wood fillers, stains, oils, lacquers, applicators, and protective equipment.
Whether you’re planning a light refresh or a complete refinishing project, our experienced team can guide you through selecting the right equipment for your specific veneer thickness and floor condition. Every engineered wood floor is different, and we’re here to help you get it right the first time.
If you have questions about the right kit for your engineered wooden floors, call us at 0208 427 6604 and speak to our knowledgeable team.
Explore our expert professional floor sanding tips and techniques guides for additional guidance on achieving professional results.
This depends entirely on your veneer thickness and any previous refinishing work. Thin wear layers (1-2mm) might manage one very light refinish at most, while thicker veneers (≥4mm) can often handle multiple cycles. We recommend a professional inspection to assess your floor’s remaining potential. Book a hire consultation for expert guidance.
Unfortunately not. Very thin wear layers and heavily textured finishes are generally poor candidates for sanding. Click-lock floating floors may also have limitations depending on their construction and condition. See our Alternatives to Sanding section for suitable options.
Oil finishes offer a natural appearance and allow easy spot repairs, while lacquer provides a more durable protective film with longer maintenance intervals. Your choice should consider foot traffic levels, desired sheen, and your preference for maintenance routines. Check our Finishes Aftercare guide for detailed comparisons.
Light, refreshing work is certainly possible with proper care and technique, but machine sanding thin veneers carries significant risks of breakthrough damage. Consider hiring professional-grade, dust-controlled equipment and getting our recommended grit progression plan for your specific floor type. Browse our Sander Hire Packages for complete solutions.
Summer’s here, and whilst we’re all looking forward to longer days and warmer weather, your floors might not be feeling quite as enthusiastic. Between the increased humidity, more foot traffic from family gatherings, your flooring faces unique challenges during the warmer months.
The combination of rising temperatures, higher humidity levels, and the inevitable dirt and moisture being tracked in from garden parties and beach trips can take a real toll on your floors.
But, with the right approach, you can keep your floors looking brilliant all summer long.
Here’s everything you need to know to protect your investment and maintain your flooring.
Understanding why summer poses such a challenge to your flooring is the first step in protecting it effectively.
During summer, humidity levels in UK homes can fluctuate dramatically. When moisture levels rise above 55%, wooden floors and laminate flooring begin to absorb water from the air, causing them to expand. This expansion can lead to buckling, cupping, and gaps between planks when the moisture eventually evaporates. Even engineered wood floors, which are more stable than solid hardwood, can suffer from excessive humidity.
Summer means more outdoor activities, garden parties, and children running in and out of the house. Each trip brings sand, dirt, pollen, and moisture that can act like sandpaper on your floors. High-traffic floor areas near entrances and patio doors bear the brunt of this increased activity, leading to accelerated wear and scratching.
The intense summer sun streaming through windows doesn’t just heat up your rooms; it can cause significant damage to your flooring. UV rays can fade hardwood floors, discolour laminate, and even affect the appearance of some vinyl and carpet materials. Floor protection from sunlight becomes crucial during the longer daylight hours.
While air conditioning provides blessed relief from the heat, it can create its own problems. Condensation around AC units can lead to moisture damage, whilst the constant cycling between cooling and ambient temperatures can cause flooring materials to expand and contract repeatedly.
Now that we understand the challenges, let’s dive into practical solutions that will keep your floors in tip-top condition throughout the summer months.
The best flooring maintenance in hot weather starts at your front door. Prevention is always better than cure, and stopping dirt and moisture from entering your home is your first line of defence.
Invest in robust indoor and outdoor doormats that can trap dirt, sand, and moisture before they reach your floors. Look for mats with deep grooves or bristles that can capture debris effectively. Place one outside your door and another just inside; this double-barrier approach can reduce the amount of dirt tracked through your home by up to 80%.
Humidity can be one of the biggest threats to your floors during summer, especially if you have wooden or laminate flooring. High moisture levels in the air can cause floorboards to expand, warp, or buckle.
The ideal indoor humidity level for most floors sits between 35% and 55%. Using a digital hygrometer will help you monitor this easily. If the air gets too humid, plug in a dehumidifier, especially in rooms that naturally retain more moisture like basements, kitchens, or poorly ventilated bathrooms.
If you’re running an air conditioner, great, it doubles up as a humidity controller. But steer clear of steam mops during this time of year. While they may be tempting for a quick clean, they add extra moisture to the air and can damage sensitive floors. Instead, opt for a lightly damp microfibre mop or cloth.
Summer brings in more dust, dirt, pollen, and grit, making regular cleaning more important than ever. Tiny grains of sand or soil can act like sandpaper on your floors, dulling their finish and causing fine scratches over time.
To avoid this, make it a habit to vacuum or sweep daily in high-traffic areas like the hallway, kitchen, and living room. For carpets, this removes trapped allergens and debris. For hard floors, use a vacuum with a soft brush attachment to prevent scratching delicate surfaces like wood or vinyl.
We all love natural sunlight streaming through the windows, but your floors might not feel the same. Prolonged UV exposure can cause discolouration, especially on hardwood, vinyl, and carpets.
To reduce fading, install blinds or curtains in sunny rooms, or consider UV-filtering window films. These block out most of the harmful rays while still allowing daylight to brighten the room.
Furthermore, rotate rugs and furniture occasionally so the same spots aren’t exposed to direct sunlight every day.
Rugs are fantastic for protecting your floors during summer, especially in busy areas like entryways, kitchens, and hallways.
Choose breathable rug materials like cotton, jute, or bamboo. These allow airflow and help prevent moisture from getting trapped underneath.
Stay clear of rubber-backed mats during humid weather, as they can hold moisture and damage the floor beneath.
Pair your rugs with non-slip pads to keep them stable and safe. Not only do they prevent slips, but they also allow for better ventilation and protect your flooring from friction damage.
Summer means more drinks, more ice lollies, and more chances for accidental spills, especially if you’re hosting barbecues or letting kids run in and out with snacks.
The key is speed. Keep microfibre cloths and floor-safe cleaning products close at hand, especially in rooms where spills are most likely to happen. As soon as something hits the floor, blot it up quickly; don’t wipe, as that can spread the liquid further.
Take extra care near skirting boards. Water that seeps into edges or beneath flooring can go unnoticed and cause long-term damage, particularly with laminate or hardwood.
Set up a dedicated paw cleaning station near your entrance. It doesn’t need to be fancy; just a towel and a bit of water will do the trick. Adding an extra mat beneath your pet’s food and water bowls can catch splashes and prevent staining or warping. Likewise, placing a rug or mat beneath pet beds stops dirt and fur from settling into your floors.
After particularly hot or humid periods, it’s important to inspect your floors for signs of damage.
Check wood and laminate floors for any planks that appear raised, buckled, or separated at the joints. These issues often become apparent after extreme weather conditions.
Examine tile floors and grout lines for new cracks, whilst checking hardwood floors for gaps between planks that may have appeared due to shrinkage.
Pay attention to any new creaks, squeaks, or hollow sounds when walking across your floors. These can indicate structural changes caused by temperature and humidity fluctuations.
Check for any new staining, fading, or discolouration, particularly in areas exposed to direct sunlight or near air conditioning units.
When it comes to maintaining beautiful floors throughout the summer months, having access to professional-grade tools and expert advice can make all the difference. Floor Sander London understands the unique challenges that UK homeowners face during the warmer months, and we’re here to help you protect your flooring investment.
Our comprehensive range of flooring tools and equipment hire includes everything you need for effective summer floor care, from high-quality floor sanders and Bona finishes to professional dust sanders that ensure a clean, healthy working environment.
If you’re planning a pre-summer floor restoration project or need professional equipment for ongoing maintenance, our expert team can suggest the best floor sander package suited to your specific project needs.
We offer professional floor sander hire in London with convenient next-day delivery, so you can tackle your flooring needs without delay.
Don’t let summer weather damage your beautiful floors. Call us today at 020 8427 6604 to discuss your flooring requirements with our knowledgeable team. Or, fill in our contact form and our flooring experts will get in touch with you promptly.
During summer months, high-traffic areas should be swept or vacuumed daily, with a thorough clean of all floors at least once weekly. Increased outdoor activity and humidity mean floors collect dirt and moisture more quickly.
Yes, humidity levels above 55% can cause wood floors to absorb moisture and expand, leading to buckling, cupping, and gaps. Use dehumidifiers and maintain humidity between 35-55% for optimal floor health.
Install UV-filtering window treatments, rotate furniture and rugs regularly to ensure even sun exposure, and consider UV-resistant sealants for hardwood floors. These measures prevent fading and extend floor life.
No, avoid steam mops on laminate and hardwood floors, especially during summer. The extra moisture can cause swelling, warping, and joint separation. Use damp mopping with appropriate cleaners instead.
If your business space has a tired, scratched floor, what does that say to your clients?
Flooring is often one of the first things people notice when they walk into a commercial property. Whether it’s a retail shop, office, restaurant or public building, the condition of your floors says a lot about your professionalism, attention to detail, and how you care for your environment.
That’s where floor sanding for commercial properties comes into play.
Floor sanding is a powerful restorative process that helps protect your investment, maintain safety standards, and extend the lifespan of your floors.
In high-traffic areas where wear and tear are inevitable, commercial floor sanding could be one of the smartest long-term decisions you can make as part of your overall commercial property maintenance strategy.
Commercial floor sanding is the process of removing the top, damaged layer of a wooden floor to expose the fresh timber beneath. Once sanded, the surface is then sealed and refinished to protect it from future damage and to enhance its appearance.
This differs from residential floor sanding, as commercial projects usually require:
One popular method is dust-free sanding, which uses advanced extraction systems to collect dust as it’s created, perfect for busy workspaces where air quality and minimal disruption are priorities.
Commercial floor sanding is ideal for a wide range of business settings, including:
Floor sanding is a smart business investment. Here are some of the top reasons why:
Over time, wooden floors in commercial buildings can become dull, scratched, and stained. Whether it’s from office chairs, muddy boots, or rolling trolleys, that surface damage builds up fast.
Floor sanding works by removing the outermost layer of damaged wood and revealing the beautiful grain underneath. Once sealed, your floor regains a rich, polished appearance that reflects light and brings a sense of freshness and professionalism to the space.
By sanding worn or splintered surfaces, you are making the floor look better, and also making it stronger. After sanding, a new protective layer is applied (such as lacquer or oil), which helps the wood resist future wear.
This is important in high-traffic commercial areas, such as reception zones, corridors, and shop floors, where constant footfall can wear down finishes quickly.
Damaged, uneven, or splintered flooring can be a potential hazard. Trip risks, loose boards, and slippery surfaces can all lead to accidents, which can put staff, customers, and your business at risk.
Commercial floor sanding helps create a level, even surface, which significantly reduces these risks.
It also supports your commitment to health and safety compliance, particularly in sectors like hospitality, retail, and healthcare, where floor conditions must meet high standards.
When you think about the cost of completely replacing your commercial flooring, it’s clear that prevention is better than a cure. Regular commercial floor sanding can significantly reduce repair costs by stopping small issues, like minor surface damage or uneven finishes, from escalating into major structural problems.
Sanding your wooden floors as part of routine floor maintenance for businesses is far more economical over time than ripping them out and starting from scratch.
Scratched or rough flooring can trap dust, dirt, and allergens. In busy work environments, especially those open to the public, hygiene matters. Floor sanding creates a smooth, sealed surface that’s easier to clean and maintain, promoting a healthier work environment.
With modern dust-free sanding equipment, the process itself doesn’t contribute to poor air quality. And once refinished, the clean surface helps reduce mould, bacteria, and irritants that can build up in neglected cracks or damaged areas.
If you lease or own commercial property, maintaining its condition should be a top priority. Clients, tenants, and prospective buyers all notice the details, and a scuffed, damaged floor can undermine an otherwise high-quality space.
Freshly sanded and sealed flooring adds immediate visual and functional value.
It displays that the property is well-maintained and looked after, which can directly contribute to higher resale or rental appeal.
Regular sanding is one of the simplest ways to boost your space and preserve value long-term.
In client-facing industries, appearances matter. From a high-street fashion retailer to a corporate office in the city, polished wooden flooring sends a message of care, quality, and attention to detail.
A well-maintained floor helps create a more welcoming, professional environment for staff and visitors alike. If you’re hosting meetings, welcoming customers, or showcasing products, floor sanding ensures your space lives up to your brand’s reputation.
The time it takes to complete a commercial floor sanding project largely depends on the size of the area and the condition of the flooring. As a general guide, a medium-sized office space might take 1–2 days for sanding and sealing.
Other factors include:
Most commercial wood floors benefit from sanding every 3 to 5 years, depending on:
If your business sees heavy use, such as retail shops, restaurants, or schools, more frequent floor maintenance may be required. Keeping up with regular sanding helps to prolong floor lifespan and avoids deeper damage later on.
Absolutely, floor sanding is typically far more cost-effective than full floor replacement. It allows you to restore your existing hardwood flooring, rather than tearing it up and starting over.
That said, replacement may be necessary if the wood is warped, heavily water-damaged, or previously sanded beyond its limit. In most cases, though, floor refinishing can save money, reduce waste, and help protect your investment.
In commercial spaces, your floors do more than support your business; they represent it.
From improving safety to enhancing durability and boosting workplace aesthetics, floor sanding for commercial properties is a smart, long-term investment. It helps preserve the natural beauty of wood, keeps your environment clean and professional, and ensures you’re meeting both visual and practical standards.
If you’re looking for a way to extend the life of your floors, reduce long-term costs, and create a better impression for your clients and employees, commercial floor sanding is the answer.
If you’re looking to bring tired timber floors back to life, then it is time to explore high-quality floor sanding equipment at Floor Sander London. We offer complete sander packages designed to suit any commercial project, big or small.
From machines to finishes, you’ll find everything you need in our carefully curated range of floor sanding products.
Call us today on 0208 427 6604 for expert advice from our friendly, knowledgeable team. Or, simply fill out our quick enquiry form, and one of our team members will be in touch to help guide your next step.
Revitalising wooden floors is a transformative process that breathes new life into your interior spaces. Central to this endeavour is the art of floor sanding, which strips away imperfections and prepares the surface for a fresh, polished finish. However, achieving a flawless sanding job requires the right tools – and that’s where floor sanders come into play.
These powerful machines are designed to tackle the nuances of different wood surfaces, ensuring a smooth and consistent finish. From the heavy-duty muscle of drum sanders to the finesse of orbital sanders, each type of floor sander serves a distinct purpose.
Let’s explore different types of sanders, equipping you with the knowledge to choose the right tool and each floor sander uses for your specific project and providing expert tips on their effective usage.
Floor sanders are essential tools in the world of wood floor refinishing. These machines harness the power of abrasive materials, such as sandpaper, to smooth and level the surface of wooden floors. By removing old finishes, stains, and imperfections, floor sanders prepare the surface for a fresh, pristine finish.
Choosing the right floor sander is crucial, as different types of sanders are designed to tackle various tasks and floor conditions. From aggressive material removal to delicate final touches, each sander offers distinct advantages and limitations. Understanding these nuances is key to achieving a flawless, professional-grade finish.
Floor sanding is an important task in the process of redesigning your wood floors. To achieve a flawless finish, it is crucial to understand the
Drum sanders are the heavy-duty workhorses of the floor sanding world. Featuring a large cylindrical drum onto which sandpaper is attached, these sanders are designed to make quick work of even the most challenging surfaces. As the drum rotates at high velocity, it aggressively removes material, tackling deep scratches, stains, and unevenness with ease.
Pros and Cons of Drum Sanders
| Pros | Cons |
|---|---|
| Extremely efficient at aggressive material removal | Requires a high level of skill and experience to operate properly |
| Can tackle deep scratches, stains, and significant unevenness | Aggressive nature increases risk of gouging or damaging floors |
| Perfect for intensive renovation projects on heavily damaged floors | Not well-suited for delicate finishing work |
When to use?
Drum sanders are the go-to choice for significant renovation projects where a substantial amount of material needs to be removed. They excel at smoothing out heavily worn, stained, or uneven floors, preparing them for a fresh start.
Orbital sanders offer a gentler approach to floor sanding, making them ideal for finer work and final finishes. Unlike drum sanders, these machines feature a square or rectangular sanding pad that vibrates in small, elliptical motions. This orbital action allows for a smooth and controlled sanding process, minimising the risk of accidental gouging or over-sanding.
Pros and Cons of Orbital Sanders
| Pros | Cons |
|---|---|
| Gentler sanding action reduces the risk of accidental damage | Relatively slow at removing significant amounts of material |
| Easy to manoeuvre and beginner-friendly | May not be powerful enough for heavily damaged floors |
| Provides a smooth, refined finish ideal for final stages | Relatively slow at removing significant amounts of material |
When to use?
Orbital sanders are the perfect choice when you need a smooth, consistent finish, especially on delicate surfaces like parquet or inlaid floors. They are also ideal for the final sanding stages, ensuring a refined and polished look before applying the finishing coats.
Belt sanders, also known as strip sanders, are a versatile option for floor sanding. These machines feature a continuous loop of sandpaper that rotates around two drums, allowing for efficient material removal. Belt sanders are particularly effective on softwood surfaces and for levelling out uneven areas.
Pros and Cons of Belt Sanders
| Pros | Cons |
| Efficient at levelling uneven surfaces and removing material | Require moderate experience to avoid patterns or gouging |
| Versatile for use on both rough and smooth wood surfaces | Not as aggressive as drum sanders for heavy-duty removal |
| Can be used for trimming and edging tasks in addition to broad areas | Can be difficult to manoeuvre compared to smaller sanders |
When to use?
Belt sanders are versatile tools that can be employed throughout the sanding process, from initial material removal to final smoothing. They are particularly useful for levelling out uneven or raised areas on softer wood floors.
As the name suggests, edging sanders are designed to tackle the areas that larger sanding machines cannot reach – the edges and corners of a room. These handheld tools allow for precise sanding along baseboards, corners, and other tight spaces, ensuring a uniform finish throughout the entire floor.
Pros and Cons of Edging Sanders
| Pros | Cons |
| Extremely precise for sanding along edges, corners and tight spaces. | Limited to edge work only, cannot sand broad open floors |
| Compact size allows access to hard-to-reach areas. | Require cautious handling to prevent accidental damage |
| Often include dust collection to minimise airborne particles. | It may leave visible lines or patterns if not used skillfully |
When to use?
After completing the main floor area with a drum or orbital sander, edging sanders become essential for achieving a seamless, consistent finish along the room’s perimeter. Their precision makes them indispensable for the final touches.
Detail sanders, also known as palm sanders, are compact and lightweight tools designed for intricate sanding tasks. With their small size and ergonomic design, they offer unparalleled control and manoeuvrability, making them ideal for detailed work and touch-ups.
Pros and Cons of Detail Sanders
| Pros | Cons |
| Compact and lightweight for maximum manoeuvrability | Very limited surface area coverage not suited for broad spaces |
| Ideal for intricate sanding work and touch-ups | Require frequent sandpaper changes on larger jobs |
| Can be used for rough removal or fine-finishing stages | Easy to apply too much pressure and cause divots if not careful |
When to use?
Detail sanders are versatile tools that can be employed throughout the sanding process. They are particularly useful for sanding corners, edges, and other hard-to-reach areas, as well as for touch-ups and final finishing tasks.
With the diverse array of floor sanders available, selecting the best sander for floors and tools for your specific project is crucial. Here are some key factors to consider:
Heavily damaged, uneven, or stained floors may require the aggressive material removal capabilities of a drum sander, while lightly worn floors can be handled with gentler options like orbital sanders or detail sanders.
Hardwood floors may require more robust sanders, while softer woods or delicate surfaces like parquet or inlaid floors call for gentler tools like orbital sanders.
Large open spaces may benefit from the efficiency of drum sanders or belt sanders, while smaller rooms or intricate areas are better suited for edging sanders or detail sanders.
If you’re aiming for a smooth, polished finish, consider combining the power of a drum sander with the finesse of an orbital sander or detail sander for the final touches.
Using floor sanders effectively requires a combination of knowledge, skill, and proper safety precautions. Here are some tips for getting the most out of your sanding tools:
What are the different types of floor sanders used for?
The main types of floor sanders include drum sanders (for aggressive material removal), orbital sanders (for smooth finishes), belt sanders (for levelling and softwood floors), edging sanders (for corners and edges), and detail sanders (for intricate work and touch-ups).
The appropriate floor sander depends on the condition of your floor, the type of wood, the project size, and the desired finish. Heavily damaged floors may require a drum sander, while lightly worn floors can be sanded with an orbital or detail sander.
Drum sanders are ideal for aggressive material removal on heavily damaged or uneven floors, while orbital sanders are better suited for achieving a smooth, consistent finish on lightly worn floors or for final finishing stages.
Orbital sanders are generally the best floor sander for hardwood floors, as they provide a smoother, more controlled finish. Belt sanders are more commonly used on softwood floors and for levelling out uneven areas.
Refurbishing wooden floors is a rewarding endeavour, but achieving a flawless finish requires the right tools and techniques. By understanding the different types of floor sanders and their specific uses, you can select the most appropriate tools for your project and ensure a seamless, professional-grade result.
Remember, safety should always be a top priority when working with powerful sanding equipment. Wear appropriate protective gear, follow manufacturer instructions, and take necessary precautions to minimise the risk of accidents or injuries.
If you’re unsure about the best approach for your floor sanding project or need professional assistance, don’t hesitate to reach out to Floor Sanders London. Our team of experts can provide valuable guidance and top-quality sanding services to help you achieve the beautiful, long-lasting wooden floors you desire.
Wooden floors are notoriously difficult to positively highlight. They can become scuffed and chipped easily and, if not properly taken care of, can look worn and run down. However, there are simple and economical ways to treat your flooring to ensure its longevity and style.
The first step to achieving an excellent shine includes sanding. Sanding your floors has many benefits, including reducing the chance of splinters, eradicating general wear and tear, making it easier to clean, and preserving the quality of the wood. As beneficial as sanding your floor is, you may need to use other methods to ensure your wooden floor is looking its best.
This is one of the best ways to shine both flooring that is sealed and not sealed. For flooring that is not sealed, a solvent-based wax that is worked into the grain and buffed with a polisher is recommended. A small amount of white spirit mixed with the wax for the first coat will make it easier to work into the grain. Waxing is a popular method as it also extends the life of a sealed floor.
For sealed flooring, the wax should be applied and buffed in the same manner but it should also be removed with detergent to reduce the build-up of the product. Sanding before carrying out any waxing is crucial to get the best possible outcome as you are removing the damaged wood, revealing the healthy layer underneath.
A thorough clean is vastly underrated and paramount to a pristine floor and you don’t always need the most expensive products. We recommend a mild soap with warm water and a damp cloth followed by rinsing with plain water. Floor sanders should be used after cleaning the floor to ensure you get the best outcome for your wooden flooring.
A natural ingredient in tea is tannic acid, which creates a beautiful shine on hardwood flooring. Allow two tea bags to stew in boiling water for a few minutes, then take a cloth dipped in the tea and rub it over the floor for the ultimate shine.
A more frequent measure that can attain a high-level shine is dusting the floor utilising a mop with a special dust agent treatment or electrostatic cloths. This enables you to keep your floor clean and shiny in between deep cleans. Of course, sanding your floor with the correct floor sanding accessories is key before this technique as otherwise the damaged and faded layer of wood will remain.
As the most vital aspect to beginning your journey to a shiny floor, floor sanding can be daunting. Luckily, Floor Sanders London has a step-by-step guide to support and advise you every step of the way. For jobs that last longer than you expected, they offer week and weekend rates for short and longer-term sander hire.
In addition to this, they can also accommodate weekly industrial and tradesman hire. Quick and efficient floor sanding equipment that is reliable is fundamental to the process. For more information on our floor sander rental prices and packages contact us or call 02084 276604.
Floor Sanders removes the top surface of wooden flooring with abrasives. It is a process that can be undertaken in a domestic and professional capacity to revive old flooring and improve the finish of several types of wooden floors.
Bona floor sanders are highly efficient machines that can help you achieve high-quality results and make any wooden flooring look as good as new. They are in high demand in labouring and interior designing companies – and for good reasons. This blog explores why.
Bona floor sanders allow you to sand down the whole floor surface. From sanding the main flooring area to finishing the edges, you will be able to carry out a complete and professional job. Bona belt sanders are powerful and reliable machines that can be adjusted to optimise performance.
The precision lifting and lowering of the drum make this machine easy to use and delivers professional results with minimal effort. Bona edgers are also convenient machines that are easy to set up and use. They are perfect to finish the edges of a room to achieve a uniform result.
As well as being able to cover every inch of the flooring you’re working on, Bona floor sanders can sand various types of flooring surfaces. Bona floor sanders are great in a professional capacity as models with the FlexiSand system can tackle even the most resilient floors. Whether you’re working on hardwood flooring or concrete floors, these powerful machines won’t fail to deliver.
Whether you’re a professional using floor sanders daily or an individual looking to revive old flooring in your home – Bona floor sanders are the perfect solution for you. Bona floor sanders are powerful yet lightweight. This means that they are user-friendly and deliver quality results in no time. Other brands and older generation floor sanders can be heavy, difficult to manoeuvre and make the job more difficult. Therefore, using Bona floor sanders can save you time and deliver better results.
Bona floor sanders can connect to Bona dust containment systems, which collect 99.996% of the dust created by the sanding process. Additionally, Bona edgers have a built-in dust collection system. This prevents harmful dust inhalation and ensures your lungs are protected throughout the process. It is important to consider such aspects of health and safety, particularly if you are a professional or firm hiring labourers and skilled workers.
As Bona floor sanders are in high demand, labouring companies could be at a disadvantage if they do not have these machines at hand. Not only does the high demand mean low stock and longer waiting times, but it also means that other companies could be at an advantage. You can stand out with such professional machinery, as well as achieve more professional results faster.
If you are looking to add this powerful machine to your day-to-day tool inventory, but do not want the added price for a potential one-time demand, consider our Bona Floor Hire rental service here at Floor Sanders London. For a quick quote on our hire services simply contact us via our website or call us directly at 02084 276604.
You have spent thousands on a new wooden floor, and now its time to make that oh so important decision, which wooden floor finish do you use? Choosing the most appropriate finish for your wooden floor can be a daunting task.
The three most common wooden floor finishes are varnish, oil and wax. In order to make the right decision for you, you need a basic understanding of each finish; their advantages and disadvantages.
With their distinctive characteristics that bring out their advantages and disadvantages when applied on wood. Wax, varnish and oil finishes will continue to be used to polish wooden floors. The decision to choose which finish is most suitable, however, can be determined from these characteristics.
Thank you for reading our blog post. If you have any queries or wish to contact us, go to our contact page or call us today on 020 8427 6604.
Are you looking to transform your living room? You may be surprised but by sanding your floors can completely change a room, creating that clean and fresh atmosphere. It may seem like this may be a lot of effort, but you’re sure to love the results. We’ve delved into all of the benefits of sanding your living room wood flooring below so you don’t need too!
Floor sanding is the process in which one uses a floor sander to remove the top surfaces of the wooden floor, removing scratches, dents and discoloration.

The sander is generally used for wood, there are different versions, from the portable to the electric one and they are very different from each other. The electric sander, for example, is a machine that allows polishing very hard materials, such as those used in hydraulics and in the construction of cylinders for engines.
Formed by blades, very powerful and sharp, made of diamond, aluminum oxide, and silicon carbide, this is because these materials are able to withstand very high temperatures, as well as guaranteeing extreme precision in cutting. This is a machine to be used by experts because, given its cutting power, it must be operated with extreme care, given some suggestions in this regard later. The blades of the electric sander rotate and swing, allowing you to work with hard materials, ensuring a precise cut. As for the more homely versions, there is the portable one, very convenient especially for the jobs to be done at home, not as powerful as the electric one, but it does its job well.
Orbital sanders instead are something in between, much more powerful than portable ones, they allow a different use, indicated for more complicated jobs; the belt sanders are very fast, and allow to minimize the efforts of the work, allowing a result as a true professional. In particular, orbital sanders lend themselves very well to carpentry work, because they adapt particularly to wood, even if you do NOT have to use it on antique furniture, but only on new furniture, because unfortunately it is too powerful, and you risk ruining it the antique furniture. Generally, a sander for domestic use or that you decide to buy because you have a passion for sanding wood certainly has much lower prices than machines with diamond blades used on an industrious level.
If this is the first purchase, and you don’t know where to start, try to ask some expert information, because it is really a pretty dangerous tool, if used without the right precautions; in principle, you must pay particular attention to the power of the motor, because it will affect the efficiency of your sander, and if the motor is not powerful enough, you risk to struggle especially with high precision work, and with more materials hardwood, in a particular way. Another factor to always keep in mind the discs, because you should have the need to change them every year, keep the sander in good condition anyway and try to always check it before using it.
If you use a floor sander for housework, wear protective glasses, because the power of this machine makes dust and pieces of wood fly, so cover your eyes well! The same goes for the ears, it would be better to cover them with headphones, especially for the use of professional and industrial sanders, because it really makes a very loud and sharp noise.
Also, NEVER wear flammable clothing, always advised against this kind of work. Last note concerns the cleaning of the sander, it sucks up all the dust and any waste, with a good vacuum cleaner.
We hope that you found this blog informative if you have any questions or queries, please feel free to get in give us a call on 020 8427 6604.
One of the most common advantages of having wooden floors is that in most cases you can repair the damaged surfaces, without needing to replace the entire floor in the room. This is often not the case with other types of floor. There are many methods which you can resort to when correcting the problem area, depending on how severe and deep the given damage is. Continue reading for all of our top tips and tricks for repairing wooden floors.
One thing that should be remembered is that it’s better to be careful and prevent any damage rather than be forced to spend more money and time repairing the floor that has been affected. Therefore, when it comes to prevention there are numerous ways to do so but the main one is to always remember to lift furniture instead of dragging it across the floor. Secondly, always remember the importance of cleaning and treating it on a regular basis and always use a mop to get any spills as soon as you can otherwise this may cause the floor to split or stain.
If your floor has scratches which cover it, you shouldn’t think about taking any complex measures, the solution is simple and you can do it on your own without any expert systems or professionals. To get rid of small scratches that occurred on your floor add a new coating of sealer to your floor and if the floor has been greased simply cover it with a layer of oil. If the floor is lacquered use a varnish pen which will assist you to solve your problem and eliminate any marks. Most DIY shops sell wax filler stems which help conceal or eliminate light or medium marks on the wooden floor. To fix the floor where deep marks and nicks are visible you may use a particular resin cartridge which is also available from DIY stores. Another home remedy that you could use is combining equal parts apple cider vinegar and olive oil in a cup and pat the mixture onto the mark, leave it for the remainder of the day then buff it out this process usually takes away the little scratches and scuffs.

If you’ve had a leak or a spillage that someone has dealt with straight away it’s likely that your wooden flooring is suffering from stains or warping or maybe even both. If the floor is stained firstly make sure that it’s completely dry and wipe up any puddles then use a heater or hairdryer to ensure all the moisture is gone from the floor. There will be a slight watermark stain left remaining on the wooden floor, therefore, get some toothpaste and gently polish that into the floor and it should do the trick!
We hope that our blog has helped you with your damaged wooden floor and if you would like some more advice and tips on how best to treat your wooden floor, or would like to speak to using about hiring floor sanders, don’t hesitate to get in touch.
There are lots of ways to add value to your house. A wooden floor is one guaranteed way of doing this. They are also a great way to enjoy the comfort that a home has to offer. However, to achieve all of this it’s necessary to give the floor the attention that it requires in order to stay looking good and strong.
Most of the things that you, as the homeowner is required to do are quite simple but should be done regularly. Lack of regularity in performing the tasks translates to lack of doing them at all. The following practices will ensure that you keep them in good conditions:
Though it’s not necessary to enforce a no-shoes strict policy, you should avoid walking on the floor high heels whenever you can. The high heels can easily dent the wooden surface. You should also ensure that felt pads have adhered to the legs of furniture so as to avoid scratching the floor.
To prevent particles from the soles of shoes from damaging and removing the floor’s finish, it’s wise to put doormats at every entrance.
The recommended temperature range for wooden floors is between 60 and 80 degrees Fahrenheit. The humidity level should be somewhere between 35% and 50%. The dramatic changes in moisture and heat increase the chances of the planks buckling and gapping.
Therefore, ensure that your thermostat stays at this range all the year round. However, very slight changes in the heat should not cause you any alarms. Radical changes in the temperature of the room have to stay for extended periods for it to begin affecting the floor.
Debris has negative effects on the sheen of the floor. If you are up to the task, you can vacuum or sweep every day. However, if you don’t think you can, do it twice every week. A microfiber mop cleaner that’s at neutral pH or a home-made solution can be used once a week to remove the dirt that sticks on the floor.
However, there are many products out there that claim that they can rejuvenate, polish or shine. These should be avoided at all costs because they contain additives that will create a buildup.
You may at any time require to replace your wooden floor. Many wood floors have stayed for a hundred years and over because of proper care. However, the wood may lose its lustre after some time. When this happens to your floor, you should hire an expert to apply for you a fresh coat of finish.
Another long-term maintenance and care practice that you can do to your floor is to sand. This can be done every 7 to 10 years. You can also do the sanding whenever there are worn out areas loss of colour, loss of stain, or gouges. These problems are often caused by food spillages, the mischief of pets or lots of foot traffic.
These care and maintenance practices for wooden floors may seem simple and easy. However, keeping up with the regularity is a big problem for most of us. If you really want your floor to really add some value to your home and stay strong for long, you can’t afford to overlook any of the above practices.
Alongside with help from floor sanding, wooden floors add style and elegance to any property, varying significantly from contemporary to traditional. Their initial outlay may be more than another alternative of carpets, but their longevity and value for the money can always outweigh exactly that. Wooden flooring evidently boasts a sophisticated history with huge variations, allowing property owners to create a unique space through stain and surface options.
Solid wood floors exude warmth, and high-quality varieties are best equipped to offer durability with resistance against daily living in high-traffic areas of any home. Routine mopping is required to ensure wood floors are kept clean and fresh; dust mites, mildew, and mould are unable to breed. A hardwood floor is an ideal solution for households with small children or pets.
The Dust free floor is important for the following reasons:
Floor sanding is an affordable way to renovate or restore, which will give it a new lease of life. The worn out, ugly, scratched and discoloured hardwood floor will perfectly manicure with floor sanding. This will result in improving the floor’s functionality, look and feel qualities. No doubt, you will enjoy the best aesthetical benefits of sanding to renovate your UK home’s wooden. In a sanding procedure, the professionals will scrape off the old layer at the top and bring forth the new and enhanced layer. This new layer will effectively soak up stains or varnish and looks fresh for a lengthy period.
Normally the wooden flooring in your home experiences wears and tear, which results in scratches and stains. In this case, a floor sanding will eliminate all these issues and make resistant. The sanding procedure levels out the and make it smoother, which makes it harder for dirt to accumulate at a specific area or penetrate deep into the floor. This ensures less maintenance or cleaning for your wooden floors.
Floor sanding prevents the penetration of dirt into your wooden floor, which makes it easy to maintain or clean the hardwood floor. You can simply wipe up the floor with a damp cloth or sweep it up to perform a general cleaning of your home’s floor.
The appearance of the floor will get enhanced that will freshen up the entire room and improves the lighting in the room. After the floor sanding is done perfectly by the professionals, you can experience the difference that how the light gets spread correctly and improves the ambience of an entire room. Apart from this, your wooden floor will prove to be durable to bear the movement of furniture and other accessories as well as also the foot traffic
Hardwood is available as pre-finished and unfinished boards. Pre-finished is more convenient with no requirement of sanding and is therefore quick to install, and there is no need for drying time for varnishes or lacquers. Unfinished flooring is more labour-intensive and often expensive, but the rewards of the results can be more than worthwhile immediately after completion. A superior seal should be obtained with unfinished boards, often recommended and preferred by professionals.
Refinishing your hardwood floor can really give a room a new lease of life, adding a sense of brightness and sophistication by removing the scuffs and dirt that may have built up over the years. Doing so can be a fairly labour intensive process though, so it’s important to make sure you know what you’re doing before you start.
Once you’ve read this article, you should be fully prepared to start sanding down your hardwood floor.
As with almost all DIY jobs, preparation is key. Sanding is a very dusty and noisy job, so it’s important to make sure you don’t make a total mess of your house!
Make sure you cover and mask around any doors (to prevent sanded dust spreading to the rest of the house) and wear protective clothing yourself (including a mask over your mouth and nose). It’s also a good idea to open any windows, so that you’re working in a well-ventilated area, as breathing in the dust particles can be harmful to health.
Finally, check over the floor to make sure that there are no protruding nails which could tear the sandpaper or damage the drum sander as you’re running it over the wood.
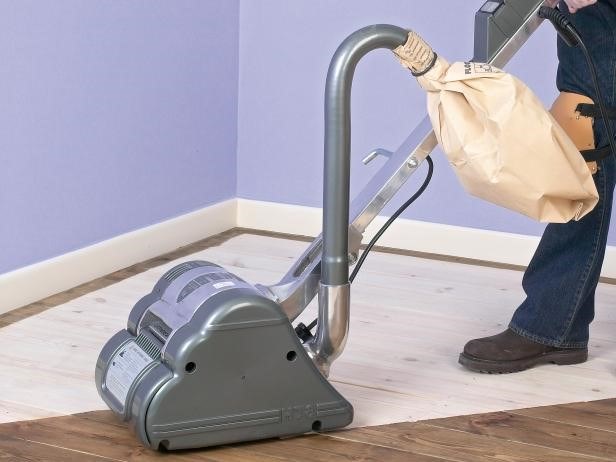
You’ll actually require three types of sander: a heavy-duty drum sander, heavy-duty edging sander, and a corner sander. Each type of sander will require its own specific type of sandpaper, so make sure you also get the right paper for each tool. When you hire your floor sanders, your hire support will be able to offer your guidance with acquiring the correct sandpaper.
It’s important to make sure the sander is unplugged before securing the sandpaper. Once this is done, simply unscrew the retaining strip, then feed a strip of sandpaper underneath it. Feed the sandpaper around the drum, and then secure the end under the retaining strip, ensuring the cut sections are aligned with the retaining screws. Before tightening the retaining screws, ensure that the paper is taut and correctly positioned.
In terms of choosing sandpaper, if the floor is in a bad condition, start with rougher 40-git paper. If the floor’s in a better condition, you can use a finer sand paper instead. Once all this is done, you can plug in the sander, tilt it back so the drum is off the floor, and start it up.
Lower the drum onto the floor, and begin to move the machine diagonally across the room. Once you’ve made one run change direction and make another set of diagonal runs at a right angle to the first run. Finally, change direction again and run the machine down the grain of the wood.
Make sure you move at a gradual, even pace in order to create an even finish. Once you’ve finished this, you’ll have done the main body of the floor, and there are only the edges and corners left!
Like with the drum sander, make sure the edge sander is unplugged before replacing the old disc of sandpaper. To remove the old disc, use the bolt key supplied to undo the retaining bolt (this key can often be found on a retaining clip on the underside of the sander).
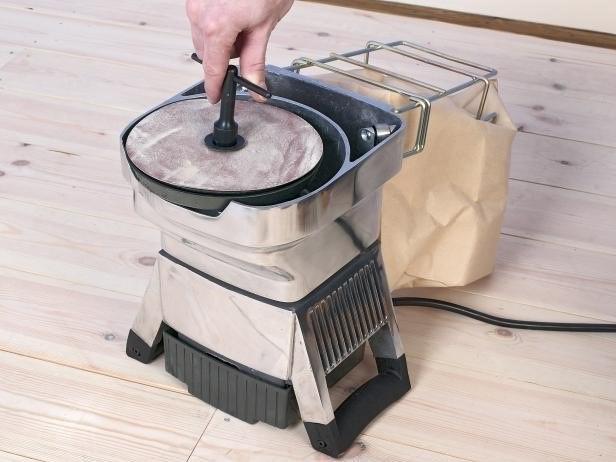
Position a new disc of sandpaper, then retighten the bolt, making sure the retaining bolt is well below the sandpaper surface level. Once this is done, you’re ready to run the sander down the edges of the room. Make sure you use a finer grain sandpaper for the edge sander because you’ll be sanding across the grain.
Changing the sandpaper on the corner sander is simple, just take a hold of the old piece of sandpaper and tear it off.
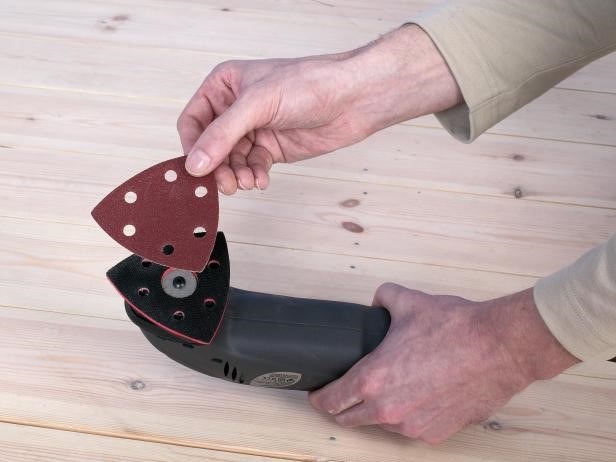
Take a new piece of sandpaper and align the pad before pressing it down. Once this is done, you can use the sander to sand the room’s corners, or any other had to reach areas (such as around a radiator).
Once you’re happy the whole floor has been sanded, sweep up any dust and debris that hasn’t been picked up by the sanders’ dust bags. Finally, wipe the floor down with a damp cloth. If you find any rough areas whilst doing this, just sand them by hand.
You’re now ready to apply the varnish to the floor. You can apply two coats of water-based varnish in a day, given how quickly it dries, although you’ll need to do some light sanding in between. Then your floor will be finished, and you can step back and admire your work!
We hope you found this information useful – let us know via Facebook or Twitter what you’d like to learn more about, or what you found most interesting!
Copyright © 2026. Floor Sander Hire All Rights Reserved. Website & SEO by Loop Digital.