Category Archives: Blog

How to Prepare Wood before Staining

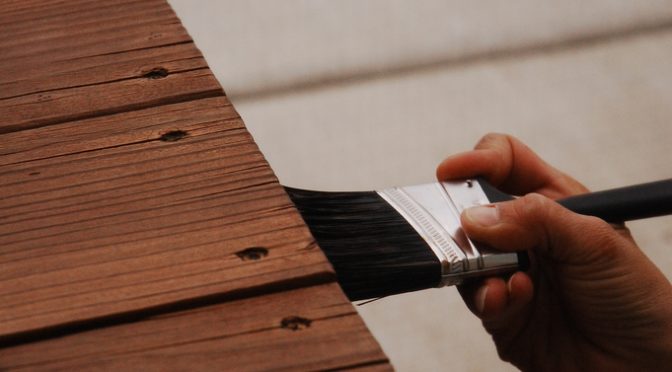
Looking after your furniture, flooring, or anything else in your house made of wood is important if you want it to last. This especially goes for anything wooden you own outside. Wooden garden furniture, decking, or a wooden gazebo will especially need staining in order to protect it from the rain.

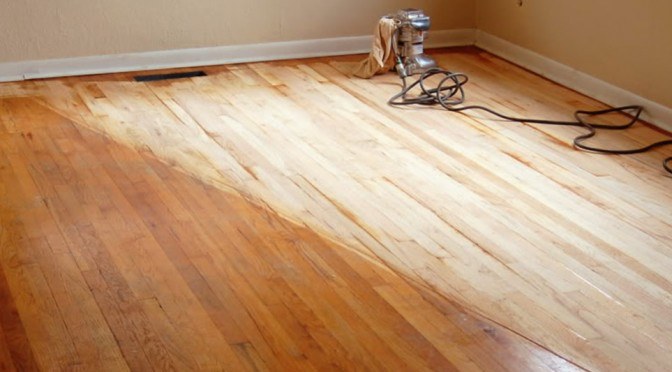
But before staining anything wooden, you’ll need to prepare it. Preparation is key to ensuring that, when you apply the stain, it seeps into the wood properly and evenly, providing the best protection. Luckily, we’ve done the hard work for you and compiled a guide to preparing wood for staining. So read on to become an expert!

Continue reading How to Prepare Wood before Staining

Can you use a floor sander on a deck? How do you sand a deck?

Spring has sprung, and fortunately, that means we’ll be spending a lot more time outdoors in our gardens. Many people will be spending this time on a wooden deck, overlooking their gardens whilst reading, or enjoying a barbeque. But the winter weather may have taken its toll on your decking, leaving it looking dirty, grey, and uninviting. Fortunately, it’s possible to breathe new life into it by sanding it down and retreating it. Continue reading Can you use a floor sander on a deck? How do you sand a deck?

4 key reasons why your hardwood floor needs regular maintenance

Hardwood is the king of domestic flooring and a personal favourite of ours. Not only is it is durable and hygienic, but it looks simply gorgeous, with the power to accentuate natural décor and raise the value of your property.

But the appeal of your hardwood flooring can be ruined by letting it succumb to scuffs, scratches and general wear and tear. So, to keep your floor looking its best, it is advised you treat it with regular sanding and varnishing.

hardwood floor freshly polished and sanded

Newer, smoother look


All types of flooring lose their flair over time, becoming dull from wear and tear. One of the biggest benefits of hardwood flooring is that, when it starts to look dull, you can simply sand away the dull layer and reveal a fresh one.

This layer makes the hardwood look like new again, giving it a smoother appearance. The new layer also allows easy applications of different aftercare products to extend the life of the flooring.


Complements the rest of the room


On top of a shinier appearance for your floor, your hardwood also does wonders for the surrounding area. The smoother your floor is, the more reflective it will become. A well-maintained floor can effectively reflect light and spread it around to brighten up any room.


Even flooring


Regularly sanding your floor means that you can keep it as even as possible, which makes fitting furniture much easier. Level flooring also makes it less prone to collecting dust and other debris and reduces the chances of suffering from a slip or fall within your home.

After every treatment with a sander, your hardwood floorings resistance to movement will decrease more and more – preventing the build-up of dust. This helps your floor stay much fresher over time, and reduces the amount of tedious cleaning your flooring will need in the future.


Allows easy staining and varnishing


Unlike carpets and rugs, you can reinforce hardwood flooring with a variety of effective varnishes and lacquers that protect it against moisture and unwanted drafts.


How to use a floor sander: Your Go-To Sanding Guide

Refinishing your hardwood floor can really give a room a new lease of life, adding a sense of brightness and sophistication by removing the scuffs and dirt that may have built up over the years. Doing so can be a fairly labour intensive process though, so it’s important to make sure you know what you’re doing before you start.

Once you’ve read this article, you should be fully prepared to start sanding down your hardwood floor.

Preparing the room

As with almost all DIY jobs, preparation is key. Sanding is a very dusty and noisy job, so it’s important to make sure you don’t make a total mess of your house!

Make sure you cover and mask around any doors (to prevent sanded dust spreading to the rest of the house) and wear protective clothing yourself (including a mask over your mouth and nose). It’s also a good idea to open any windows, so that you’re working in a well-ventilated area, as breathing in the dust particles can be harmful to health.

Finally, check over the floor to make sure that there are no protruding nails which could tear the sandpaper or damage the drum sander as you’re running it over the wood.

The tools you’ll need

You’ll actually require three types of sander: a heavy-duty drum sander, heavy-duty edging sander, and a corner sander. Each type of sander will require its own specific type of sandpaper, so make sure you also get the right paper for each tool. When you hire your floor sanders, your hire support will be able to offer your guidance with acquiring the correct sandpaper.

Sanding the floor

Step 1: Setting up the Drum Sander

It’s important to make sure the sander is unplugged before securing the sandpaper. Once this is done, simply unscrew the retaining strip, then feed a strip of sandpaper underneath it. Feed the sandpaper around the drum, and then secure the end under the retaining strip, ensuring the cut sections are aligned with the retaining screws. Before tightening the retaining screws, ensure that the paper is taut and correctly positioned.

setting up the drum sander
DK – Do It Yourself Home Improvement, 2009 Dorling Kindersley Limited

In terms of choosing sandpaper, if the floor is in a bad condition, start with rougher 40-git paper. If the floor’s in a better condition, you can use a finer sand paper instead. Once all this is done, you can plug in the sander, tilt it back so the drum is off the floor, and start it up.

Step 2: Using the drum sander

Lower the drum onto the floor, and begin to move the machine diagonally across the room. Once you’ve made one run change direction and make another set of diagonal runs at a right angle to the first run. Finally, change direction again and run the machine down the grain of the wood.

Drum sander in use on half sanded hardwood floor
DK – Do It Yourself Home Improvement, 2009 Dorling Kindersley Limited

Make sure you move at a gradual, even pace in order to create an even finish. Once you’ve finished this, you’ll have done the main body of the floor, and there are only the edges and corners left!

Step 3: Setting up and using the edge sander

Like with the drum sander, make sure the edge sander is unplugged before replacing the old disc of sandpaper. To remove the old disc, use the bolt key supplied to undo the retaining bolt (this key can often be found on a retaining clip on the underside of the sander).

edge sander set up bolting sandpaper
DK – Do It Yourself Home Improvement, 2009 Dorling Kindersley Limited

Position a new disc of sandpaper, then retighten the bolt, making sure the retaining bolt is well below the sandpaper surface level. Once this is done, you’re ready to run the sander down the edges of the room. Make sure you use a finer grain sandpaper for the edge sander because you’ll be sanding across the grain.

Step 4: Setting up and using the corner sander

Changing the sandpaper on the corner sander is simple, just take a hold of the old piece of sandpaper and tear it off.

corner sander set up man fitting sandpaper
DK – Do It Yourself Home Improvement, 2009 Dorling Kindersley Limited

Take a new piece of sandpaper and align the pad before pressing it down. Once this is done, you can use the sander to sand the room’s corners, or any other had to reach areas (such as around a radiator).

Step 5: Finishing the floor

Once you’re happy the whole floor has been sanded, sweep up any dust and debris that hasn’t been picked up by the sanders’ dust bags. Finally, wipe the floor down with a damp cloth. If you find any rough areas whilst doing this, just sand them by hand.

You’re now ready to apply the varnish to the floor. You can apply two coats of water-based varnish in a day, given how quickly it dries, although you’ll need to do some light sanding in between. Then your floor will be finished, and you can step back and admire your work!

We hope you found this information useful – let us know via Facebook or Twitter what you’d like to learn more about, or what you found most interesting!

How to maintain your newly-sanded hardwood floor

Maintenance of newly sanded floor is a task requiring the right types of materials, equipment, trained personnel – as well as a practical maintenance plan. Periodical maintenance helps keep your wood floor in newly sanded condition, while preventive maintenance is useful for avoiding any sort of damages to the floor from accidental damage. Knowledge of sanded floor characteristics helps in adopting the right maintenance method by using the best of floor-friendly cleaning agents.

Sanded Floor Characteristics

  • A sanded floor becomes sleek and even in nature. The smoother texture is due to the old wood layer being stripped away to reveal the raw, fresh surface.
  • The wood shine will nearly be restored to its original condition.
  • However, this means the floor is less resistant to foot traffic, so the impact of stress on the wood is higher.

Periodical Maintenance

  • First, it is important to carry out any repairs that are needed, such as removing and replacing damaged wood planks, which will often create dust and debris.
  • Removal of dust is the primary part of periodical maintenance. This should ideally be done every day. The traditional dust mop is the best equipment for performing this task. Choose an optimum sized mop which you can manoeuvre without having to disturb the installed furniture. Ensure that you keep the mop on the floor without having to lift it up. This helps in keeping the dust on the floor and collection, so removal becomes easier. Alternately, you can use a vacuum for dust removal.
  • Floor conditioning is the next maintenance task which you should perform at least twice in a week. You can use hardwood floor cleaning liquid for this purpose. Spray the liquid uniformly all over the floor and let it soak for about 15 to 20 minutes. Now you can use a floor brushing machine with a scrubber for taking out the stains and stress marks from the floor surface.
  • Coating is the next maintenance task which you should perform once in a month or quarterly, depending on the volume of foot traffic on the newly sanded floor. Waxing is said to be an effective way of restoring the original shine to the floor. Alternately you can opt for polishing of the floor. These two processes make it easy for cleaning the floor at later stages.

Preventive Maintenance

  • Ban smoking inside the premises which have newly sanded floors. This prevents accidentally dropping a cigarette on the floor and leaving burn marks.
  • Use paint thinner to periodically clean the floor with the help of steel wool. This helps prevent stain marks from getting deposited on the floor surface.
  • Use a wood lacquer which can protect your floor from damages and also provide additional shine. This makes it easier to wash, mop and vacuum. Stress marks will be eliminated from the floors and it takes a longer time for them to reappear. unless you forget to use the wood lacquer regularly (usually once every 3 months).

Floor Sander Hire

Hiring professional-standard floor sanders can help simplify your floor maintenance, and with our friendly staff here to support you, we can help ensure your sanding is perfectly executed. Since we have been in the professional floor sanding business for several years, our qualified staff have all the experience and know-how to give you all the advice you need to get the best results, and even extend your floor life – and recommend the best quality accessories and materials for maintaining your hardwood floor.

How to raise the value of your property with your flooring

There are lots of little tricks that you can use to up the value of your home, or property that you are investing in, but an immediate hit with prospective buyers is flooring.


It can be the difference between zero interest and a high-end offer, so it’s important that you keep your flooring well maintained. Because it’s a present factor in every room of any house, and the fact it affects the appearance of everything else in proximity, a shabby floor could leave property buyers turned off.


Fit hardwood flooring


If you’re reading this and don’t already have hardwood flooring in your home, you owe it to yourself to fit it as soon as you can. Hardwood flooring is highly desirable because of its easy-clean finish, timeless appeal and smooth appearance.


With hardwood flooring, you can easily fit underfoot heating systems, plus the timber retains heat much more effectively than with other materials. What was once considered something exclusively for the wealthy, is now readily accessible thanks to modern means of production. Today, anybody can install hardwood flooring in their homes with ease, and without necessarily breaking the bank.


Even if the potential buyer doesn’t like hardwood flooring, it’s still preferable to a home with wall-to-wall carpeting because it holds a great deal of options to the buyer.


If they want to fit a carpet with a colour and pattern that suits them, then they’re free to simply place it above the hardwood, as opposed to ripping up dull carpeting and replacing it.


Sand your floor periodically and practice good aftercare


All flooring is going to show wear and tear over time, and spilling drinks or plates of food is going to leave nasty stains. One of the other amazing perks of having hardwood flooring is that you can maintain its gorgeous aesthetic by utilising an electric dust-free sander.


The top layer of hardwood flooring will inevitably lose its shine over time, but with a quick sanding from a high-quality electric sander, you can clear away the dull top layer to reveal another layer underneath that will look good as new.


You can even time your sanding to coincide with a viewing of your property to show how well you care for and maintain the residency, so you can really impress your potential buyers. You won’t want to constantly be sanding your hardwood floor, though, so it’s always a good idea to treat your floor with aftercare products once you’ve finished the sanding process.


There are many types of aftercare products available, such as acrylic floor lacquer or gap filler, which can help the hardwood stay smoother for longer, boost its water-resistant qualities, or simply offer a more noticeable sheen.


Well-maintained hardwood flooring could become the primary selling point of your home. The versatility of wood flooring and the potential to keep it looking amazing for many years with little effort helps make any home highly desirable.


Floor Sanders London carries a comprehensive range of hardwood sanders for hire, plus a plethora of aftercare products that will keep your flooring strong and attractive for many years. Browse our site for a full list of the products we offer.