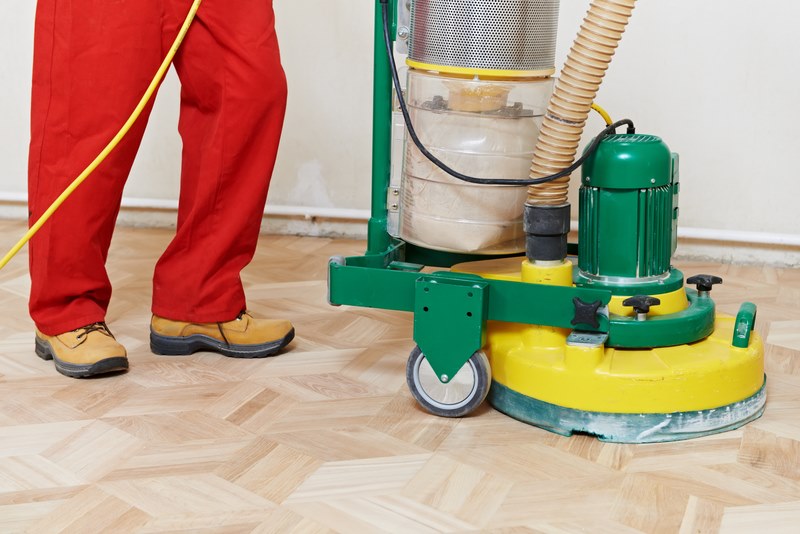
If you’re reading this, chances are you’re tired of gaps in your floorboards. Maybe they’ve sneaked up on you over time, or perhaps a DIY fix just hasn’t held up. Those widening cracks can let in draughts, collect dirt, or even make your floor feel less sturdy.
If you’re nodding along, you’re not alone. Gaps in floorboards are one of the most common frustrations homeowners face, particularly in period properties across London and the UK. What starts as a minor cosmetic annoyance can quickly escalate into a genuine problem affecting your home’s warmth, energy efficiency, and aesthetic appeal.
At Floor Sanders London, we understand your frustration. You didn’t spend good money on beautiful wooden floors just to end up with unsightly gaps and annoying upkeep. The good news? Those gaps between floorboards aren’t a permanent sentence for your flooring. With the right approach and professional expertise, your floors can be restored to their former glory.
Before you jump into filling them, it helps to know why the gaps are growing:
The primary culprit behind expanding gaps in wooden floors is variation in moisture content. During the winter months, central heating systems significantly reduce indoor humidity levels. As the air becomes drier, wooden floorboards release moisture and contract. Come summer, when humidity increases, the boards absorb moisture and expand again. This continuous cycle of expansion and contraction creates stress on the wood, and over time, the gaps become more pronounced.
Historic floorboards have character, but they’ve also endured decades of foot traffic, furniture movement, and environmental stress. The natural wear process causes boards to shrink slightly over time. Additionally, the original installation methods used in period properties often allowed more movement than modern techniques, meaning gaps in floorboards can develop or worsen as the years pass.
Modern heating systems, whilst wonderfully comfortable, are brutal on traditional wooden floors. The consistent, dry heat they produce accelerates moisture loss from timber, leading to more significant shrinkage than homes would have experienced when they were originally built. If you’ve recently upgraded your heating system, you might notice gaps in wood floor boards appearing or worsening shortly afterwards.
Sometimes, the problem isn’t just the boards themselves. Inadequate subfloor ventilation, rising damp, or structural movement can all contribute to problematic gapping. If gaps are accompanied by squeaking, bouncing, or unevenness, there may be underlying issues that need addressing before any surface treatment.
Great question. Many of our customers wonder: “Do you need to fill gaps in floorboards at all?” Here’s how to think about it:
Professionals like us at Floor Sanders London typically recommend gap filling during a full floor restoration. That way, we can sand, fill, and reapply the finish to leave a seamless and robust result.
We understand the appeal of tackling floorboard gaps yourself. There’s no shortage of advice online, and the DIY approach seems cost-effective. But here’s the uncomfortable truth: most DIY methods provide only temporary relief and can sometimes worsen the problem.
Wood filler products are rigid once cured. Your floorboards, however, continue their seasonal expansion and contraction. This movement causes fillers to crack, shrink, and eventually fall out, leaving you back where you started within months. Additionally, achieving a convincing colour match is surprisingly difficult, often resulting in conspicuous lines running across your floor.
Some guides recommend mixing PVA glue with shredded newspaper to create a paste for filling floorboard gaps. Whilst this is inexpensive, it’s also messy, time-consuming, and produces inconsistent results. The mixture doesn’t bond properly to the wood, deteriorates quickly, and looks decidedly amateur once dried. If you’re hoping to maintain your property’s value and appearance, this approach is a false economy.
Pushing rope into gaps before applying sealant on top is another popular suggestion. This can work reasonably well for very wide gaps, but it requires meticulous preparation, the right materials, and considerable patience. Get the technique wrong and you’ll have unsightly bulges, uneven surfaces, or sealant that peels away from the boards.
Beyond the questionable longevity of DIY repairs, there are hidden costs. Many homeowners spend weekends labouring over their floors, purchasing multiple products as initial attempts fail, and ultimately feeling frustrated with substandard results. The materials cost mounts up, and if you eventually call in professionals, you may need to pay extra to have poorly executed DIY repairs removed before proper work can begin.
More concerning, inappropriate gap-filling methods can trap moisture, potentially leading to rot or pest infestation beneath your floors. What begins as a money-saving exercise can escalate into a far more expensive problem.
When you work with experienced floor restoration specialists, you’re accessing techniques and materials that simply aren’t available or practical for DIY enthusiasts. Here’s what professional gap-filling actually involves:
Before filling a single gap, professionals assess your entire floor. We examine the subfloor condition, check moisture levels, evaluate ventilation, and identify any structural issues. This comprehensive approach ensures we’re addressing causes, not just symptoms. If gaps are caused by inadequate ventilation or moisture problems, simply filling them won’t solve anything long-term.
Professional gap-filling uses flexible resins specifically formulated for timber floors. These materials move with the wood’s natural expansion and contraction, preventing the cracking and failure common with rigid fillers. They’re also colour-matched precisely to your existing floorboards, creating virtually invisible repairs.
For wider gaps, we might use thin strips of matching timber (slivers), carefully shaped and fitted to ensure seamless integration. This traditional technique, when executed properly, is incredibly durable and maintains the floor’s authentic character.
Here’s what DIY approaches can’t replicate: professional gap-filling is just one stage of a comprehensive floor restoration. After gaps are filled, the entire floor is sanded using progressively finer grades. This process feathers the repairs into the surrounding wood, making them completely invisible.
Following sanding, we apply professional-grade finishes that seal the wood, protect against moisture fluctuations, and enhance the floor’s natural beauty. This complete treatment not only solves the gap problem but also revitalises your entire floor, often making it look better than when first installed.
Professional floor specialists don’t just fix the immediate problem. We provide guidance on maintaining optimal conditions to minimise future gapping. This might include recommendations on humidity control, heating management, and seasonal maintenance routines that keep your floors stable year-round.
You might be tempted to try a quick DIY fix, a tube of caulk, some sawdust, or a rope filler. And sure, that may give some short-term relief. But here’s what often happens:
Lasting peace of mind: we use materials and techniques that accommodate seasonal wood movement — so your floor stays beautiful and functional for years.
We know the thought of a floor restoration can feel overwhelming:
You save in the long run: Better insulation, fewer draughts, and a longer-lasting surface.
If your floorboard gaps are annoying, letting in draughts, or you’re just tired of the mess and the imperfect DIY patches, then yes, you should consider proper gap filling. But not just any patch-up job will do. What you need is a lasting, professional-quality solution. That’s where Floor Sanders London comes in.
Why Floor Sanders London Is Your Perfect Partner
At Floor Sanders London, we’ve dedicated years to perfecting the art and science of wooden floor restoration. We understand that your floors aren’t just surfaces; they’re integral to your home’s character, comfort, and value.
Our team brings expert knowledge of traditional and modern techniques, ensuring we select the perfect approach for your specific floors and circumstances. We use only premium materials designed specifically for long-term performance, not quick fixes that fail within months.
Most importantly, we stand behind our work. When we fill gaps in floorboards, apply finishes, or restore your floors, we’re confident those repairs will last because we’ve done them correctly, using proven methods and quality materials.
Here are some of the most asked questions about gaps in wood floors, based on real search queries with professional insights from Floor Sanders London to guide you:
A. t’s a classic trick: mix your own sawdust with PVA or wood glue, fill the gap, let it dry, then sand. It can work for small gaps, but it’s less effective long-term. The joint tends to dry too hard or shrink, and it may not match your finish.
A. If the wrong filler is used, yes. Hard fillers that don’t flex will crack as the boards move. That’s why flexible or resin-based fills, or slivers, are preferred for durability.
A. For draughts or pests, we recommend a combination method: steel wool can be pressed into the gap first, then a caulking sealant over the top for a tight, yet flexible fix.
A. Yes. After applying putty or resin or slivers, we sand the floor to level things out and ensure a smooth, even finish.
A. Absolutely. Filling gaps helps reduce draughts and minimises airflow from below, making a room feel warmer and more comfortable.
A. Many DIY fixes may feel good immediately — but over weeks or months, hard or brittle fillers crack, shrink, or fall out. Professionals do this regularly, with materials and techniques calibrated for movement, durability, and finish.
As the year draws to a close, it’s the perfect time to give your floors the attention they deserve. Whether you manage a busy commercial space or simply want to keep your home spotless for the festive season, year-end floor maintenance plays a crucial role in preserving your flooring’s appearance, hygiene, and lifespan
Floors endure daily wear from foot traffic, dirt, moisture, and changing weather — and by December, many surfaces need a little care. A structured year-end cleaning and maintenance routine helps prevent long-term damage and sets your floors up for a fresh start in the new year.
For commercial properties, such as offices, retail spaces, and hospitality venues, floor maintenance isn’t just about aesthetics—it’s a matter of hygiene, safety, and compliance. Clean, well-maintained floors create a professional image and ensure compliance with UK workplace standards related to cleanliness and slip prevention.
For residential homes, the motivation is more personal. Clean floors mean a healthier, more comfortable environment for your family. Dust, allergens, and winter grime can build up throughout the year, and refreshing your floors before the new year helps protect your flooring investment and maintain indoor air quality.
Your exact checklist depends on the flooring type and setting, but these universal steps form a solid foundation for both commercial and residential environments:
Completing these steps before year-end ensures that minor issues don’t turn into costly repairs later on.
Start by examining all your floors — especially in high-traffic zones like entrances, hallways, or retail areas. Look for dull patches, scratches, warping, or moisture damage. For wooden floors, pay close attention to the finish: if the shine is fading or scratches are visible, you may need to sand and recoat the surface.
Commercial clients can use this inspection to document conditions for health and safety records, while homeowners can make note of any repairs or refinishing needed before hosting holiday gatherings.
A thorough deep clean is essential before the year ends. Over time, dirt, grit, and cleaning residue can settle into floor surfaces, dulling their appearance. Use pH-neutral cleaners and soft mops or microfibre cloths to avoid damaging finishes.
For commercial properties, this may mean hiring a professional cleaning team to tackle high-traffic areas and deep-clean floors overnight or during downtime.
By year-end, even well-maintained floors can show signs of fatigue. Refinishing or recoating your wooden floors can restore their lustre and extend their lifespan.
If you notice visible wear through the finish or patchy colouring, it might be time to schedule professional floor sanding and refinishing. This process removes surface imperfections, smooths the texture, and adds a fresh protective coating — leaving your floors looking brand new for the new year.
For London homeowners and businesses, Floor Sanders London provides professional-grade equipment, bundles, and accessories to help you achieve excellent results, whether you’re tackling the job yourself or hiring a specialist.
You can explore our floor sander packages and sanding tips for expert guidance.
The UK winter can be harsh on floors. Muddy boots, road salt, rainwater, and grit are frequent culprits of surface damage and discolouration. Preventative measures can make a world of difference:
Commercial buildings can also implement matting systems and regular entryway cleaning schedules to reduce tracked-in debris.
Using the wrong product can do more harm than good. Avoid bleach, harsh detergents, or wax-based solutions unless recommended for your floor type. Instead, invest in eco-friendly and pH-balanced cleaners that preserve finishes without leaving residues.
Find the best of the best floor sanding accessories and maintenance tools for your floors. Don’t forget that the right products go a long way to supporting safe cleaning and upkeep.
For commercial premises, December often brings quieter operational periods — making it the ideal time to conduct deep cleaning or refinishing without disrupting business activities.
Scheduling professional sanding or recoating before the new year ensures that your floors are ready for increased footfall in January, giving your space a refreshed, professional appearance for returning staff and customers. Homeowners can take advantage of time off over the holidays to reset their home environment, completing floor care tasks before the new year begins.
When performing year-end maintenance, steer clear of these common errors:
Avoiding these mistakes ensures that your floors remain strong, safe, and visually appealing throughout the coming year.
For commercial spaces, the focus is on rigorous scheduling, safety, and professional longevity. Establish a scheduled maintenance log to document inspections and cleaning routines. To minimize slip hazards and prevent debris from damaging the floor, ensure entrances and exits have proper matting. For deep maintenance, plan professional sanding or recoating every few years based on the level of foot traffic. Logistically, coordinate maintenance during holiday shutdowns or other slow periods to prevent disruption to business operations.
In residential settings, the emphasis is on gentle, everyday care and environmental control. For the daily routine, use soft brushes or microfibre mops for everyday cleaning. To prevent wear, place rugs in hallways and play areas to reduce wear from movement. Deep maintenance involves scheduling seasonal deep cleans to prevent damage from moisture or grit. Environmentally, it’s crucial to regularly check humidity levels—especially for wood floors—to prevent warping or cracking.
Quick Reference List for the Season:
Keep this checklist handy for both residential and commercial environments—it’s a simple yet effective way to ensure your flooring remains protected year after year.
Year-end floor maintenance isn’t just a finishing touch — it’s a vital part of protecting your investment, enhancing hygiene, and ensuring your space starts the new year on the right foot. Whether you manage a commercial property or simply want your home to shine through the holidays, adopting best practices now saves time, money, and effort later.
Take the proactive approach: assess, clean, protect, and, if necessary, refinish your floors before the calendar turns. With the right equipment and expert advice from Floor Sanders London, your floors will stay strong, safe, and beautiful all year long.
Give your floors the professional care they deserve this year-end. Whether you’re tackling a full home renovation or refreshing a busy commercial space, Floor Sanders London has everything you need for flawless results. From professional floor sander hire to expert sanding tips, complete bundles, and high-quality accessories, they make it easy to restore your floors with confidence.
Their flexible packages suit both DIY enthusiasts and professional contractors — ensuring every project runs smoothly and cost-effectively. With fast, London-wide delivery, you can get your tools and supplies exactly when you need them.
Don’t start the new year with tired, worn floors — revive them today with Floor Sanders London. Explore our full range of floor sanding solutions and make your space look brand new again.
London is a living museum of architectural history. From the Georgian terraces to the intricate detailing of Victorian townhouses, each creaky step and scuffed floorboard tells a story, stories that deserve to be preserved, not polished away.
Similarly, if you live in or have recently purchased a period property in London, you may be wondering how to balance restoration with preservation. One of the most powerful ways to honour your home’s heritage is through the careful restoration of its original wooden floors.
Floor sanding, when carried out with the right tools and approach, can reveal the natural beauty of aged timber floorboards while maintaining the architectural integrity that gives historic homes in London their distinctive charm.
Let’s explore why your period property’s floors deserve a little extra care and how the right floor sanding process can help you preserve the character of old buildings for generations to come.
Wooden floors in historic homes in London are a vital part of their story. From hand-cut planks laid in the 1700s to decorative parquetry, each timber floorboard has witnessed centuries of life and change.
What sets them apart from modern alternatives is their uniqueness.
Each board holds the marks of time, knots, and nail holes that add to the home’s authenticity. Unlike engineered flooring, which often aims for uniformity, original wooden floors bring a tactile connection to craftsmanship that simply can’t be replicated.
Many homeowners don’t realise that original flooring is one of the few untouched features left in period homes. Restoring and preserving wooden floors improves the visual appeal and also safeguards a major element of the property’s identity.
Unfortunately, some renovations unintentionally erase that identity with the often overlooked sanding process.
That’s where sympathetic and professional floor sanding becomes necessary. When done correctly, it enhances the original materials rather than replacing them, giving old floorboards a new lease of life while protecting their heritage.
Unlike modern materials, aged wood carries decades of wear, movement, and exposure. In this case, it needs to be treated with care and respect, not with aggressive sanding machines or a uniform sanding method.
Where modern floors might be perfectly even, consistent, and sealed, heritage floors often feature natural undulations, slight gaps, and variable wear patterns. These are not flaws to be corrected but features to be revived. Treating them the same way you would a brand-new floor risks losing what makes them special.
The temptation to rip out and replace may be strong, especially when faced with heavily worn areas, but keeping the original boards where possible is always the better option. Through careful restoration and sympathetic sanding, you retain the craftsmanship and materials that make your home truly one of a kind.
Original timber flooring in a period property becomes a feature rich in history, texture, and beauty. But over time, it can lose its lustre, becoming dull, uneven, or stained. This is where floor sanding plays a pivotal role in heritage home restoration.
Floor sanding done properly can transform worn wooden boards without compromising their character. Rather than replacing original timber, the aim is to revive what’s already there, revealing the hidden grain, smoothing out wear marks, and enhancing natural colouration that’s been dulled over time.
It’s not about achieving perfection. Some of the quirks, such as the knots, historic nail holes, and soft undulations, are what make these floors so unique. Gentle sanding respects this, allowing the wood’s history to shine through.
Unlike the sanding methods of old, modern techniques now allow for dust-free sanding. This is particularly important in period homes where you want to avoid spreading fine dust into cornices, coving, or delicate furnishings.
Dust-free systems use high-filtration vacuums attached directly to the sanding machinery, helping keep your home clean and your air quality safe.
It’s a small detail that makes a huge difference, especially when working in older properties where finishes and materials can be sensitive to contamination.
One of the biggest mistakes when restoring heritage floors is sanding too deeply. Over-sanding strips away surface wear, but also removes the original patina that took decades to form. Skilled sanding involves just enough abrasion to refresh the surface without erasing the subtle signs of age and craftsmanship.
Once the sanding is complete, the finish you choose matters enormously. In historic homes, it’s important to use conservation-grade finishes that replicate traditional materials and give a sympathetic, low-sheen look.
Modern finishes like polyurethane can look too ‘plastic’ and glossy, clashing with the surrounding period décor. Instead, opt for hard wax oils or natural oils that enhance the natural tone and grain while remaining breathable and authentic.
A carefully sanded and properly finished heritage floor won’t just look good, it will last for decades. With the right upkeep, you can reinforce the floor’s strength and wear resistance without losing the historical detailing that makes your home so special.
When working with period properties, it’s vital to approach floor restoration with care, respect, and the right techniques. One misstep can strip away years of character. Here are some essential dos and don’ts to guide you through the process and ensure your floors retain their timeless appeal.
Older homes often feature ornate skirting boards, decorative cornicing, and other delicate features that can easily trap dust. Dust-free sanding systems minimise mess, protect your interiors, and create a safer environment, especially important if your home is still lived in during renovation.
Period homes aren’t like new builds, because they require a different skill set. By choosing floor sanding specialists who understand heritage home restoration, you’ll ensure the right tools, techniques, and finishes are used to respect the age and condition of your floorboards.
Whether you’ve got diagonal-laid Georgian boards or intricate Victorian borders, preserving the original layout is key to maintaining the character of old buildings. Realignment or patchwork repairs should be sympathetic to the original design.
Avoid synthetic finishes and instead go for conservation-grade finishes such as natural oils, waxes, or shellac. These not only offer long-lasting protection but also align better with traditional craftsmanship and the look expected in period properties.
It can be tempting to keep sanding to achieve a perfectly smooth finish, but in doing so, you risk taking away the very surface that holds historical value. Remember, less is more when it comes to heritage floors.
While durable, these types of finishes often look out of place in older homes. Their artificial sheen can make timber floorboards appear plastic-like, detracting from their natural beauty and clashing with period aesthetics.
Tiny gaps, slight undulations, or nail marks aren’t defects as they’re reminders of a floor’s story. Embrace them as signs of authenticity rather than flaws to fix.
Some floors have already been sanded several times over the decades. If your boards are particularly thin or fragile, heavy sanding can cause irreversible damage. Always assess first or seek expert guidance.
When it comes to restoring character-rich floors, the right tools make all the difference.
At Floor Sanders London, we provide high-quality, reliable floor sanding equipment that’s specifically designed for delicate wooden flooring, perfect for heritage home restoration and equally suited to modern wood floors.
Whether you’re working on a listed Georgian townhouse or refreshing Edwardian parquet, our machines are built to handle your flooring with care. From dust-free sanding solutions to a complete sander package ready for any project, we’ve got you covered. For a wide range of project requirements, we have the right set of tools.
If you’re unsure where to begin or need help choosing the best approach for your home, call us on 0208 427 6604 for expert advice.
Prefer us to reach out? Fill out our quick enquiry form, and one of our team members will be in touch to guide you through your project with confidence and care.
Renovating your home is a fantastic way to breathe new life into your living space. Whether you’re updating a single room or giving your entire house a makeover, the right tools can make all the difference in achieving that polished, professional finish. Among the many tools you might consider for your renovation project, a floor sander stands out as an invaluable asset when it comes to transforming tired wooden floors.
But is a floor sander the right tool for your home renovation project? Let’s explore what floor sanders do when to use them, and how they can elevate your renovation results.
A floor sander is a specialised power tool designed to smooth and rejuvenate wooden floors. Over time, wooden floors can accumulate scratches, stains, and wear, making them look dull and lifeless. A floor sander removes the top layer of wood, erasing imperfections and preparing the surface for a fresh finish.
There are several types of floor sanders to suit different needs:
Not every project requires a floor sander, but there are specific scenarios where it’s the ideal choice:
Floor sanders work best on solid hardwood, parquet, and engineered wood (as long as the top layer is thick enough to withstand sanding). If your floors are laminate or heavily damaged, sanding may not be suitable, so always assess your floor’s condition beforehand.
If you’re still on the fence about whether to hire a floor sander, here are some compelling reasons to give it a go:
Using a floor sander can be a game-changer for your home renovation project, but it’s not without its challenges. Before diving in, it’s crucial to understand the potential obstacles and how to overcome them to ensure a successful outcome.
Operating a floor sander effectively takes some practice. While the tool itself is straightforward, achieving a smooth, even finish requires attention to detail and a steady hand. If you’re new to sanding, consider practising on a less visible area before tackling the entire floor.
Dust can quickly become a nuisance if not managed correctly. Many modern sanders come with built-in dust collection systems, but it’s wise to supplement this with:
If using a floor sander feels overwhelming or unsuitable for your project, there are alternative options to explore.
For a hassle-free experience, hiring a professional service is a great option. Professionals have the expertise and tools to deliver flawless results without the risks associated with DIY sanding. While this option may be costlier, it saves time and ensures a polished finish.
If your floors only need minor repairs, consider DIY touch-up kits. These kits typically include everything needed to fill scratches, remove stains, and restore shine without requiring a full sanding job.
Not all floors can be sanded. For example:
Choosing whether to use a floor sander depends on several factors. Here’s how to make the best decision for your renovation.
Inspect your floors carefully. If they’re structurally sound and free from severe damage, sanding could be an excellent option to breathe new life into them. However, floors with significant damage or laminate materials may require alternative solutions.
Ask yourself:
DIY sanding can be cost-effective, but it does require an investment of time and effort. If you’re on a tight schedule or prefer a stress-free process, professional refinishing services might be worth the extra expense.
Think about the final result you want to achieve. If your goal is to completely transform your floors, a floor sander might be the perfect tool. For smaller touch-ups or cosmetic fixes, simpler alternatives could suffice.
A floor sander can be a game-changing tool in your home renovation journey, offering a professional finish and renewed life to your wooden floors. However, it’s essential to weigh the benefits against the challenges, such as the skills required and the time investment.
By preparing properly, following safety guidelines, and choosing the right type of sander, you can achieve impressive results that elevate your home’s aesthetic and value. Don’t forget to consider the importance of sealing your floor after sanding to preserve its beauty and durability.
Ready to tackle your renovation project? At Floor Sanders London, we’re here to make your flooring transformation as smooth as possible. We offer a wide range of top-quality floor sander rentals, perfect for everything from restoring tired hardwood floors to preparing surfaces for a fresh finish.
With our selection of professional-grade sanders, essential tools like belt and drum sanders, and dust management systems, you’ll have everything you need to achieve flawless results. Plus, our affordable rental packages are tailored for both DIY enthusiasts and professionals, making it easier than ever to bring your vision to life. Let us help you get started on creating the floors you’ve always dreamed of!
Explore our complete sander packages to ensure you have everything required for a seamless project. If you’re unsure which sander is right for you, our friendly team is here to help. Call us today at 0208 427 6604 or contact us online with any questions or queries about floor sander rental. Let’s bring your home renovation vision to life!
Have you ever walked into a room with beautifully restored hardwood floors and marvelled at their gleaming perfection? That professional finish might seem out of reach for the average DIY enthusiast, but with the right tools and techniques, you can achieve stunning results on your own. DIY floor sanding is the process of removing the top surfaces of a wooden floor by sanding with abrasive materials. It’s a key step in home improvement that can breathe new life into tired, worn floorboards.
Undertaking a floor sanding project yourself offers numerous benefits. Not only can you save a significant amount of money, but you’ll also gain a sense of satisfaction and pride in your home. Plus, you’ll have complete control over the final look of your floors. While it may seem daunting at first, with proper preparation and a bit of elbow grease, you can achieve professional-looking results.
In this guide, we’ll walk you through the entire process, from preparing your space to applying the final finish.
Getting ready is crucial for achieving top-notch results in DIY floor sanding. Choose the right sanding equipment for the size and condition of your floor, ensuring you’re well-prepared for each stage of the project.
The first step in any floor sanding project is to clear the room completely. Remove all furniture, rugs, and curtains. For items that can’t be moved, such as built-in cupboards or radiators, cover them thoroughly with plastic sheeting to protect them from dust. Don’t forget to remove any nails or tacks from the floor that might damage your sanding equipment.
Before you start sanding, take a close look at your floor. Are there any loose boards that need securing? Are any protruding nails that need to be punched below the surface? How about deep scratches or gouges that might need filling? Addressing these issues before you begin sanding will ensure a smoother process and better results.
For minor repairs, a hammer and nail punch for loose boards, and wood filler for small holes or scratches should suffice. For more significant damage, you may need to replace entire boards. Remember, the time you spend on preparation will pay off in the quality of your finished floor.
Selecting the appropriate sanding equipment is crucial for achieving professional results. There are three main types of sanders you’ll need:
When choosing your equipment, consider factors such as the size of your space, the condition of your floors, and your level of experience. Many DIY enthusiasts find that renting professional-grade equipment offers the best balance of quality and cost-effectiveness.
Achieving a professional finish involves a methodical approach with three main stages: rough sanding, medium sanding, and fine sanding.
The sanding process typically begins with rough sanding. This initial pass removes the old finish, evens out any minor height differences between boards, and deals with surface damage. For most hardwood floors, start with a coarse 24 or 36-grit sandpaper.
When using the drum sander, always keep it moving. Start with the sander tilted back, then lower it gently onto the floor as you move forward. Sand in the direction of the wood grain, overlapping each pass slightly. Be extra careful not to let the drum dig into the floor when starting or stopping.
Once you’ve completed the rough sanding, it’s time to smooth out those coarse scratches with medium-grit sandpaper. This step typically uses 40 to 60-grit paper. The process is similar to rough sanding, but you’ll notice the floor becoming significantly smoother.
Remember to use your edger to sand along the walls and in corners. Match the grit on your edger to that on your drum sander for consistent results.
The final sanding pass uses fine-grit sandpaper (80-100 grit) to achieve a smooth finish ready for staining or sealing. This pass removes the scratches left by the medium grit and prepares the wood to absorb the finish evenly.
Take your time with this step. A thorough job here will result in a more professional-looking final product. Don’t forget to vacuum between each sanding pass to remove dust and loose particles that could scratch the floor.
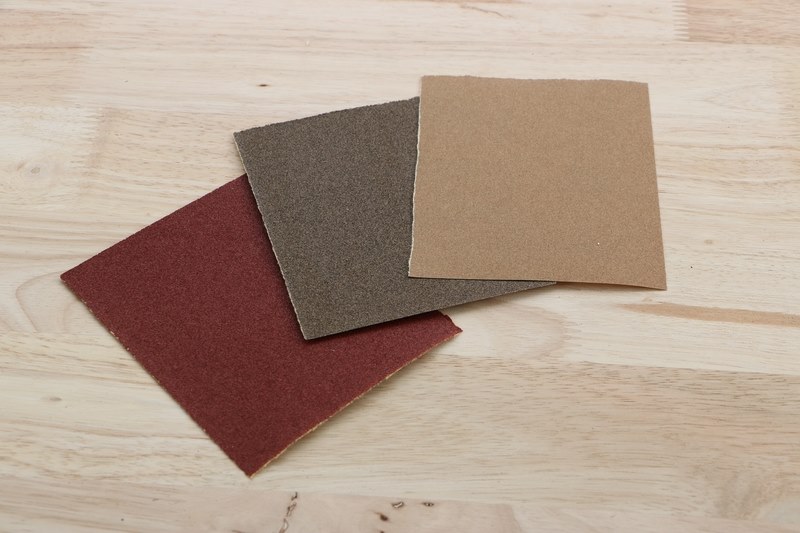
Understanding sandpaper grits is crucial for achieving professional results. Sandpaper grit refers to the size of the abrasive particles on the paper. The lower the number, the coarser the grit.
Different wood types may require different approaches. Softer woods like pine might need you to start with a less aggressive grit to avoid gouging, while harder woods like oak can withstand coarser initial sanding.
As you progress through your sanding, move gradually through the grits. A typical progression might be 36-grit, 60-grit, then 100-grit. This methodical approach ensures a smooth, even finish.
One of the biggest challenges in floor sanding is dust management. Not only can dust be a health hazard, but it can also settle back onto your freshly sanded floor, affecting the quality of your finish.
Using a vacuum attachment with your sander is an effective way to control dust. Many professional-grade sanders come with built-in dust collection systems. If you’re renting equipment, ask about these features.
Proper protective gear is essential. Wear a dust mask or respirator to avoid inhaling fine wood particles. Safety goggles will protect your eyes from both dust and any larger particles that might be kicked up during sanding.
Before you start, seal off the room as much as possible. Cover doorways with plastic sheeting, and close off any air vents to prevent dust from spreading to other areas of your home.
The final steps in your floor sanding project involve cleaning and applying the finish. Taking your time with these finishing touches ensures a durable, beautiful floor that you’ll be proud of.
Once you’ve completed all your sanding passes, it’s time to clean up. Vacuum the floor thoroughly, then go over it with a tack cloth to pick up any remaining dust. Some professionals even recommend using mineral spirits on a cloth to wipe down the floor, which can help reveal any areas that might need extra attention.
Choosing the right finish is crucial for protecting your newly sanded floor and achieving the look you want. There are several types to consider:
Consider factors such as the type of wood, the amount of foot traffic the floor will receive, and your desired sheen level when choosing your finish.
Applying the finish requires patience and care. Use a high-quality brush or applicator, and work in long, even strokes in the direction of the wood grain. Be sure to maintain a “wet edge” to avoid lap marks.
Most finishes require multiple coats, with light sanding between each coat for the best adhesion. Follow the manufacturer’s instructions regarding drying times and recoat windows.
Remember, the key to success to transforming your worn wooden floors, lies in careful preparation, methodical sanding, diligent dust management, and patient application of finish. Don’t rush the process – each step is crucial for achieving that professional-quality result.
While this guide provides you with the knowledge to tackle your floor sanding project, having the right equipment is equally important. That’s where Floor Sanders London comes in. We offer professional-grade floor sanding rental packages that give you access to top-quality equipment without the hefty price tag of purchasing.
Our rental packages include everything you need for your project, from powerful drum sanders and edgers to dust containment systems. Plus, our team of experts is always on hand to provide advice, deliver the package and support, ensuring you have everything you need to achieve those professional results.
Ready to start your floor sanding project? Reach out to Floor Sanders London today. Whether you need equipment, or advice, or just want to discuss your project, we’re here to help. Contact us to book your rental or for more information on how we can support your DIY floor sanding journey.
Have you ever walked into a room with beautifully restored hardwood floors and marvelled at their gleaming perfection? That professional finish might seem out of reach for the average DIY enthusiast, but with the right tools and techniques, you can achieve stunning results on your own. DIY floor sanding is the process of removing the top surfaces of a wooden floor by sanding with abrasive materials. It’s a key step in home improvement that can breathe new life into tired, worn floorboards.
Undertaking a floor sanding project yourself offers numerous benefits. Not only can you save a significant amount of money, but you’ll also gain a sense of satisfaction and pride in your home. Plus, you’ll have complete control over the final look of your floors. While it may seem daunting at first, with proper preparation and a bit of elbow grease, you can achieve professional-looking results.
In this guide, we’ll walk you through the entire process, from preparing your space to applying the final finish.
Getting ready is crucial for achieving top-notch results in DIY floor sanding. Choose the right sanding equipment for the size and condition of your floor, ensuring you’re well-prepared for each stage of the project.
The first step in any floor sanding project is to clear the room completely. Remove all furniture, rugs, and curtains. For items that can’t be moved, such as built-in cupboards or radiators, cover them thoroughly with plastic sheeting to protect them from dust. Don’t forget to remove any nails or tacks from the floor that might damage your sanding equipment.
Before you start sanding, take a close look at your floor. Are there any loose boards that need securing? Are any protruding nails that need to be punched below the surface? How about deep scratches or gouges that might need filling? Addressing these issues before you begin sanding will ensure a smoother process and better results.
For minor repairs, a hammer and nail punch for loose boards, and wood filler for small holes or scratches should suffice. For more significant damage, you may need to replace entire boards. Remember, the time you spend on preparation will pay off in the quality of your finished floor.
Selecting the appropriate sanding equipment is crucial for achieving professional results. There are three main types of sanders you’ll need:
When choosing your equipment, consider factors such as the size of your space, the condition of your floors, and your level of experience. Many DIY enthusiasts find that renting professional-grade equipment offers the best balance of quality and cost-effectiveness.
Achieving a professional finish involves a methodical approach with three main stages: rough sanding, medium sanding, and fine sanding.
The sanding process typically begins with rough sanding. This initial pass removes the old finish, evens out any minor height differences between boards, and deals with surface damage. For most hardwood floors, start with a coarse 24 or 36-grit sandpaper.
When using the drum sander, always keep it moving. Start with the sander tilted back, then lower it gently onto the floor as you move forward. Sand in the direction of the wood grain, overlapping each pass slightly. Be extra careful not to let the drum dig into the floor when starting or stopping.
Once you’ve completed the rough sanding, it’s time to smooth out those coarse scratches with medium-grit sandpaper. This step typically uses 40 to 60-grit paper. The process is similar to rough sanding, but you’ll notice the floor becoming significantly smoother.
Remember to use your edger to sand along the walls and in corners. Match the grit on your edger to that on your drum sander for consistent results.
The final sanding pass uses fine-grit sandpaper (80-100 grit) to achieve a smooth finish ready for staining or sealing. This pass removes the scratches left by the medium grit and prepares the wood to absorb the finish evenly.
Take your time with this step. A thorough job here will result in a more professional-looking final product. Don’t forget to vacuum between each sanding pass to remove dust and loose particles that could scratch the floor.
Understanding sandpaper grits is crucial for achieving professional results. Sandpaper grit refers to the size of the abrasive particles on the paper. The lower the number, the coarser the grit.
Different wood types may require different approaches. Softer woods like pine might need you to start with a less aggressive grit to avoid gouging, while harder woods like oak can withstand coarser initial sanding.
As you progress through your sanding, move gradually through the grits. A typical progression might be 36-grit, 60-grit, then 100-grit. This methodical approach ensures a smooth, even finish.
One of the biggest challenges in floor sanding is dust management. Not only can dust be a health hazard, but it can also settle back onto your freshly sanded floor, affecting the quality of your finish.
Using a vacuum attachment with your sander is an effective way to control dust. Many professional-grade sanders come with built-in dust collection systems. If you’re renting equipment, ask about these features.
Proper protective gear is essential. Wear a dust mask or respirator to avoid inhaling fine wood particles. Safety goggles will protect your eyes from both dust and any larger particles that might be kicked up during sanding.
Before you start, seal off the room as much as possible. Cover doorways with plastic sheeting, and close off any air vents to prevent dust from spreading to other areas of your home.
The final steps in your floor sanding project involve cleaning and applying the finish. Taking your time with these finishing touches ensures a durable, beautiful floor that you’ll be proud of.
Once you’ve completed all your sanding passes, it’s time to clean up. Vacuum the floor thoroughly, then go over it with a tack cloth to pick up any remaining dust. Some professionals even recommend using mineral spirits on a cloth to wipe down the floor, which can help reveal any areas that might need extra attention.
Choosing the right finish is crucial for protecting your newly sanded floor and achieving the look you want. There are several types to consider:
Consider factors such as the type of wood, the amount of foot traffic the floor will receive, and your desired sheen level when choosing your finish.
Applying the finish requires patience and care. Use a high-quality brush or applicator, and work in long, even strokes in the direction of the wood grain. Be sure to maintain a “wet edge” to avoid lap marks.
Most finishes require multiple coats, with light sanding between each coat for the best adhesion. Follow the manufacturer’s instructions regarding drying times and recoat windows.
Remember, the key to success to transforming your worn wooden floors, lies in careful preparation, methodical sanding, diligent dust management, and patient application of finish. Don’t rush the process – each step is crucial for achieving that professional-quality result.
While this guide provides you with the knowledge to tackle your floor sanding project, having the right equipment is equally important. That’s where Floor Sanders London comes in. We offer professional-grade floor sanding rental packages that give you access to top-quality equipment without the hefty price tag of purchasing.
Our rental packages include everything you need for your project, from powerful drum sanders and edgers to dust containment systems. Plus, our team of experts is always on hand to provide advice, deliver the package and support, ensuring you have everything you need to achieve those professional results.
Ready to start your floor sanding project? Reach out to Floor Sanders London today. Whether you need equipment, or advice, or just want to discuss your project, we’re here to help. Contact us to book your rental or for more information on how we can support your DIY floor sanding journey.
Once you’ve finished sanding your project, you may notice that the edges are still a bit rough or uneven. This is especially common when sanding a wood floor, as the grain can cause the sandpaper to create different textures on the surface. To create a more finished and professional look, it’s important to blend the edges after sanding.
There are a few different ways to blend edges after sanding, but the most common method is called feather sanding. This technique involves using a sanding block or sandpaper to lightly sand the edge of the project, moving towards the centre of the surface. The goal is to create a smooth transition between the edge and the rest of the project.
If you’re working with a large project, you may want to use a power sander to feather the edges. However, be careful not to over-sand, as this can damage the surface. The perfect floor sander for this job is a floor edger.
A floor edger is a power sander that is specifically designed to sand the edges and corners of a room. Floor edgers are typically smaller and more lightweight than other types of floor sanders, making them easier to manoeuvre in tight spaces.
Floor edgers typically have a rotating sanding disk that is attached to a long handle. The disk is positioned at a slight angle to the floor, so that it can sand the edge of the room without damaging the baseboards.
Floor edgers are used in conjunction with other types of floor sanders, such as drum sanders and orbital sanders. Drum sanders are used to sand the main area of the floor, while orbital sanders are used to sand smaller areas and smooth out any rough patches.
Floor edgers are an essential tool for refinishing hardwood floors. They allow you to create a smooth and even finish on the edges of the room, which is important for achieving a professional-looking result.
To use a floor edger, start by sanding the perimeter of the room. Position the sanding disk against the baseboard and slowly move the edger forward. Be careful not to press too hard, as this can damage the baseboard.
Once you have sanded the perimeter of the room, you can start sanding the corners. To do this, position the sanding disk in the corner of the room and slowly move the edger back and forth. Be careful not to sand too much in one spot, as this can create a dip in the floor.
Once you have sanded the entire perimeter of the room, you can use a drum sander or orbital sander to sand the main area of the floor. Once you have finished sanding the entire floor, you can apply a coat of stain or sealant.
Once you’ve blended the edges of your project, you can finish it off with a coat of paint, stain, or sealant. This will help to protect the surface and give it a polished look.
Looking to use a power tool for your blending job? Hire a floor sander today to help make your sanding project faster, easier and more efficient. Contact Floor Sander Hire today to find out more.
Parquet floors are a beautiful and timeless addition to any home. However, over time they can become scratched, stained, or faded- none of which is good news for your home. If you’re looking to restore your parquet floor to its former glory then sanding is the first step.
Sanding a parquet floor can be a daunting task, but it’s not impossible and you can do it yourself with the right tools and techniques.
Here’s a step-by-step guide on how to sand a parquet floor:
Before you start sanding a parquet floor, you need to make sure the floor is clean and free of debris. Remove any furniture, rugs, or other objects from the room. Sweep or vacuum the floor, and then wipe it down with a damp cloth.
If there are any loose or damaged tiles, you’ll need to repair them before you start sanding a parquet floor. Use a wood glue to secure the loose tiles and then sand the repaired areas smooth. You might want to contact a professional for this depending on how confident you are.
The grit of the sandpaper you use will depend on the condition of your floor. You’ll need to start with a coarse grit such as 36 or 40 for a heavily worn floor. A medium grit sandpaper such as 60 or 80 will most likely be suitable for a less damaged floor.
Start by sanding in the direction of the grain, working your way from the centre of your room towards the edges. Use a drum sander for the large areas of the floor, and an edge sander for the edges and corners. Be sure to wear a dust mask to protect yourself from the dust.
Once you’ve finished sanding a parquet floor with coarse grit sandpaper, you’ll need to repeat the process with a medium grit sandpaper, and then a fine grit sandpaper. This will help to create a smooth, even finish.
Once you’re satisfied with the sanding, you can finish the floor with a stain, varnish, or polyurethane. Be sure to follow the manufacturer’s instructions for the best results.
Sanding a parquet floor is a time-consuming process, but it’s worth it to get a beautiful, restored floor. If you’re not comfortable doing it yourself, you can always hire a professional floor sander.
With a little care and effort, you can sand your parquet floor and enjoy its beauty for years to come.

Here are some additional tips on sanding a parquet floor to ensure that you get the best possible finish:
With a little care and effort, you can sand your parquet floor and enjoy its beauty for years to come.
Now that you know how to sand a parquet floor, it’s time to begin your project. If you’re interested in floor sander hire, please get in contact with Floor Sander Hire today. We’ll be happy to help you choose the right sander for your project and answer any questions you have about our floor sanding solutions.
Floor sanding is a common woodworking task that is used to smooth and prepare surfaces for finishing. However, traditional sanding methods can produce a lot of wood dust, which can be harmful to the health of the sander and people in the surrounding area. Dust free sanders offer a valuable solution to this problem as they minimise the amount of dust produced. Here, we’re going to show why you should consider using a dust free sander for your next project.
Dust free sander offers a number of benefits, including:
If you are planning to sand a surface, it is important to consider using a dust free sander. This will help to protect your health and the health of those around you, and it will also help to create a cleaner, safer work environment.
The main health risks associated with wood dust include asthma, occupational asthma, lung cancer, rhinitis, dermatitis, and eye irritation. The risk of developing health problems from wood dust exposure is higher for people who work in woodworking or other industries where they are exposed regularly. However, even people who only do occasional woodworking can be at risk of certain illnesses, especially if they are not taking steps to reduce their exposure.To reduce the risk of health problems from wood dust exposure, it is important to take steps to control the dust, such as using a dust mask, vacuuming up dust regularly, and wet sanding whenever possible. If you are concerned about your exposure to wood dust, talk to your doctor.
If you are looking for professional dust free sander hire in London, please contact Floor Sanders London today. We use the latest dust collection technology to ensure that your home or workplace is left clean and dust free after the sanding is complete.To learn more about our services, why not contact Floor Sander Hire today? We would be happy to answer any questions you have and help you to choose the right dust free sanding solution for your needs.
There’s a certain allure to the natural beauty of wood that makes it a timeless choice for various woodworking projects. Whether you’re refinishing furniture, crafting a new piece, or working on a wooden floor, achieving a flawless and long-lasting finish relies heavily on ensuring you prepare wood before staining.
Before diving into the preparation process, take a moment to inspect the wood surface thoroughly.
It’s essential to determine whether the wood has been previously stained, painted, or coated with a finish. Stains and paints can hinder the absorption of the new stain.
Carefully examine the wood for any cracks, scratches, or dents that could affect the final result. Unaddressed damages may become more pronounced after staining and make for a poor overall finish.
You can anticipate potential challenges and address them proactively by thoroughly assessing the wood surface. This not only saves you time and effort but also ensures a more satisfying end result.
Sanding is a crucial step in preparing wood for staining, as it helps achieve a smooth and uniform surface that allows the stain to penetrate evenly. However, it’s essential to understand the right sanding techniques and the appropriate grit range for different wood types to achieve the best results.
Wood can be susceptible to various blemishes like dents, scratches, or stains that can mar its appearance. For minor dents filler and sanding can work. Superficial scratches can often be remedied by sanding the affected area with a fine-grit sandpaper.
Thoroughly cleaning the wood surface before staining is vital to achieve a smooth and flawless finish. Dust, debris, and contaminants can negatively impact stain adhesion and lead to uneven coloration and an unsatisfactory outcome. A clean wood surface not only enhances stain absorption but also allows the wood’s natural beauty to shine through, resulting in a stunning and professional finish.
“Popping” the wood grain is a technique that involves wetting the wood surface with a damp cloth before applying stain. This method helps enhance the absorption of the stain, allowing it to penetrate the wood more effectively and achieve a more even coloration. Pores in the wood open up when damp, which in turn allows the stain to seep in and bring out the natural grain patterns.
Applying the stain to the prepared wood surface is an important step in achieving the desired finish. Start by thoroughly mixing the stain according to the manufacturer’s instructions. Using a brush, cloth, or applicator pad, apply an even coat of stain in the direction of the wood grain. Take care to avoid drips or pooling, ensuring a smooth application.
After applying the stain, it’s crucial to allow it to dry properly before proceeding with any protective finishes, such as varnish or polyurethane. Avoid rushing the process to ensure the stain sets evenly and enhances the wood’s natural beauty. When it’s time to apply the protective finish, use a clean brush or applicator pad and work in smooth, even strokes following the wood grain.
Proper cleanup after staining is essential to maintain a pristine workspace. Dispose of used materials responsibly and clean brushes, applicators, and any spills promptly. To preserve the stained wood’s appearance and longevity, practise regular cleaning with a soft cloth and mild, non-abrasive cleansers.
Now that we’ve covered how to prepare wood before staining, it’s time to get to work. Rent our top-notch dust free and regular sanders today for flawless projects. Need assistance or have queries? Contact us now and let’s transform your floor sanding project together!
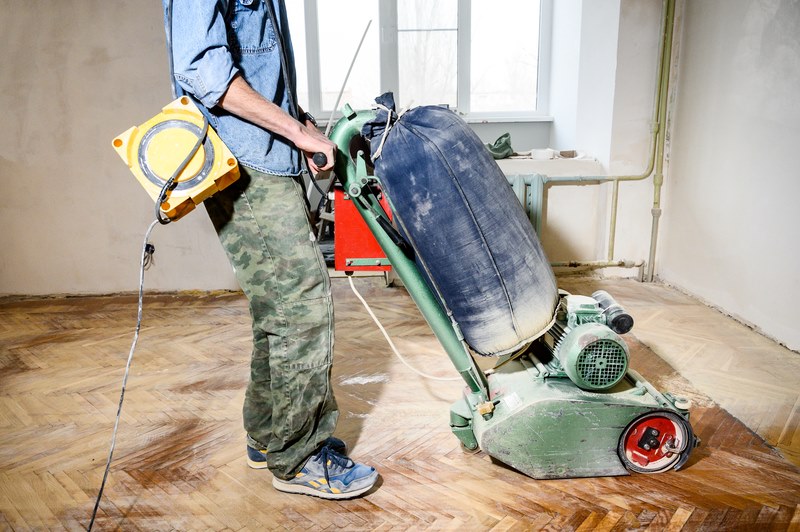
If you have wooden floors, they can easily become scratched or damaged, so it’s important to keep them well-sanded and finished to maintain their condition. Floor sanding is especially important when it comes to gym floors. A gym will experience lots of wear and tear due to people wearing shoes on the floor, dropping weights, and moving heavy gym equipment.
(more…)When it comes to getting the perfect finish on floorboards, there’s no substitute for a professional-grade floor sander. But with so many different types of sanders and papers out there, it can be daunting trying to figure out which one is right for the job. There are a few things you should know first before you consider floor sander hire.
When it comes to choosing a floor sander, there are many different types available and it can be hard to know which one is best for you. If the options are drum vs belt sanders, for instance, drum sanders are usually more powerful and can cover a larger area in less time. On the other hand, belt sanders offer more control and they’re better suited to detailing work on hardwood floors. At Floor Sanders London we offer both types of sanders, so you can be sure to choose the right one for your job.
The grit number of sandpaper you use when sanding your floorboards is incredibly important. The correct grit will depend on what type of finish you’re aiming for and how much prep work you need to do. If the boards have been sanded before, then a finer grit paper can be used. However, if they’re brand new or haven’t been sanded in a while, then it is best to start with a more coarse paper such as 24 grit. Starting with this will ensure all dirt and old varnish is removed, resulting in a much better finish – not to mention that using a finer grit could end up costing more in the long run as you’ll need to buy more paper.
When sanding your floors, it’s important to remember to protect yourself from the dust and debris that will be created. Make sure you’re wearing an appropriate face mask, safety goggles and ear plugs to prevent any health problems arising from the dust. It’s also important to wear old, comfortable clothing as the dust will stick to any exposed skin causing irritation.
When rental, you should find out how to use a sander safely and correctly. Before operating the machine, make sure you understand all the safety instructions and read up on any other information that may be relevant. Remember, it’s not just about getting a great finish – it’s also important to stay safe while using these powerful machines!
It’s essential to choose a company that will provide you with quality machines and services. Floor Sanders London has been providing floor sander hire for many years and we’re proud to be trusted by our customers. We provide everything you need for a successful project, from the correct sandpaper and dust bags to safety gear and detailed instructions on how to use the machines.
If you’re looking for a dependable and quality floor sander rental service, then look no further than Floor Sander Hire London. We offer a wide range of sanding services for both residential and commercial properties, from spot repairs to full-scale sanding projects.
Visit our website today for more information on what we offer and contact us to get your project off the ground.
If you’re thinking of giving your beautiful wood floor a spruce up with a new wood stain, or you’d just like to remove some of the chips and damage that have been created over the years, then floor sander hire is likely to be next on your agenda. There are a couple of different types of wooden floor sanders, so it’s essential to understand which is best for you. So, let’s take a look at the differences between two of the most common and put them head to head in our orbital floor sander vs. drum sander guide.
An orbital floor sander is great for removing the top layers of a wooden floor and any varnish that’s left over. They’re a great option if you just want to refinish your floor and repair any unsightly chips or scrapes that have developed over time.
These orbital sanders work best for this because they work to remove small layers at a time. This way there’s less chance of damaging your floor. If you start to go too deep, you won’t cause an obvious dip in the wood and can even out the floor easily.
These sanders are also a great option for smaller projects and people who are new to sanding. They’re very forgiving and are the safest option to get started on your DIY project.
However, they do take much longer to complete a whole floor. If it’s speed you’re looking for, then an orbital sander might not be right for you.
A drum sander is much rougher than an orbital sander. This means that they take off thicker layers of wood. They’re great for floor levelling tasks, or tasks that require you to remove coats of varnish quickly.
Because these sanders use a cutting motion, rather than the grinding motion of the orbital sander, you will get the job done more quickly. However, there’s more chance that you could damage the floor if you go too deep.
It’s also difficult to use a drum sander against the grain, as it can cause greater damage to the wood.
Depending on your project, it’s essential to look at the pros and cons of using a drum or orbital floor sander. The option you choose to complete your DIY could completely change the final result.
A drum sander is the fastest way to get a job done. You’ll be able to level out floors in no time. They’re best used for larger jobs by an experienced sander. While they are fast at getting the job done, they can make it easier to make a mistake and cause damage to your floor by sanding too deeply. Make sure you always sand with the wood grain and be careful how many layers you’re cutting off.
An orbital sander is a great option for smaller, lighter jobs just to grind away the top few layers if you’re planning to re-varnish. They’re the best option for people who aren’t experienced in floor sanding as they are generally easier to use. However, they can take a long time to get the desired effect. An orbital sander is also physically smaller, meaning that it can get closer to walls and corners and is the lightest and most cost-effective option.
If you’d like to freshen up your floor, Floor Sanders London has a range of quality floor sanders for hire. We specialise in providing top-quality machinery and equipment for hire at a fraction of the purchase price.
For support and guidance on achieving the perfect wooden floor with floor sander hire, contact us today!
Copyright © 2026. Floor Sander Hire All Rights Reserved. Website & SEO by Loop Digital.