Redecorating is a more difficult task than people imagine; you might spend hours on a task but it doesn’t quite turn out as you expected. If you’re sanding and repainting a wooden floor or upcycling your old wooden furniture, then wood primer is your friend. It will help you to get that professional look with minimal effort. However, knowing how to apply primer on wood is the key to getting a great finish.
Applying primer to wood helps to hide any cracks, knots, or imperfections, making your design a little more pleasing to the eye. Applying wood primer also gives you the ideal base for paint. It protects your wood with a seal, meaning that your paint doesn’t soak in and you’ll achieve a brighter colour. It also stops paint absorption from expanding your wood and ruining your design.
It’s obvious that primer is the way forward. But first, it’s essential to find out how to apply primer on wood correctly to get the best finish.
To begin with, you need to remove any old varnish or primer. Floor sander rental London is a great option to get a short-term floor sander. Simply sand away the top layer of your wood, then wipe away any excess dust with a damp cloth. Don’t leave your surface wet though. It will need to be fully dried before you apply your primer.
When you purchase a good primer, make sure you check out exactly how much you’ll need to cover the area. You should complete the job in one go to avoid your floor looking uneven later, so you don’t want to run out.
When you open the primer, you must give it a good mix. In the tin, the water will rise to the top and separate from the oils. If you don’t mix before you apply your primer, it will be too thin and get gradually thicker as you use more. You need an even consistency.
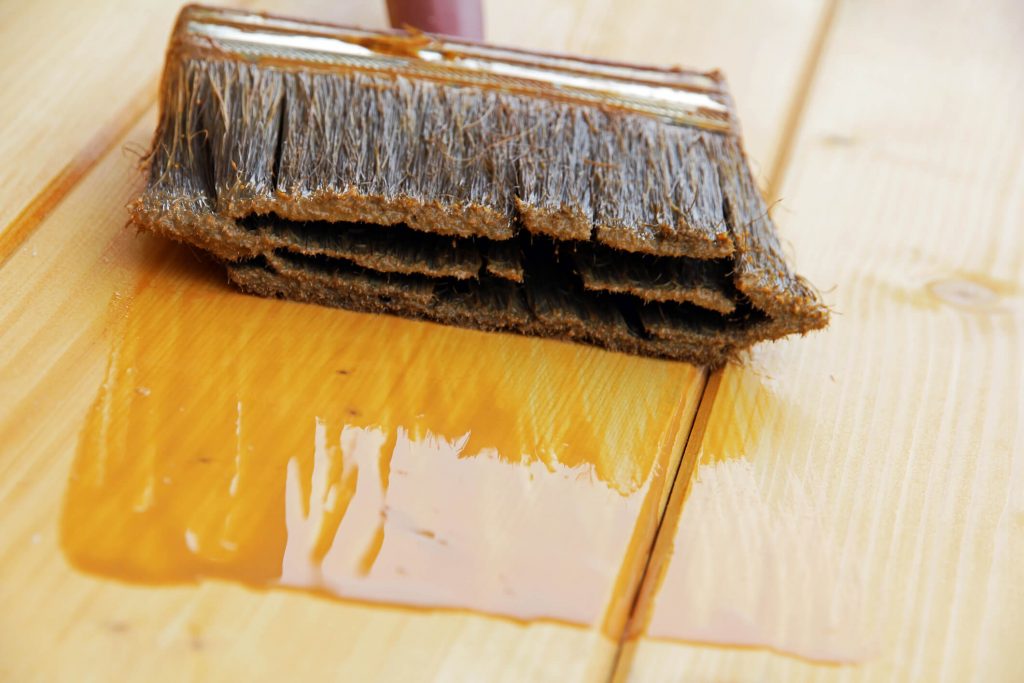
Depending on your area, you can either use a brush, a roller, or a spray paint gun to apply your primer. It’s the quickest and easiest to use a spray paint gun. However, this is likely to use much more primer and you will need to pay close attention to areas that might have a thinner layer. Make sure it’s evenly spread.
You should wait for 6-8 hours before applying any varnish or paint to your primer. It should be completely dry and not sticky. This makes it easier to apply anything on top and also means that you’ll have a smooth finish later.
If you want to paint the wood, then a second coat of primer is absolutely necessary.
In this case, sand the primer using sandpaper, remove the dust, and repeat the same process – again waiting up to 8 hours before applying any paint or varnish.
At Floor Sanders London, we offer a range of floor sanders to help you transform your wooden floors quickly and easily, with a professional finish. Hiring a floor sander means having the highest quality equipment for a fraction of the cost. Once you’ve finished your job, we’ll collect the sander and you’ll be left with perfect results.
For reliable floor sander rental in London, contact us today!
So, you’ve got a beautiful piece of furniture but you think it needs a bit of TLC. Well, if you are wanting to paint or stain your wood, then you’ll need a smooth finish. This is where sanding comes in. Sanding will remove all the roughness of the wood, creating a nice, smooth piece of furniture ready to decorate however you please. This guide will be the perfect tool for you while you learn how to sand furniture.
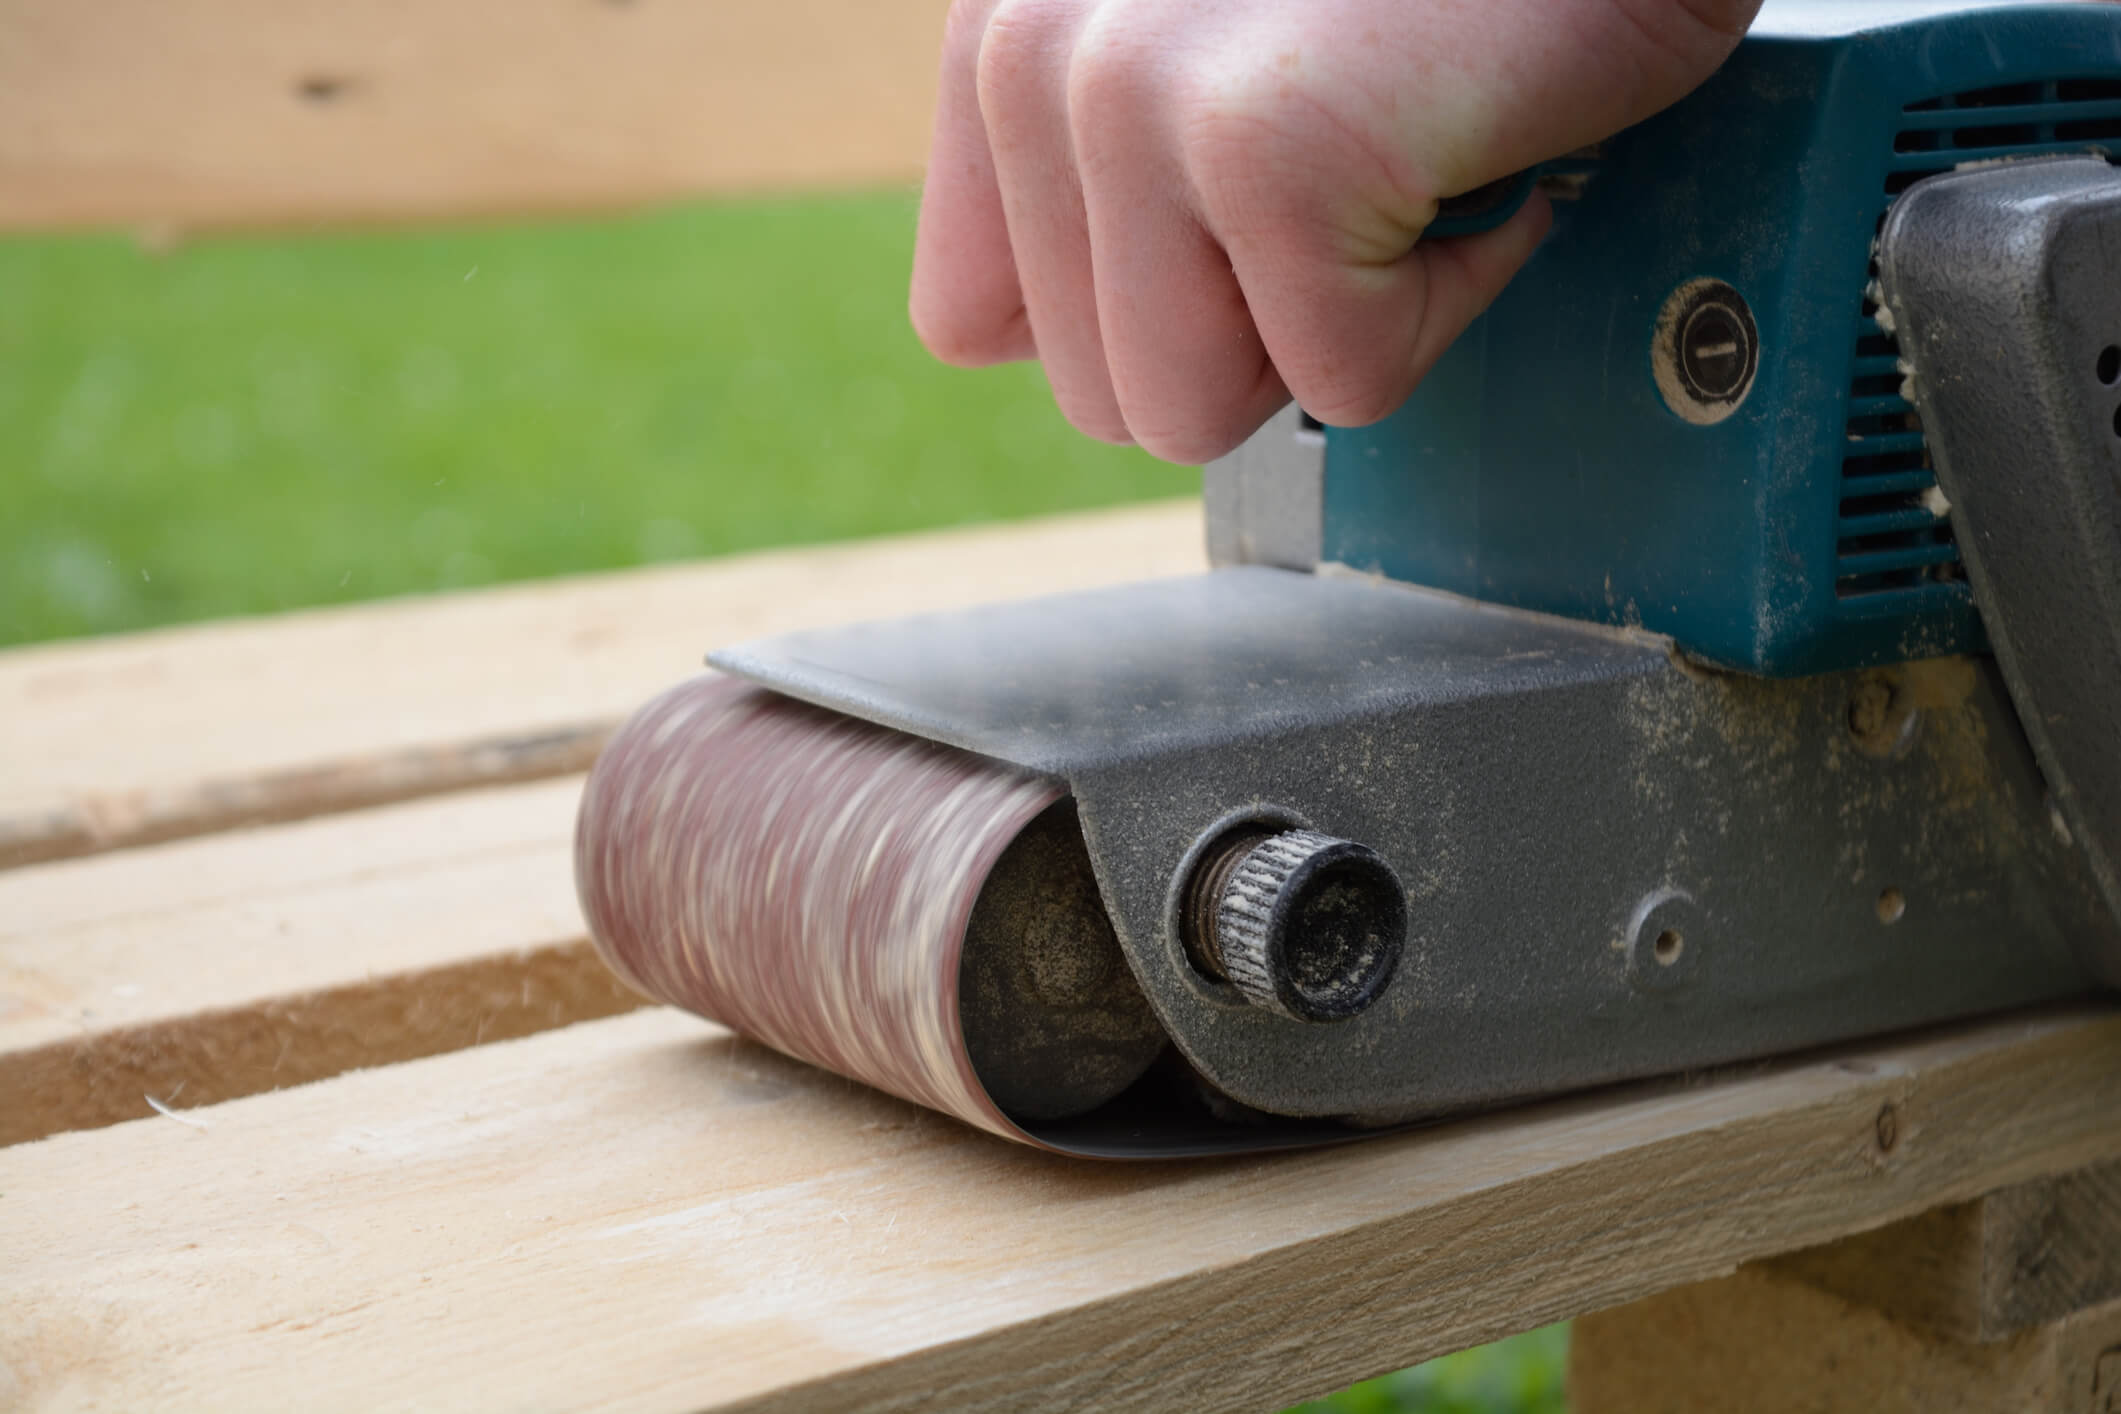
When it comes to your project, using the right type of sander will have a big impact. There are four main types of sanders used:
Deciding between these options can feel overwhelming, especially for someone who is new to woodworking and learning how to sand furniture. For you, the best option to choose would be an orbital sander. This is due to its ability to work large areas and reach a smooth finish while also being a safer and easier tool to get the hang of.

Depending on what you are sanding, the type of sandpaper you use holds a crucial role. There are four types of sandpaper, each with different grits to achieve a different finish:
Once you’ve picked the right sander and sandpaper for your project, it’s time to get work. Turn the sander on and begin. Don’t rush this step though, it’s best to go nice and slowly when sanding or you may create a swirling effect. Don’t press down on the sander or push it hard. Make sure to move the sander with the wood grain to create a more natural look and prevent scratches in the wood.
If you do develop a swirling effect, don’t panic. This is simple to fix – all you need to do is change to a finer grit and go over the problem areas until its nice and smooth.
When it comes to sanding your furniture and you don’t have the correct sander, then Floor Sanders Hire is the team for you. Contact Floor Sanders Hire today, and they can supply you with top of the range sanding tools and equipment and provide professional and friendly advice to any sanding novice.
One of the most common issues we hear from inexperienced DIYers is that ‘my sanding belt keeps breaking’.
Sanding belts should last around 12-18 months if they’re used constantly. Though a hire company will check that your sander is in perfect working order for your before it leaves their warehouse.
If you notice that your sanding belt keeps breaking, it could be down to a number of things.
If your sanding belt keeps breaking, it could be down to a manufacturing defect. If the manufacturer hasn’t had the belt at the right temperature for the glue to set or tape to cure, then it may not be as strong as it should be.
The belt also needs to be scuffed properly prior to glueing to ensure strong adhesion. If this process wasn’t carried out correctly, your belt could be weaker than it should be.
If you notice this happen to belts from the same manufacturer, then it could be an issue with their quality assurance.
If you notice your belt popping off regularly, it could be because there is too much of the material that you’re sanding getting into the machine. If large particles get caught up in the machine it can put a lot of pressure on the belt. This will eventually wear it down and cause it to snap.
Storage is essential when it comes to keeping your belt in good condition. If the sander is stored where there is excessive moisture or condensation, or its exposure to extreme cold or heat, this can affect the pliability of the belt. This will cause it to become brittle and be prone to breaking or crumbling.
There are several different types of belts and it’s essential that you find the right one to suit your needs. Paper backed belts provide a smoother finish than cloth backed belts but are much more delicate. If you’re sanding metal rather than wood, then a cloth backed belt will be required to prevent the belt from snapping.
You should also ensure that you’re using the right pressure for the type of belt you have. Putting excess pressure onto your belt can lead to tearing, folding or joint failure. Depending on the type of belt you’re using, this is the maximum pressure you should apply:
If you’d like to find out more about why your sanding belt keeps breaking or need professional sanding advice, Floor Sanders London can provide expert guidance and support. They hire out the best quality sanders, fully safety checked to help you give your home that extra shine. Contact Floor Sanders London today to receive a quote and specialist sanding advice.
Floor Sander Hire Co helps homeowners to spruce up their wooden floors without the hassle or mess. Their expertise spans over 30 years, where they have helped thousands of customers to restore the beauty of their wooden floor by hiring out premium floor sanding machines from the highest quality manufacturers.
The team are always on hand to provide expert advice and reassurance to those new to floor sanding and offer the very best rates along with health and safety tips to keep your sanding experience running smoothly.
Floor Sander Hire have lots of amazing reviews and referrals to support their excellent customer service and top-of-the-range equipment.
Their 30 years of experience in the trade, still owned and managed by the original founders, has given them the best insider knowledge on products that will deliver the most amazing results, which you can get at a fraction of the cost of purchasing.
The friendly and helpful team are also always happy to discuss the products and resolve any issues or concerns.
Keeping your floor looking and feeling new is a massive part of your home décor upkeep. Over time, a varnished floor may acquire cracks or chips, especially if you have a home with small children or pets, where accidents and claws can create scratches easily.
Depending on the location of the floor, certain areas can also get bleached by the sun in hot weather, meaning that one side of the room may appear a little lighter than the other.
To rectify these issues, sanding the top layer off the wood can remove the varnish along with any damage, leaving a clean canvas again for you to recondition your floor.
Floor sander hire is an excellent option if you’re planning to sand your floor back to health. It provides a range of benefits which buying a floor sander may not offer:
The cost to hire a floor sander is minimal in comparison to buying one of your own. This means that you get the same experience with a top-quality product for less money.
It’s often impractical to store such a large piece of equipment all year round, especially if you know you’ll only use it once in the year. Floor sander hire means that you can use the sander as normal, then give it back when you don’t need it, saving you lots of space in your garage.
Floor sander hire also comes with the support from DIY experts. The team at Floor Sander Hire Co are well versed in all their products and can talk you through the process when you decide to hire. This means that you aren’t left trying to decipher complex instructions.
Often, floor sander hire comes with the right health and safety equipment too, giving you a steer on what you need to do to keep yourself and your family safe during the sanding process.
If you’d like to restore your floor to its original beauty, reach out to Floor Sander Hire today for a quote and advice from the dedicated team.
Wood floors are beautiful and can add limitless character to any room. However, in order to stay looking their best they need to be maintained over time . This includes re-sanding and finishing from time to time, especially if you start to notice things like scratches, dullness, fading, and general wear and tear.
(more…)If you have wooden floors, it’s important to take care of them and treat them regularly. This is to keep them looking new for longer, meaning that you’ll have less maintenance or replacement costs in the long run.
Sanding a wooden floor is a way to remove old wear and tear from your floor and restore it to its former glory without having to pay out lots of money on repairs or replacements.
If you live in a household with children or pets, then it’s inevitable that your wooden floor will develop scratches and imperfections from toys or claws.
Wooden floors in high traffic areas are also likely to develop scratches due to people walking in heels or simply due to furniture, such as dining chairs, being moved across it.
These imperfections don’t necessarily mean that you need to replace the floor though. A simple sanding could solve the problem for you.
Varnishing a floor can give it a whole new lease of life. But you shouldn’t put new varnish on top of old varnish. This can create a fake, shiny look and develops an extra layer of varnish that may show scratches more in the future.
Instead, you should sand off the old varnish first. Sanding the old varnish and removing the very top layer of wood removes the scratches and scrapes.
When you varnish over the top of your newly sanded floor it’ll look like a brand new one. You’ll have a new sparkling floor at half the cost of buying a new one and with much less stress and upheaval.
If you’re not happy with the colour of your wood, sanding can also be an option before staining to get the exact right colour to match your décor.
Some woods may come with slight imperfections to begin with. Real wood is likely to have knots and places where the floor isn’t quite even. That’s part of its charm.
However, with wooden floors that aren’t perfect to begin with, splits and changes can start to occur as the wood settles into your home.
Sanding the top of the wood can prevent these issues from growing. The longer you leave imperfections in the wood, the worse they’ll get over time, meaning you’ll have no choice but to replace.
Opting for floor sander hire and taking care of the problem at the source will help you maintain your floor’s integrity.
With real wood flooring, you can’t ever guarantee that the floor will be perfectly even, because trees aren’t even. But the last thing you want in your home is a sloping floor.
The solution to this problem is floor sander hire. Hiring a floor sander for a few days and sanding off the top layer of your floor will ensure that it’s perfectly even before you varnish.
Floor Sanders London hires out top quality floor sanders for this very purpose. Their team of professionals can talk you through the process, give advice and support and have your wooden floor fixed up in no time.
Contact Floor Sanders London today to hire a top of the range floor sander!
Floor sanding removes the top surfaces of a wooden floor by sanding it with abrasive materials – normally using a floor sander. It is a great way to improve the appearance of your floor as it removes stains and other imperfections such as scratches. Sanding also makes your floor smoother which makes it easier to clean.
Once you have sanded your wooden floor back to its beautiful state, it is important to seal it to protect it from future damage. There are many different types of wooden floor sealants available on the market, so it can be difficult to decide which one is the best for your needs. In this blog post, we will discuss the pros and cons of different types of sealants and give you some floor care tips.
There are many different types of sealants you can use for floor restoration, each with their own advantages and disadvantages. Here are some of the most popular types of sealants:
So, which type of sealant is right for you? It depends on your needs and preferences. If you are looking for a durable sealant that will provide good protection against scratches and stains, polyurethane may be the best option for you. If you are concerned about water damage, a penetrating sealer may be a better choice. And if you want an easy-to-apply sealant that does not need to be reapplied often, wax may be the best option for you.
Once you have chosen the right sealant for you, you can finish off your floor maintenance efforts by following these simple steps:
Sealing your wooden floor is a great way to protect it from damage and keep it looking its best. You can browse our selection of quality sealants and accessories to perfectly finish and care for your wooden floors. Or if you are looking to start the restoration of your wooden floor then check out our floor sander packages that supply you with everything you need.
There’s something about wood floors that just oozes warmth, sophistication and refinement. Whether you’re aiming for a classic or contemporary look, wooden flooring is always a timeless choice. And with so many different design options available, it’s easy to find a style that suits your taste.
If you’re looking for a classic look, herringbone or chevron patterns are always a safe bet. For something more modern, opt for wider planks in a light finish. Or for a truly unique design, try incorporating different wood types into your flooring.
Whatever your personal style, there’s a wood floor design to suit you. Are you wondering what the best patterns are? Keep reading to discover the top wooden floor patterns.
There’s nothing like the look and feel of a wood floor. And when it comes to wood flooring patterns, the sky’s the limit. Here are some popular wood floor design options:
One popular option is the chevron pattern. This V-shaped design is created by laying planks of wood at an angle, resulting in a strikingly geometric look. Chevron patterns can be used to create a focal point in a room, or to make a space appear larger or wider.
Another popular option is the basket weave pattern. This design is created by laying alternating planks of wood in a criss-cross formation. The result is a textured look that adds visual interest to any space. Basket weave patterns are often used in formal spaces, such as living rooms and dining rooms.
For a more contemporary look, opt for a herringbone pattern. This zig-zag design is created by laying planks of wood at a 45-degree angle. Herringbone patterns are often used in modern spaces, such as kitchens and bathrooms.
If you’re looking for a more traditional wood flooring option, the plank is the way to go. This design is created by laying planks of wood parallel to each other. Plank patterns are often used in formal spaces, such as living rooms and dining rooms.
If you’re looking for a truly unique wood flooring design, try incorporating different wood types into your flooring. This can be done by using different colours of wood, or by using different woods with different grain patterns.
No matter what your personal style, there’s a wood flooring pattern to suit you. These are some of our personal favourites and most coveted types of patterns, but there are endless possibilities when it comes to wood flooring patterns. So get creative and have fun!
Just remember to keep your beautiful new wood flooring looking its best with regular maintenance. To keep the fresh new look of your wood floors, be sure to vacuum or sweep them regularly. Also make sure you sand and refinish them every few years to keep them looking like new.
At Floor Sanders London, we have a wide range of floor sanders for hire, which are perfect for keeping your wood floors looking their best for years to come. Simply hire the equipment you need and you’ll be able to sand and refinish your floors in no time!
There are many different types of wood, and each one requires a certain level of maintenance. While some woods can be left unpainted or untreated, others require a lot more care. Keep reading to find out more about how to sand your wooden flooring.
Many different types of wood can be used for wooden flooring, including:
All of these types of wood create beautiful flooring, but they all require different levels of maintenance. It’s important to know how often you will need to use a floor sander to keep it looking its best.
Each type of wood requires a different level of maintenance, so it’s important to know how often to sand it. Generally, softwoods should be sanded every few years, while hardwoods should be sanded every five to ten years. However, this can vary depending on the type of wood and the conditions it is exposed to.
Here is a timeline of when you should sand different types of wood:
It is important to keep in mind that when using floor sanders, you must use the right type of sandpaper for the type of wood you are sanding. At Floor Sanders London, we can help you choose the right floor sander as well as grit of sandpaper for your needs! Simply give us a call today on 0208 427 6604 or visit our contact page to submit an enquiry form.
When installed properly and with care, wooden flooring can look elegant, tasteful, and timeless, but what are the best woods for wooden flooring, and how easy is it to maintain them? Let’s explore the best cuts of wood suitable for flooring and the easiest and best ways to keep your wooden flooring clean and shiny.
There are plenty of options to choose from when deciding on wooden flooring. You can pick from a selection of finishes, colours, and grains, depending on what vibe you’re aiming for. Durable woods such as maple, cherry, and oak are the best in terms of durability. This means they’re a smart choice for areas that will see a lot of footfall, however, they are also some of the most expensive.
Among the more affordable options are bamboo and pine but they do mark more easily. When high-quality wooden flooring is installed correctly, with a little regular maintenance, you can ensure your floor keeps its quality for years and years. You can also always sand, refinish, and paint the wood to get your floor looking brand new again. It’s important to note that how often you need to use floor sanding tools will depend on which type of wood you opt for.
It’s all very well having half a dozen names for types of wood thrown at you, but to choose wooden floor wisely, you need to know the advantages and disadvantages of each type of wooden flooring:
Oak is one of the most popular types of hardwood flooring because of its durability to marks and scratches. It’s low maintenance, long-lasting, and is a common choice for people who prefer a more luxurious type of flooring.
Another popular choice is cherrywood due to its elegant and timeless appearance, that’s associated with naturally dark hues and a sanded finish. Cherrywood also darkens as time passes so is not a good option for people who prefer a lighter colour of flooring. This type of hardwood flooring is sanded after installation, however, this does, unfortunately, mean it’s susceptible to wear and tear over time, so may require more maintenance.
Maple is one of the strongest and most durable woods, resistant to most, if not all, weather conditions. However, it’s important to note that as time passes, maple tends to yellow (especially on areas that aren’t used). This is easily fixed by cleaning the wood, which will enhance the appearance too. Maple also features a beautiful grain pattern that adds a unique element to your home’s decor.
Perhaps associated with areas that are more regal or classic, mahogany is water-resistant, durable, and lasts longer than oak. This is a very expensive wood that can quickly cause your budget to skyrocket so is not a viable option for everyone.
On the other end of the scale is pinewood, a softwood that is usually installed in long thin planks that have a similar appearance to plywood. It is long-lasting against most weather conditions and does not require a huge amount of maintenance to sustain its shiny appearance, routine touch-ups in the corners once a year is usually enough.
With so many types of wood, each displaying different characteristics in terms of appearance, texture, maintenance, and price, there truly is a wooden floor out there for everyone, you just have to find it!
Once you have decided on your favourite type of wood, then it’s time to look after it so it looks its best for the long term. Industry standards state that wooden floors should be sanded at least once a year to maintain their integrity and appearance.
For floor sander hire to help your floor retain its quality, get in contact with our team at Floor Sander London today. Give us a call on 02084 276604 to find out more about our hire packages.
If you need to sand your floors at home, then follow these instructions to be fully experienced with the Bona Floor Sander.
1) Coarse Sanding – Firstly, equip the coarse abrasives to the Bona floor sander. Then on your machine, set this to high pressure. Ensure the drum is raised off the floor before firing up the machine. Then, turn it on and gradually release the sanding drum towards your floor.
It’s important to do this process slowly and it’s essential the drum is always lowered.
● Begin on the left side of the room and sand in the direction of the grain. If you have an uneven floor, we advise you to sand diagonally. As you move forward, gradually lift the drum at the wall and re-engage when you go the opposite way. Lift the drum again and create a new walkway to the right-hand side.
● Once the entire area has been sanded, turn the machine around and sand the opposite end of the room. Keep repeating the above until all the floor is smooth and all residues are gone. Make sure the dust bag is empty before you begin to ensure maximum dust collection.
2) Edge Sanding – Attach the grit 40 abrasives.
● Operate in small circles.
● Don’t press onto the floor, let the machine do the work.
● Sand until smooth.
● Empty your dust bag.
3) Medium Sanding
● Set the Bona floor sander to medium pressure and attach the grit 60 abrasives.
● Sand in the opposite corner and follow the grain of the wood.
● Complete the process slowly and repeat on the way back.
4) Medium Edge
● Check that you’ve emptied the dust bag.
● Attach the grit 60 abrasives. Sand off all the scratches on the room’s edges. Do this until smooth.
5) Corner scraping – Now, remove the old coating from the room’s corners. It’s more effective and less time-consuming to scrape off the old coating with a scraper. Finish the job by sanding any excess coating.
6) Filling The Gaps – Filling in gaps gives the surface a finer, more professional look. The joint filler is made for slight gaps up to a maximum of 2 mm with floors that are stable.
● Shake the filler and then mix up the substance with the dust you gathered from the medium edge sanding. Mixing it in a separate container may prove easier. The best ratio is 1 part wood dust to 3 parts filler.
● Carefully apply the mix to the floor and evenly spread with a trowel. To get the best coverage, apply it diagonally in the direction of the floor’s grain.
● For any gaps, use a spatula to cover them.
● Allow drying for 30 to 60 minutes. If there are any gaps, apply a second coat.
7) Sanding The Edge
● Remove any residue left.
● Start at the edges, attach the grit 100 abrasives to the edge sander, and go around all the edges of the room.
8) Fine Sanding – Remove any filler and fine sand from the floor using the drum Bona floor sander with the abrasive grit 100.
9) Additional Sanding – If you are using oil or hard wax on your floor, then it’s best to complete another fine sanding. This is due to oil and hard wax highlighting abrasive scratches. Use the grit 100 on the edges and the grit 120 on the surface.
Should You Buy Your Own Tools or Use a Floor Sander Hire Service?
It’s not just the Bona floor sander that can be quite costly, any power tools for use around the home can set you back. However, while your floors will need sanding regularly to keep them looking their best, this doesn’t mean that you need to break the bank and buy the best equipment.
Consider sander hire by Floor Sander Hire London. They have extensive experience helping people get their floors looking great. They can conveniently arrange the right sander for you and ensure that it is a cost-effective way of getting the job done. If you are unsure of anything sanding-related, their knowledgeable team members are there to help you out. Contact us for further support.
Wooden flooring is a great fit for any home. It has the capability of making a room look homely and traditional, but also contemporary and minimalist depending on the type of wood and stain.
While it’s a great choice, you’ll need to provide ongoing care for your wooden floor to keep it looking its best. Scratches can build up quickly from pet claws, furniture moving, or children’s toys, so you need to keep on top of them.
Usually, wooden flooring will have a lacquered surface to keep it looking shiny and fresh. But it’s this surface that can easily be damaged – making scratches noticeable and dull in comparison.
Before you immediately grab the polish to try to buff out any scratches, you’ll need to take a look at these tips on how to look after wooden flooring.
Clean your floor
Before you start to restore any scratches, you’ll need to make sure that it’s 100% clean. Polishing doesn’t clean the floor; it just adds a protective layer, and you don’t want to be protecting the dust that’s formed.
Choose A No-Rinse Cleaner
Some cleaning agents ask you to mop the cleaner onto the floor and then use a clean mop to wash away the cleaning residue with water. But soaking your floor with cleaner, then again with water can make the wood expand and warp.
Use a no-rinse cleaner and a damp – not wet – mop to remove any dust and dirt.
Pay Attention To Corners
Most people will give their wooden flooring a quick mop over and then get straight to the polish. However, the highest build-up of dust is in the corners of your room which are often missed by your mop.
Wipe around the corners and edges of the room by hand.
Repeat If Necessary
Don’t assume one clean will do the trick. If it still looks dirty – try again.
Choosing Lacquer
Oil, polish, and lacquer are all names for the same thing. They come in matt or satin finishes depending on what type of style you’re going for. The matt look provides a more natural feel to the wood, while satin gives it a nice shine.
Most lacquer is a yellowish colour and may make your wood dry very slightly darker than it was before, so bear this in mind.
To lacquer your floor, you’ll need:
We hope that our blog has been informative, please don’t hesitate to give us a call on 020 8427 6604 or head over to our contact page to fill in our online enquiry form.
Copyright © 2026. Floor Sander Hire All Rights Reserved. Website & SEO by Loop Digital.