If you have a variety of wooden or wood finish floors throughout your home, then you may already be thinking of ways to keep them looking at their best. Ultimately, a great wooden floor is one that you clean and treat regularly. They take time and care to keep them looking at their best, but providing you work out what’s best for your flooring, there are no reasons why this should provide any headaches.
So – have you considered floor sanding, buffing, or screening? In this quick guide, we’ll take a look at the difference between all three and will consider which might be the best fit for your home and your particular needs.
When it comes to applying maximum pressure and doing the job, floor sanding is likely to be the best option. Full floor sanding means that you effectively take your floor down to its base wood – that you effectively strip away the upper layers or coatings and take things down to basics.
A full-floor sanding will then lead to additional finishing, meaning that you are effectively refurbishing your floors, so they look virtually brand new again! This tends to be the most intensive of the three choices.
Buffing is really the midpoint choice of the three. This essentially means that you are still sanding your floors to a degree, but you’re not taking the coating right off down to the base layer.
A light floor buffing essentially reduces the top sheen or coating to revitalise the look of your floors. This means that it is less intensive than a full sanding, and it often means that you get great results within a fraction of the time. There’s no need for you to worry about reapplying coating over and over, either.
Floor screening is perhaps the least intensive option of them all. While similar, the screening process involves lightly sanding the floor surface so that it takes away its initial look before you gently apply a surface recoat so that it takes on a new sheen or aesthetic.
Ultimately, floor screening is the option you’d take if your floor doesn’t need much in the way of deeper work or refurbishment – you just simply need to give it a fresh coat and a new style.
Crucially, we must remember that all three of these options serve different needs and purposes. For example, you might not need something as time-consuming or as labour-intensive as a full sanding. You might simply need to screen your floors so that they look great again for a little while longer.
If you’re not sure which is best, then floor buffing is a great middle choice. However, what’s always best to do is consult an expert in floor sanding, screening, and buffing to help you find the right pick for your floors and your aesthetics.
Don’t let your floors fade or wear down – take care with expert sanding help!
If you would like to find out more about how we can help you, please feel free to get in touch with our friendly team on 020 8427 6604 or head over to our contact page for more details
Hardwood flooring has grown massively in popularity in recent years and is now one of the most common choices for flooring in the home because of its durability, low maintenance, and how easy it is to clean. It can even add value to your home. While materials such as laminate or even tiles can emulate the look of hardwood they will never be as good as the real thing.
Trends do of course change over time. It’s important to pick a style of hardwood flooring that suits your style rather than picking something just because it is in fashion. Consider how it will look with your choice of paint colour and the style of your kitchen, but don’t be scared to commit to hardwood flooring in case you’re worried that you might change your mind in the future. One excellent property of real hardwood flooring is that over its lifespan it can be refinished and dyed to match new trends or to suit a room that you’ve redecorated. This isn’t something that can be done with cheaper styles of wood flooring.
In 2021 the trend for hardwood flooring tends to either be towards dark and light colours, or cooler and browner tones. Warmer tones tend to be less popular and with cool and brown tones the trend is to not pick colours that contain much yellow.
For the kitchen, you should give a great deal of thought to using dark coloured woods as they can show dirt more easily than lighter colours which may increase how often you need to clean the floor. While dark colours undoubtedly look impressive, and colours such as solid black and greys are certainly very popular at the moment, light colours are also popular and may be better suited to a kitchen as they won’t show up every single spec of dust.
The trend for light colours focused on cool and brown tones removes the yellow hues from the wood to give a clean, modern look. A lighter floor will also create the illusion that the room is bigger than it is, unlike a dark floor which may make the room feel more enclosed. Popular lighter colours include lighter shades of grey and even whitewashed flooring.

Once you’ve chosen a colour for your kitchen flooring it’s important to also pick the style of finish you want the wood to have. If you’ve got glossy cupboards and countertops you might want to consider a matte or satin finish to contrast the rest of the kitchen. Matte and satin finishes are easier to clean which is a big bonus in a room where things such as food spillages will be fairly common. If you’ve got natural wood cupboards with a flat finish a shinier colour on the flooring will create a floor that’s a real eye-catcher.
If you would like to find out more about how we can help you, get in touch today on 020 8427 6604 or head over to our contact page for more details.
You’ve thought it all out and arrived at the conclusion that it’s time to redo your floors. Before you go tearing up carpet or refinishing hardwood there is plenty of prep work that needs to be done. In order to get your project off to a good start, there are several things you’ll need to take into consideration, such as the following:
Let’s take a closer look at each of these considerations and the steps that go along with them.
It may seem obvious, but installing carpet is different than installing laminate flooring, which is different than installing hardwood. Knowing the materials you’ll be working with can help to inform certain aspects of the project like the budget and what sort of contractor you would need to hire.
If working with hardwood flooring, there are variables, including whether you’d be installing new wood or simply refinishing existing flooring.
For carpet, you might want to take into account the colours so as to match the room’s paint scheme or décor layout. Communicate with your contractor in order to get help choosing the best materials or options for working with them.
No matter where the project takes place inside the house, there’s bound to be some staging of furniture that takes place to accommodate the work. This preparation includes covering furniture that may risk getting dusty if there is sanding being done.
Additionally, if the only bathroom in your house is being worked on and is inaccessible, it’s a good idea to plan for not being able to use the room.
This notion of having a back-up plan extends to other living things in the house, particularly pets and children. You’ll want them to be in a place that is safe and out of the way of the floor renovation. If that place isn’t easily found in the same location, you may want to line up somewhere for the child or pet to go for the day, or until the work is completed.
There are many things to keep in mind when preparing to begin your flooring project. You must choose your flooring materials well, you must take as many precautions as possible within your workspace, especially where furniture is concerned, and you must take into account the wellbeing of those with whom you share the space while the work goes on.
If you take all of these factors into account, your flooring project will be off to a strong start, well on the way to an even stronger finish.
If you would like to find out more about how we can help you, get in touch today on 020 8427 6604 or head over to our contact page for more details.
A wooden floor offers a timeless classical style in the home. When it’s well cared for, well maintained, and well installed, it can last a lifetime, but getting to that stage does take a little time and a lot of know-how.
Getting the finish, you want on your wooden floor, whether it’s newly installed or being renovated, means that, at some point, you’re going to have to sand the floor. This will mean you’ll have to choose between a drum or orbital sander, but what are they, and which is best? Let’s take a look.
Before we jump into whether you want a drum sander or an orbital one, you first need to understand both the differences between the two and also the type of work you’re undertaking with each option.
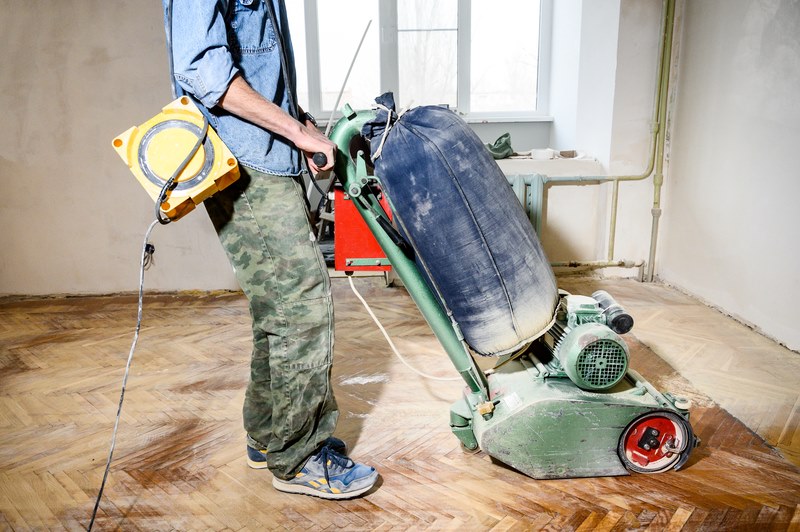
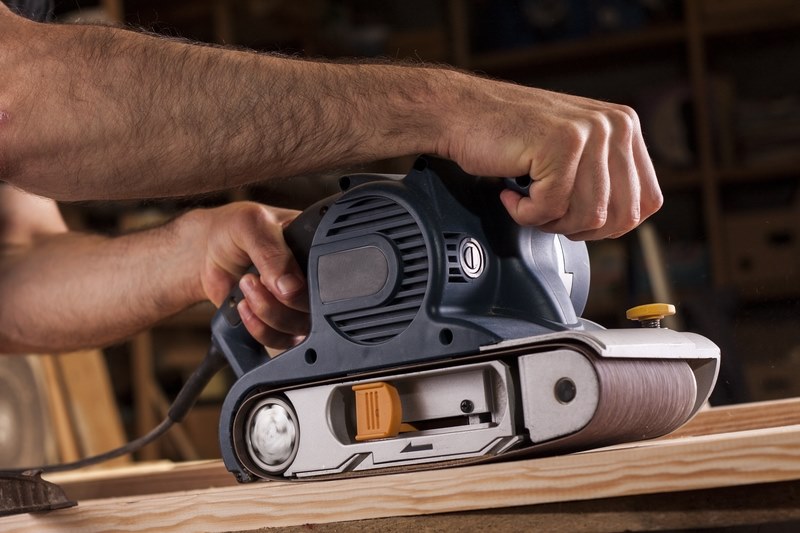
In the industry, a drum sander is known as a ‘big machine’, which should tell you a lot about the kind of equipment it is. A drum sander, or floor sander, can easily weigh over 50kg (even ‘small’ ones weigh about 45kg). When you see one, you’ll see why it’s designed for large, heavy-duty jobs. It gets its name from the large spinning drum of sandpaper that it houses.
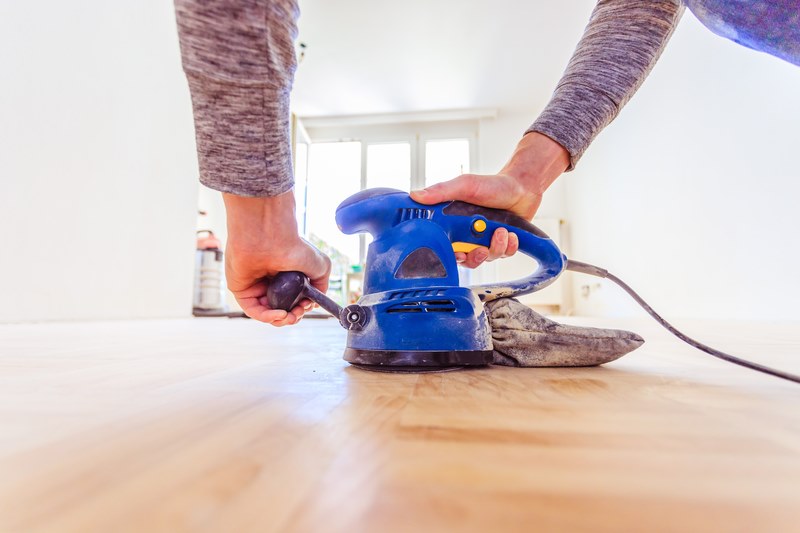
An orbital sander, on the other hand, is generally a handheld device with a circular disk of sandpaper that oscillates, rather than having the disk spinning around as you might expect. It smoothes the wood by scratching patterns of little swirls. Being smaller, it’s much easier to control than a drum sander.
Now we understand the differences, it’s time to think about the work you need to do to know which one is best to use.
As you would expect, the drum sander is much more abrasive, so if you are looking to cover a large area quickly, or your floor needs some serious sanding, then a drum sander is probably the way to go. The type of sandpaper you use in a drum will depend on the type of finish you’re looking to achieve or the type of wood you have, but using it is not for the faint-hearted.
Because of the size and weight of the machine, it can be difficult to control and manoeuvre. If the floor is upstairs, you’re probably going to need help getting it up there. They’re also not the type of machine that you buy unless regular sanding is part of your business. They are more likely to be rented, used, then returned. They are also not the sander you use to finish the floor. They aren’t going to get you a floor that’s immediately ready to be lacquered or varnished, to get to that stage, you need an orbital sander.
Orbital sanders, being handheld, are much easier to handle and control. It’s also much less aggressive, so allows you to get your floor to a much more completed state. Unlike the drum sander, it allows you to reach the edges of the floor, although you’ll need an attachment to get into the corners. By using the right sandpaper, you can get the floor to a finished state, something out of reach with a drum. Given their smaller size, it’s not something you’d used to do a whole floor, at least not in one go, but is much more affordable and can be used on several applications.
When it comes to which sander to use, the choice between a drum and orbital resides on the floor you have and the work needed to be done. The drum is fantastic if you want large jobs done quickly, whereas the orbital is a much more refined piece of sanding equipment. The choice is yours, but the decision is smooth either way.
If you have any questions, please don’t hesitate to give us a call on 020 8427 6604, alternatively, head over to our contact page to fill in our online contact form.
Sanding a wooden floor isn’t your typical DIY job. It’s not something you need to do every week, every month or even year. You probably don’t own your own floor sander, but that’s a good thing. Because of the infrequent need for this very specific equipment, hiring one is always going to be the best option, but which floor sander is right for your home or business?
If you’re about to embark on this particular task and your wooden floors are looking past their best, we’re going to take a look at your options. We’ll also try and give you some simple tips and tricks to make the whole job go much smoother.
The first thing to say is that the sander you choose is going to depend on a number of things that are specific to you. The size of your floor is going to be key, but also the current state of it. If it’s been newly installed, then it might not need much work. However, if it’s in serious disrepair, then you’re going to need something a little more hardcore in terms of sanding.
Sanders for the floor basically comes in three main varieties; the drum sander, the belt sander, and an edge floor sander (sometimes just called a floor sander).
The Drum Sander is probably the sander you need if your floor needs some heavy-duty sanding or covers a large area. It’s the largest and most aggressive of the three, so you will need a strong hand when using it. When we say it’s ‘aggressive’, we mean that it will remove cuts, knots, and scratches by being stronger than other sanders. If you’re using a drum sander, you need to be careful not to go too hard on a particular area as you can seriously damage your floor if you aren’t experienced in using one, so be careful.
If you’re trying to remove existing paint, stain or varnish from a large floor, then a belt sander is another good option. As the name suggests, the sander is done through the movement of a rotating sanding belt. This can alter the abrasiveness of the sanding process. If you’re working on a particularly rough floor, it’s a good idea to use a coarse belt first, then move progressively to the finest one until you’re happy with the finish.
Also, sand the floor in the direction of the grain. If you can, get a sander with a dust collector attached to it to eliminate dust in the air as much as possible. It’s still a fairly aggressive sander, but not quite as hard as the drum. They can come in a couple of different sizes, depending on the floor size, so choose wisely. The larger the sander, the harder it will be to control.
The final option for you is the floor edge sander. No prizes for guessing that this piece of equipment is for areas around the edge of the floor. Most other sanders will have circular motion, meaning that the ‘corners’ of that circle can get missed, especially those around the outside edge of the floor. The best tip we can offer with this sander is, when you first turn it on, you should lean it back at an angle to avoid damage when it first comes into contact with the floor.
There are other options for sanding, but the handheld varieties are more suited to walls, doors, and other pieces of smaller furniture. When you’re hiring your next floor sander, please keep these things in mind and you’ll soon have a floor that looks fantastic, lasts for years, and will be as smooth as silk.
So, if you are looking to hire a floor sander, Floor Sanders London has you covered. Call today on 02084 276604 or visit our contact page for more details.
There’s probably any number of questions that keep you up at night. “Why are we here?”, “What fruit flavour is Dr Pepper?” and “Should I hire or buy a floor sander”? You’re not alone.
Before we answer one of those important questions, let’s have some context. There’s a certain machismo in going through life collecting tools. From buying your first screwdriver to hammering in the last nail with your new mallet (you should probably use a hammer). Everyone needs tools at some point in their life. Not least for the myriad of jobs that need doing around the house.
If you have a large project going on that’s in need of a floor sander, then one of those questions that keeps you awake at night needs to be answered.
Not only is a floor sander unlikely to fit conveniently into your toolbox, but it’s also not a tool you need to buy. Unless you run a floor sanding business, you don’t need to own every piece of equipment you might use. Nowadays you can hire almost everything you need. So, when it comes to floor sanders, hiring is the only way to go.
Obviously, a floor sander isn’t something you’re going to need very often. It’s a tool that comes into its own when you have a big project to do. Over recent years, the popularity of adding new wooden floors or removing carpets to reveal the timbers beneath has skyrocketed. As such, the need for a sander to bring the boards back to their best has increased. You can now hire them from any number of tool hire shops.
So, now we know why we need to hire a floor sander, which one do you go for? That really depends on the size, the type of floor you have and the amount of work it needs.
If it’s a big job, then you may need to consider a heavy-duty sander at first. These are great for stripping wooden planks where there are years of paint, varnish or stains to remove. The problem is that, as the name suggests, they are heavy-duty, so they tend to strip a lot of wood. If you’re not careful, you can strip the wood too far, weakening the timber. Heavy-duty sanders are rented more than most because of their size, weight, and cost. Meaning buying one isn’t really viable.
For most people, when they are looking to hire a floor sander, they are really looking for a smoothing sander. These vibrate thus smoothing the wood after the upper surface has been removed. These tend to be lighter and easier to manoeuvre than the heavy-duty ones. They glide across the floor smoothing the surface, rather than stripping the wood, like a giant piece of sandpaper. Making them perfect for beginners and advanced floor sanders.
Almost every floor, regardless of size, will have edges and corners. There are specific sanders that reach these areas that are difficult to get into. They tend to be smaller (often handheld) and usually have dust bags attached to catch the sawdust. They may be small in size but are quite powerful for smaller jobs.
As you can see, sanders themselves come in all shapes and sizes. There are upright floor sanders, push-along belts or drum sanders and handheld ones. There are tools and attachments that help you do huge areas and those specifically for corners. There are drum sanders for big tasks and floor buffers for finishing off.
With a choice like this, you couldn’t possibly think about buying all the options you might need, which is why hiring is the way to go. Now, what were those other two questions?
If you’d like to find out more about how we can help you and your flooring dreams, get in touch today on 020842 76604 or pop us an email via our contact form.
Most of the time hardwood floors will last for the entire life of a home. The only problem is that they are exposed to a lot of wear and tear which makes them look tired. But this should not be a huge issue, as you can easily refinish your floor to make it look glorious once more.
The good thing with refinishing projects is that they are quite easy to work on, especially if you love DIY projects. You may need to rent a few pieces of equipment and buy some supplies, but that’s as hard as it gets.
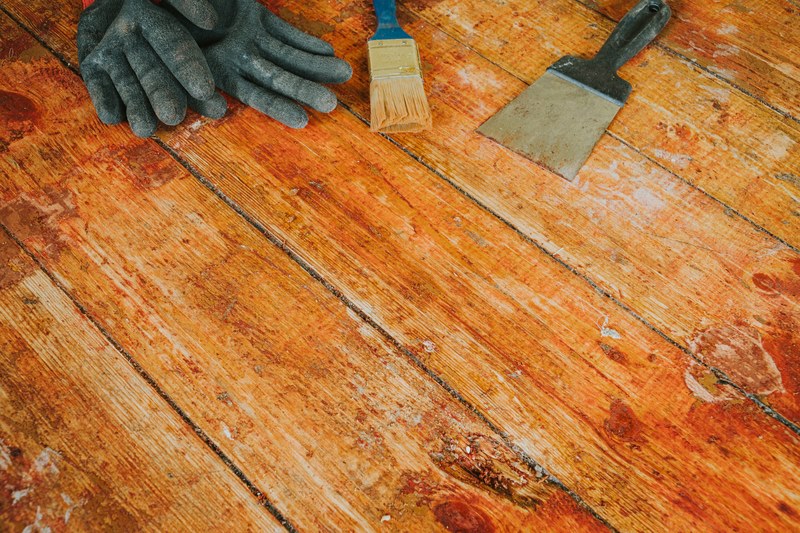
To refinish your floor, you will first have to get rid of the old finish. To do this you should use different types of sanders, which you can rent. No matter what you do, safety comes first. For this reason, you should use a dust mask, as well as ear and eye protection. Use a walk-behind sander to evenly remove the finish, while using the correct series of sandpaper.
You will require the three most common grades of sandpaper, these are fine, medium, and coarse. If, after you have finished sanding, you notice any nicks or gouges, you can fill these with wood putty using a broad knife to fill and spread the putty. Let the putty dry according to the directions, and then sand the areas until smooth by hand, using fine or medium-grade sandpaper.
After all the sanding is complete, it’s time to get rid of the dust so it won’t ruin the new finish as it dries. Use a dry rag once, to wipe down the walls and mouldings, then use a damp rag to remove any residue on the mouldings. That way, no dust particles will be falling onto the floor to ruin the new finish.
Let the dust settle, and then use a standard shop vacuum with a dust filter to get rid of the remaining dust. You can then use a tack cloth to pick up the remaining dust particles. Remember to use new tack cloths when needed, for maximum effectiveness.
The finish you decide to use will affect the look of your floor as well as its durability. Here are the best choices to consider:
To prevent the wood surface from absorbing moisture, you should seal the floor on the same day you sanded it. For amazing results, use a sheepskin applicator to apply the stain (if desired), and then apply a sealer. When applying the sealer, you should be careful to avoid applying too much but ensure that you use enough to evenly cover the entire surface. Keep in mind that any excess sealer will not soak into the wood. It will pool on the surface, leaving an ugly mess.
Once the sealer is completely dry, follow the steps outlined below:
Renewing the look of your floor is not a hard thing to do, as long as you have the necessary equipment and supplies. With the information in this article, you should find it easier to give your floor a new and shiny look. If you are not certain that you can handle the project, it’s advisable that you hire a professional, to avoid ruining the look of your floor.
To find more information about this, you can get in contact with us by phone on 020 8427 6604. Alternatively, you can visit our contact page to send a message.
The Bona floor is stunning and can transform your home’s interior as soon as it’s installed. However, to keep it looking beautiful all the time, you have to familiarise yourself with Bona floor care tips.
Scratches and dirty marks become quickly visible and can ruin the classy look of the floor. That’s why you should treat the surface with a lot of care and always fix the slightest damages. The tips discussed in this article should make it easier to keep your wooden floor spotless and flawless.
It is easy to move furniture around your house without giving it a second thought. That, however, can ruin your floor before you even know it. That’s why you always want to have some sliders under every piece of furniture in your home to avoid scratching the Bona floor.
Even though scratches may be inevitable on a Bona floor, furniture pads go a long way in reducing the probability of such scratches. You should add them to the legs of various furniture pieces, including beds, chairs, tables, sofas and others.
A hardwood floor is not cold, and therefore there is no need to put on shoes whenever you are indoors. Other than tracking dirt into your house, some shoes are not soft enough for your smooth wooden floor. You should train your family as well as request guests to remove shoes before walking into the house.
You should always use a slightly damp and clean cloth to clean up any spills on your hardwood floor. You should not use steam or wet mops as they damage the floor with time. If the wood absorbs water, it can swell and then shrink, causing splitting, gapping, and cupping in the long run. Therefore, you should clean up all spills immediately and keep humidity levels as low as possible.

No matter how much you take care of your hardwood floor, it will lose its shine after extended periods. That’s why it’s important to apply a new coat of hardwood floor finish after some time. How often you should do this depends on the traffic experienced in the house each day as well as your lifestyle.
In areas with high traffic, you should add mats and rugs to avoid ruining the look of your floors. Such areas are also susceptible to grit and sand, which cause scratches on the wood.
Mopping and cleaning must be done at least once per week. However, when doing general cleaning you should only use recommended cleaners. Some cleaners such as wax and vinegar make your floor dull.
Pets are members of your family and must also be kept clean to keep your interior looking good. Wash and brush your pet regularly to prevent hairs from spreading all over the floor. You should also trim the pets’ claws to prevent scratches on your spectacular floor.
Bona floors come in different finishes and stains. It is one of the easiest floors to take care of when you’ve got the right tips. You should, however, get it installed by professionals to avoid unnecessary disappointments. In addition, be sure to go for products made for wooden floors and follow instructions so that your floor can retain its classy look for years.
To find more information about this, get in contact with us you can phone us on 020 8427 6604 alternatively, you can visit our contact page to send a message.
Having a wooden floor can be fulfilling when it is still new and good looking. However, as time goes by, you should start thinking of how you are going to restore it. The earlier you restore it, the better. Here are a number of signs which will tell you whether you will need to restore your wooden flooring:
When the wooden floor is first fixed, it looks bright and attractive. However, with time, it becomes dull. At this point, the floor is never beautiful and becomes dull. Even when you clean it well, it will remain dull, leading others to think that you have not cleaned it. When this happens, you should consider it as a sign that there is a need to restore that wooden floor. It is also important to remember that when the floor is dull, the overall aesthetic of the home decreases. In this case, it is advisable for you to restore it before the condition worsens.
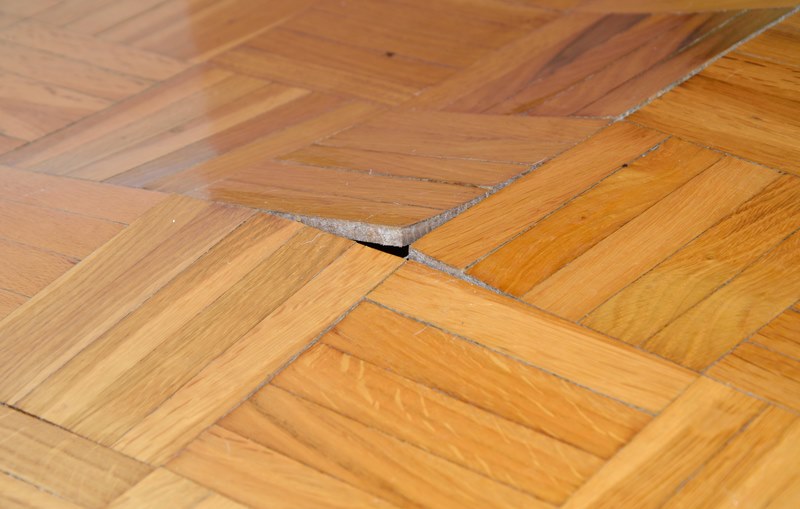
This is also another sign that you should consider restoring your floor. In most cases, cupping takes place when the edges of the wooden floorboards start being lifted higher than the centre of the piece. This could be due to moisture under the wooden floor. Therefore, you would definitely need to restore the flooring. If you ignore such a sign, you will start stumbling on the edges. These edges are likely to cause accidents within the home, so if you have kids, they should be warned, and you should look to get the wooden flooring restored as soon as possible.
Have you started to notice a bad odour in the house? It could be that the wooden floor is already damaged and needs to be restored. Well, you might have to do some proper cleaning in the house, and ensure that everything is clean and the floor is well scabbed. If nothing happens, then you should consider looking under part of the flooring, as the smell is likely to be from moulds which are growing under the floor. Remember it is hazardous to inhale the smell from the algae.
You don’t have to get your wooden floor removed so that a new floor can be installed. Most of the time, a simple restoration would be more productive and cheaper than having the floor redone. You can use the floor sander and floor finishes to restore the whole thing. In fact, the floor finishers you can do yourself, and don’t have to hire someone to do it for you. Some of the restorations (as long as it is not an entire replacement of the floor) can be done yourself. However, you must ensure that you choose the best floor sanders and finishes. If however, you are not sure how to go about it, you can hire an expert.
We hope you have found this blog useful. If you have any questions, feel free to visit our contact page or call us on 020 8427 6604.
A floor sander is a tool used for sanding the surfaces of wooden floors. Floor sanders connect sandpaper and the instrument, in order to speed up the work. There are lots of types of floor sanders for different kinds of problems. Let’s delve into the different types of floor sanders and all their uses.
A heavy-duty sander would be known as a drum sander, these sanders are for your toughest jobs. They will be able to sand the floor without any strength required from you. The only thing is because they are so powerful you must be aware that it may be stripping back the wood more than you think.
Smoothing sanders are also known as vibrating sanders to smooth out the wood after you have used a sander drum. Smoothing sanders are much more lightweight and easier to manage. This sander will basically glide across the hardwood floor and you won’t have to worry that it will scrape the floor as they don’t pose any threat to your wooden floor. This type of sander will get your wood down to the smoothest finish.
This sander is often used for getting to the harder to reach places such as the corners and edges of the wood. Edge sanders are a lot smaller in size than the other types of sanders, as they are handheld. Edge sanders have dust bags attached to the back of them. Although these sanders are smaller, they provide a lot of power and they will get the job done.
These sanders are also known as strip sanders. This sander is used electrically which has a revolving brush at its front. It is mainly used only on softwood. These types of sanders work best on smooth services, they can also trim, sand and level areas out.
Its, not a secret that sander machines can generate a lot of dust. While most sanders do have a bag attached to the back of them, dust is still very easily caused and can create a huge mess in your home. A sander vacuum will help polish up the floor after it has been sanded. As well as getting rid of that annoying dust. It can be very difficult to remove all of the dust from sanding without a sanding vacuum as the dust is so fine.
Always make sure that you are using all of the correct safety equipment when sanding the floor such as a mask, eye protection, gloves and maybe even overalls to protect any clothing that you don’t want to ruin. Sanding can be very dangerous if you do get the fine dust particles in your eyes, therefore, safety goggles are probably the best option. Elbow pads would also be advisable.
If you would like to find out more about floor sander hire or the equipment that is available, please don’t hesitate to contact us on 02084 276 604 and one of our friendly team members will be able to help you or alternatively head over to our contact page and we will be in touch as soon as we can.
Wooden floors are a great option for your house as they are aesthetically pleasing, long-lasting, and affordable. After you have installed a wooden floor however, you need to protect it to ensure that it lasts for a long period of time. There are a few ways in which you can help protect and care for your wooden flooring which will be shown below.
When there are spills of any liquid on the floor, make sure you clean them immediately as wooden flooring is not waterproof. The top layer of the floor may initially protect the rest of the flooring, but when the liquid is left unclean it gets soaked into the wood, leading to damage that is irreparable. Soak up the spill from the surface gently, then use a fresh towel to wipe the floor.
It is essential to have a routine schedule that you stick to, as this will ensure that you regularly clean the floor. Sweep everyday to remove grit and dirt from the surface, using a brush bristle that is soft. When you notice there are stains and marks on the surface you can choose to clean to get rid of them. Sweeping dust on a daily basis will ensure your floor is left clean from dirt and is looking beautiful.
You should know the type of floor finish that is installed, since every type of finish requires a different kind of care. With regards to wood flooring, you can contact a professional in your local area to make sure you are using the right cleaning products. This is vital, as using the right products will help you protect and extend the life of the wooden flooring.
This helps in reviving your floor and removing any unwanted stains and marks. If your floor has an oiled finish you can choose to sand it with a floor sander to reduce the look of dents and small scratches. Depending on the size of the scratch and dent, you can either choose to lightly sand the surface or use a deep sand to keep your floor looking new.
Before walking on your floor make sure you leave your shoes outside since any outdoor footwear carries grit and dirt that is likely to scratch or dent your floors if you were to walk on it. A popular option you could look into are door mats. These can be placed at all of your home entry points or where you would usually leave your shoes.
Place the felt protector pads at the bottom of your furniture legs to act as a soft barrier between the heavy objects and the wooden floor, therefore minimising scratches. Also, when moving your furniture in the house always make sure you pick them up and avoid dragging them across the wooden floor.
Although wooden flooring is an expensive investment, they are beautiful, and with proper care they can last a long time. Overall, it is important to have the knowledge on how you can provide proper maintenance and care to your floor.
Thank you for reading this blog post, if you have any enquiries or wish to contact us, visit our contact page or call us on 020 8427 6604.
Resin flooring is a hard wearing plastic exterior, generated by blending a selection of components jointly to institute a swift and managed chemical response. The chemical response creates an extremely long-lasting finish. In the easy form, a resin covering consists of discrete hardener and a formulated synthetic resin. As discharge requirements escalate, it usually leads to an increase in the thickness of resin floor, and the variety of components increases to involve pigments, decorative flakes, or chips, aggregates, and in some instances, cement powder. The thicker type of resin floor is consistently firmer than concrete.
Most resin floors use a primer which can react with the substrate to produce an excessive powered and dependable bond, which is necessary for the durability of the flooring. The primer is usually followed by a significant structural coating, generally known as the body coat which produces the volume and thickness of the floor, and offers numerous crucial performance components like flexibility, overall strength, and resistance, as well as establishing the attractive finish of the floor. Most resin floors can be completed with one to three seal coats to enclose the body cover and ornamental component of the flooring. This also offers the ultimate performance attributes such as wear and chemical resistance. Here are the three main types of resin flooring.

This resin flooring provides great resistance to the collision, wear, and chemicals. However, the significant advantage of this resin flooring is its opposition to direct heat and high temperature. For this reason, it is used in many industries such as bakeries, where there may be higher temperatures etc. Although polyurethane may not be as hard as epoxy flooring, it is more optimal in places with a great amount of heat variation, and also available in many distinct finishes.
Possibly the most ideal and broadly utilised kind of manufacturing resin flooring, this resin flooring is a thermoset substance that provides the durability and performance of resin flooring, and is the best flooring alternative for electrically conductive flooring. There are numerous kinds of epoxy resin accessible, providing different benefits for different applications. All epoxy floorings are sturdy and can bond totally to concrete, thus safeguarding the basic concrete from abrasion, wear, collision, oil, water ingress, and a broad span of chemicals. If an epoxy resin flooring is vandalised however, it must be entirely restored, which could mean re-sanding the wooden flooring. Therefore, due to the prolonged restoration time for all resin flooring alternatives, a spontaneous restoration can be expensive to a business.
This is an artificial resin, also known as acrylic glass. It’s used to produce common items like Lucite, Perspex, and Plexiglas. Categorized as thermoplastic resin, this resin flooring can be extremely customized for exact manufacturing requirements like electrical resistance, chemical resistance, and slip resistance. The differentiating attribute of this resin flooring is it’s unbelievably easy to use and hardening time. This quick restoration time guarantees that the floor can be totally installed and entirely rehabilitated over a weekend, ensuring minimal downtime for manufacturing and production services.
Resin flooring is usually chosen for one of the following reasons:
A lot of resin flooring systems provide far superior wear, collision, and chemical opposition than the substrate they shield.
Resin flooring is hygienic, seamless, and straightforward to clean. They also cease the cleaning of cementitious substrates.
Slip opposition types of resin flooring provide remarkable performance in production habitat, and their cleanliness makes them perfect for healthcare services.
Hope you have enjoyed reading this blog post, if you have any enquiries, or wish to contact us.
Copyright © 2026. Floor Sander Hire All Rights Reserved. Website & SEO by Loop Digital.